Category Archives: Photos

Rocks Floating on Clouds


Rocks Floating on Clouds
Originally uploaded by jezza323

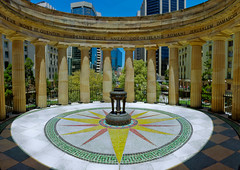
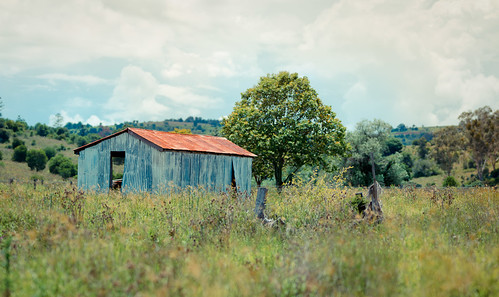
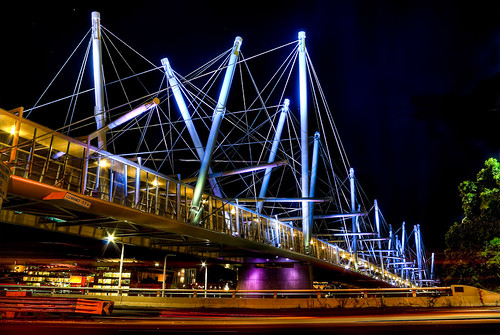
This is an old shot I thought I would share. It may not be immediately obvious to everyone how you get this effect of the cloud-like water.

This effect comes from the movement of the water during a long shutter exposure. In this case it is also accentuated by blending 2 shots together, similar to a HDR.

This was shot using the Pentax K200D and Pentax SMC DA 18-55 AL II lens. I also used TianYa ND8 filter and TianYa ND8 grad filters in a Cokin P holder. These filters block out light, so allow you to use longer shutter speeds, and enhance the cloud-like effect.

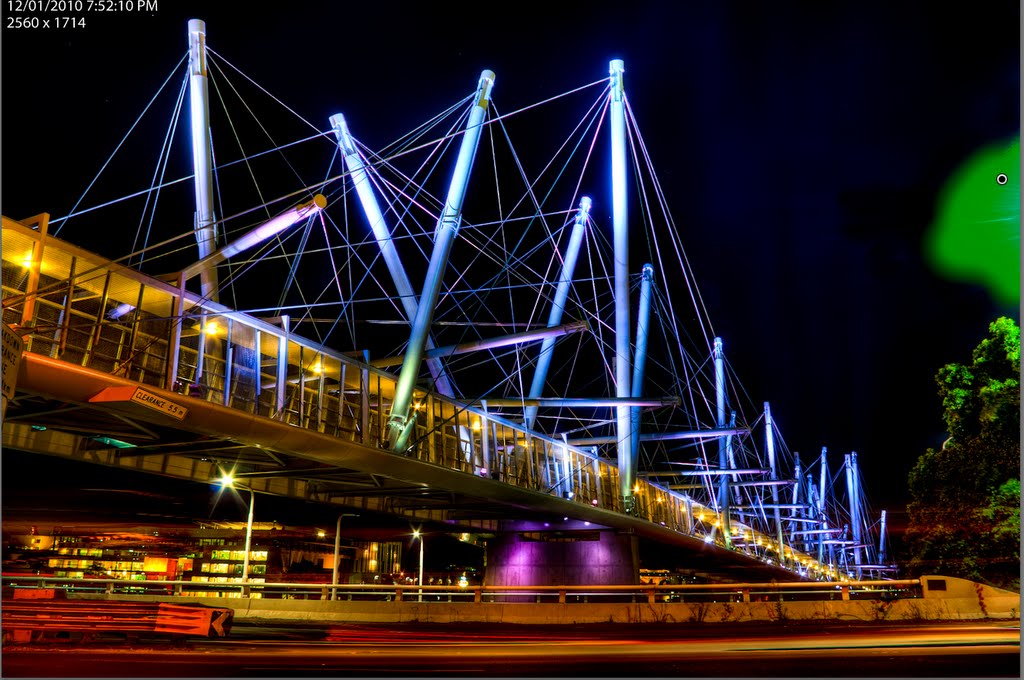
To get my 0, -2 EV images which I later blended, I set my camera to bracketing mode, and +/- 2.0 EV steps. I have also set my camera to shoot those steps in 0, -2, +2 order. For this shot the sky was becoming a bit blown out when getting the exposure I was after for the foreground, so I set the base exposure to what I wanted for the foreground, then shot 0 and -2 EV only (I didn’t bother shooting the 3rd bracket).

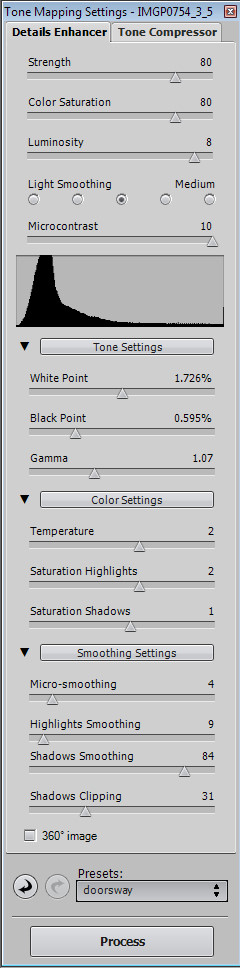
In Photomatix there is the option of “Exposure Blending” as opposed to “Generate HDR”. I selected this option, my 2 images, and the Average method.

Project 52 – #4 – Mt Cootha Lookout

 
This is a 5 shot HDR of the sunrise from Mt Cootha Lookout, which overlooks Brisbane’s CBD and surrounding suburbs. This is landmark #4 in my Project 52 Brisbane Landmarks for 2010.

I have already posted this shot on the blog as a general shot with full processing info, so check that out if you are interested

Australia Day Sunrise

Happy Australia Day to all the Australians :)

This shot is from a few moments before sunrise yesterday morning (Australia Day, 26th Jan 2010) from the Mt Cootha Lookout in Brisbane. The Brisbane CBD and surrounding suburbs are visible in the shot.

The shot was taken using my Pentax K200D, Pentax DA 18-55 AL II, Slik 500DX Pro tripod and Kenko CPL filter. It is a HDR shot blended from 5 images, taken at -4, -2, 0, +2, +4 EV steps using Photomatix 3.1 and Tone Mapped using the Details Enhancer. I outline how I did this below.

Shots used were all at 18mm, ISO 100 and f13. Shutter speeds were 1/20sec, 1/80sec, 1/5sec, 0.8sec, 3.0sec

Shooting and Processing as follows:

  1. Shot in Pentax RAW (PEF)
  2. Set Exposure Compensation to -2.0 EV
  3. Shot 3 bracketed shots at +/- 2.0 EV (giving -4, -2 and 0 EV shots)
  4. Set Exposure Compensation to +2.0 EV
  5. Shot 3 bracketed shots at +/- 2.0 EV (giving +4, +2 and 0 EV shots)
  6. Imported into Lightroom 2.5
  7. Applied the settings shown below to all 6 images (the first image)
  8. Exported all 6 images to full quality JPG
  9. Deleted the worst of the 2 0 EV shots (this is only 5 images remember!)
  10. Blended the remaining 5 images in Photomatix
  11. Tone Mapped in Details Enhancer using the settings show below
  12. Saved as JPG
  13. Imported HDR JPG into Lightroom 2.5
  14. Applied the settings shown below in Lightroom (last image)
  15. Exported to JPG for Web

A Gecko on My Windowsill


A Gecko on My Windowsill
Originally uploaded by jezza323

This is the gecko that came visiting while I was writing the last post in the macro photography series. He was only a baby, probably about 20mm long in total.

I shot this using the reversed 28mm lens mounted to my K200D. I used the on-board flash for some lighting. I took the shot at f22.0, but was unable to focus at f22, so I used my little finger to activate the aperture control lever on the lens (remember it was mounted reverse so you can access it!) to hold the aperture open while I composed and focused the shot. Then released the lever just before firing the shutter.

You can see by the size of the dirt and fibres in the shot that this is at quite high magnification. If you have a good 28 to 35mm lens you can reverse mount I highly recommend buying yourself a cheap reverse adapter and giving it a go. It may take a little while to get used to the short working distance (distance from lens to subject) but you can really get up close with lots of stuff!

Project 52 – #3 – Anzac Square Eternal Flame AGAIN!

I re-did this shot yesterday afternoon. It was a bit overcast so there are no shadows, and thats why the sky is white. No stitching errors this time! (that you can notice at this size).

This is a Brenizer Panorama, stitched from 181 shots using Autopano. The final edit is 123 megapixels. I could have rendered it larger, but its hard enough to work with at this size!

Shot with Pentax K200D and Jupiter-9 85mm f2.0 @ f2.8. Shot handheld, this time I made a conscious effort to keep my body still while shooting, to avoid the stitching errors I got the first time I shot.

I am much happier with this shot, so I will use it as my Project 52 shot for Week 3.

Project 52 – #3 – Anzac Square Eternal Flame


Anzac Square Eternal Flame
Originally uploaded by jezza323

This is a Brenizer Panorama of the Eternal Flame in Anzac Square, Brisbane. This is landmark #3 in my Project 52 Brisbane Landmarks for 2010.

Taken with my K200D and Jupiter-9 85mm f2.0 lens @ f2.8. It is made up of 204 stitched images (it took a while to shoot it)

Unfortunately the exposure is a bit off (i was shooting in jpeg so i didnt fill up the card too much with 1 photo), and i got some parallax error in the stitch around the pillars above the flame. The midday lighting was also not ideal.

I am going to re-do this shot tomorrow afternoon to try and get a better version. I will update this with the results

A Broken Christmas


A Broken Christmas
Originally uploaded by jezza323

I took this shot to enter in my workplace monthly photo comp in Decemeber. The theme for the month was “Broken”. Being Christmas time I got into the spirit and broke some tree decorations.

I was trying to capture a decoration in the process of breaking, but unfortunately my timing was never quite good enough. This was the best of the lot though, which I took just after it had broken.

There was a LOT of work in Lightroom 2.5 to complete this photo. The key to doing large area Adjustment Brush work like I did in this photo is to use a LARGE brush, and the Auto Mask feature. Don’t be too tempted to use a small brush to get in between things. If you keep the centre of the brush in the right spot, the Auto Masking will take care of the rest!


A before/after comparison in Lightroom

Shooting and PP Details as follows:

  • White Nylon backdrop
  • Pentax K200D body, firing onboard flash
  • Pentax SMC “A” 50mm f1.7 lens @ f22
  • Tripod to mount the camera, and a cable remote to fire it
  • Sunpak flash with optical trigger and home made diffuser, placed directly above, and slightly behind the subject
  • Shot in Pentax RAW (PEF)
  • Import into Lightroom 2.5
  • Applied large area of adjustment brush to make background more white, area and settings shown below
  • Minor basic edits to improve contrast and colour in the broken pieces, shown below
  • Edit Detail settings
  • Export to JPG For Web

Brenizer Shed Recrop


Brenizer Shed Recrop, originally uploaded by jezza323.

Buy art

This shows how cropping can really change an image (well I think so).

Compare to the original which I blogged a while back. It was just bland shot, with a distracting shed on the left of frame, and you couldnt really see the narrow depth of field, except that the foreground was out of focus.

In this tighter crop, you no longer have the distraction on left of frame, and you can see the sharp outline of the shed and tree as compared to the background.

If you like this shot, have a read of my Tair-11a Lens Review or have a look at my other Tair-11a shots

Project 52 – #2 – Kurilpa Bridge


Kurilpa Pedestrian Bridge, originally uploaded by jezza323.

Buy art

This is the 2nd shot for my 2010 Project 52 – “Brisbane Landmarks”

This is the recently completed Kurilpa Bridge, a Pedestrian Bridge from the Brisbane CBD over the Brisbane River to West End/Southbank.

This is a 3 shot HDR, taken with my Pentax K200D and Pentax SMC DA 18-55mm AL II

Base shot was 18mm, ISO 100, f9.0, 5 sec, bracketing was at +/- 2.0 EV

UPDATE – Processing details now posted – sorry for the delay.

Shot and Processed as follows:-

  • Shot in Pentax RAW (PEF)
  • Imported into Lightroom 2.5
  • Exported to 16-bit TIFF
  • HDR Generated using Photomatix
  • Tone Mapped using Details Enhancer (settings shown below)
  • Save-as 16-bit TIFF
  • Import into Lightroom 2.5
  • Minor editing applied using adjustment brush to remove some unwanted detail on the right of image (brush positioning and settings shown below)
  • Increased Blacks and Brightness
  • Exported to JPG for Web


Bird and Stair Testing the Tair-11a


Bird and Stair Testing the Tair-11a  

Originally uploaded by jezza323

I have already used this one in my Tair-11a review, but I just have to share again. This shot really works for me.

Taken with the Tair-11a at f2.8 (wide open), ISO 100, 1/640.

Post Processing as follows:-

  • Shot in Pentax RAW (PEF)
  • Imported in Lightroom 2.5
  • Exported to JPG for Web

No editing at all!

If you like this shot, have a read of my Tair-11a Lens Review or have a look at my other Tair-11a shots