Well its been raining since the beginning of the weekend here now (on and off raining anyway). Here is a shot I got of some rain clouds in between the showers. Unfortunately the background is a boring grey rather than white or blue sky (or even better more cloud formations)
This is a 3 shot panorama. I shot using the K200D and Jupiter-9 85mm lens with aperture set to f5.6. I made sure to shoot the frames quickly so the movement of the clouds wouldn’t interfere with the stitching.
Shooting and Processing as follows:
- Shot in Pentax RAW (PEF)
- Imported into Lightroom 2.5
- Exported to 3x 16 bit TIFF
- Stitched using Autopano Giga
- Rendered to a single 16 bit TIFF
- Imported new TIFF into Lightroom 2.5
- Applied adjustments in Lightroom (clarity, contrast, white balance)
- Exported to JPG for Web
I re-did this shot yesterday afternoon. It was a bit overcast so there are no shadows, and thats why the sky is white. No stitching errors this time! (that you can notice at this size).
This is a Brenizer Panorama, stitched from 181 shots using Autopano. The final edit is 123 megapixels. I could have rendered it larger, but its hard enough to work with at this size!
Shot with Pentax K200D and Jupiter-9 85mm f2.0 @ f2.8. Shot handheld, this time I made a conscious effort to keep my body still while shooting, to avoid the stitching errors I got the first time I shot.
I am much happier with this shot, so I will use it as my Project 52 shot for Week 3.
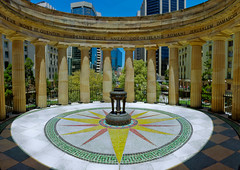
This is a Brenizer Panorama of the Eternal Flame in Anzac Square, Brisbane. This is landmark #3 in my Project 52 Brisbane Landmarks for 2010.
Taken with my K200D and Jupiter-9 85mm f2.0 lens @ f2.8. It is made up of 204 stitched images (it took a while to shoot it)
Unfortunately the exposure is a bit off (i was shooting in jpeg so i didnt fill up the card too much with 1 photo), and i got some parallax error in the stitch around the pillars above the flame. The midday lighting was also not ideal.
I am going to re-do this shot tomorrow afternoon to try and get a better version. I will update this with the results
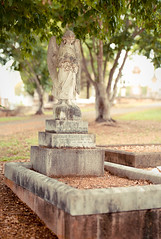
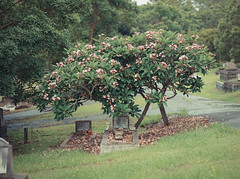
Another Brenizer Panorama from the Toowong Cemetary taken yesterday. This one is again with the Tair-11a on K200D. Its 58 images stitched with Autopano Giga 2 and edited (cropped, curves, colours, exposure brush) in Lightroom 2.5.
Processing :-
- Shot in Manual Mode, ISO 200, f2.8, 1/320 sec shutter – Pentax RAW (PEF), custom white balance.
- Imported into Lightroom 2.5
- All shots in pano exported to subfolder “Pano-5″ as 16 bit TIFFs
- Stitched using Autopano Giga 2
- Saved-as 16 bit TIFF
- Imported result back into Lightroom 2.5 library
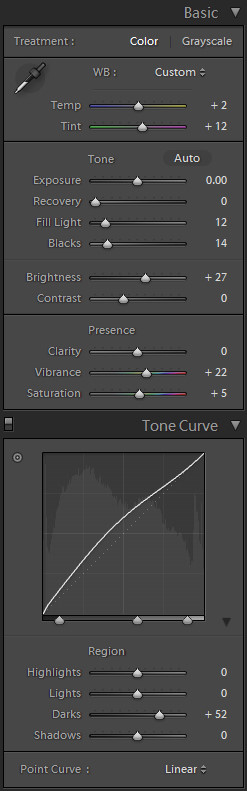
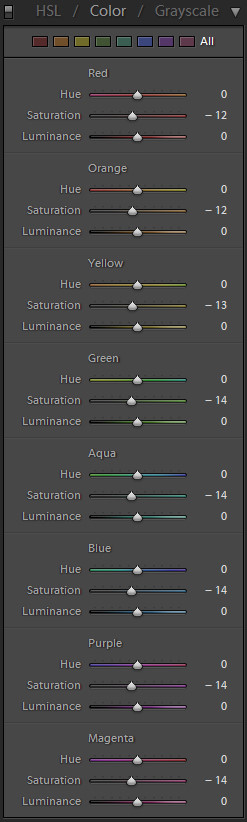
- Edited in Lightroom as show below (click pics for more detail). I did use a preset for most settings. Also cropped but not shown.
Exposure Brush to show more detail in the Angel
Develop settings
Another Brenizer shot I took today in the Toowong Cemetary in Brisbane. This one was also taken with the Tair-11a 135mm f2.8.
- 42 shots taken with K200D, manual mode, ISO 100, f2.8, 1/640 sec, custom white balance, shot in JPEG (to save space)
- Import into Lightroom 2.5
- Stitched with Autopano Giga 2
- Save as 16 bit TIFF
- Import result into Lightroom 2.5
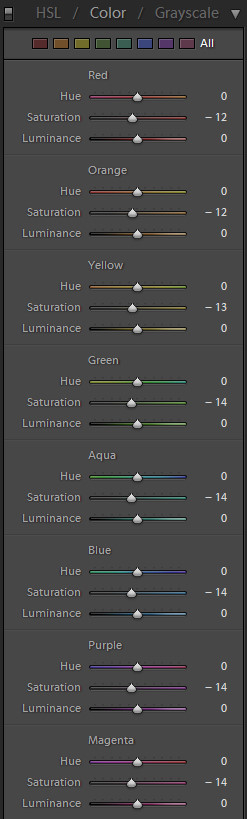
- Edit as shown below
Lightroom Edits (click for larger)
Shooting panoramas is something I have done a little bit of now. It allows you to really get some great large images, without having a super expensive camera or lenses. Some tips I’ve found from experience.
- Avoid Parallax – Landscapes work best, where most of the image is at infinity focus or close to it. This avoids parallax error. (see here for a good article about parallax error)
- Camera Orientation – Shoot with the camera in portrait orientation when doing a landscape orientation panorama, this gives a much better final image, not too wide for the height. With a portrait orientation panorama, shoot with the camera in landscape orientation.
- Manual Exposure – Set the camera on manual mode, so all shots will be at the same ISO / shutter / aperture. You can use another auto mode to get the required exposure for the panorama. Pick the point in the panorama which will be brightest, and use the exposure information to guide your manual settings.
- White Balance – If shooting JPG also set the white balance (dont use Auto white balance) so that the white balance is the same for all the shots (if you shoot RAW then make sure you set the white balance to the same for all shots before you merge the panorama).
- Overlap! – Make sure you overlap shots by plenty. Better to have too many photos to stitch than having gaps. I aim for about 50% overlap. To do this when you compose the next shot in the sequence, have something that was at the very edge of the previous frame, and move it to the centre of the next.
- Shoot Extra – Go extra around the edges. Dont stop where you want the final cropped panorama to finish. When correcting distortion you can often lose parts of the edges of the image. So go an extra row if you are doing a multiple row panorama, and go for an extra shot at either end of what you would like to show in the final image.
- Manual Focus – Make sure the camera is set to manual focus. By all means use autofocus to get the correct focus, but then switch to manual. This will make sure the focus doesnt change between shots.
Thats all I can think of just at the moment, I’ll add more if I think of them! 
Good luck panorama shooting.
A Blog of my Photographic Journeys, Equipment, Techniques and Images.