Tag Archives: photo

Foggy Morning

Foggy Morning, originally uploaded by jezza323.

A while back I went for an early morning fog chase. I have been meaning to do this for some time, but generally I find myself too asleep to get to it! On this particular morning though I was keen and ready to roll bright and early. It was a great fun morning driving around taking pics all over the place. Definitely worth doing if you can find the motivation.

This shot was the first stop once the light was good enough to actually see what was around. I quickly got out the tripod, set it up and took this shot with the Tamron 17-50mm lens mounted. After this I kept the camera mounted to the tripod, and tripod legs extended, and just popped it in/out of the car at each stop.

Macro Photography Techniques – Part 4

The 4th installment of the macro photography techniques series will cover reversed lenses, and my experience using a reversed lens. A reversed wide angle lens can give very high magnification.

Macro Photography Techniques

  1. Close Focus Lens
  2. Teleconverters
  3. Extension Tubes
  4. Reversed Lenses
  5. Macro Lens
  6. Combining Techniques
  7. Close Up Filters

Reversing Your Lens

The idea behind a reversed lens, is to use a wide lens (I use my Pentax M 28mm) because it is designed to take a large image, and project it onto a small spot (the sensor). If you reverse that lens, it is then taking a small image and projecting it onto a large area. To reverse your lens you will need a reversing adapter. This adapter has a standard lens mount on it, and a thread mount on the other. You need to get a thread mount in the correct size for the lens (or lenses) you wish to reverse. My Pentax M 28mm has a 49mm filter thread, so I needed a 49mm Pentax K reverse mount.

To mount your lens, you simply screw the adapter into the filter thread of your lens, then mount the lens using the adapter’s K mount (or whatever mount you are using).

Aperture?

When using a reversed lens, there is no way for the camera to operate the aperture of your lens, so you will want to use a lens which has an aperture ring that allows you to set the desired aperture. Some of the newer digital lenses do not allow this.
The second problem this can cause, is if you want to use a smaller aperture (larger f-stop number) it will be very dark to look through the viewfinder, this can make composing and focusing your shot very difficult. This is one of the drawbacks of using the reversed lens method.

Focusing

This method of macro photography will require a very close working distance. Working distance is distance from the subject to the lens. So be prepared to get down and really get in close to your subjects. The other thing it means is a very very narrow depth of field, sometimes it can be so narrow you will find it hard to get something in focus.

To focus with a reversed lens I still use the handheld, moving back and fowards method I described in Part 1, however, I take many more photos of a single subject than I would using the other methods. This is because the viewfinder is often dark (I try to use the smallest aperture I can get away with) and because the depth of field is so narrow. The hope is that at least 1 of the photos I take of any particular subject will have the focus in the correct position.

Results

Here are a couple of photos taken using this technique. You will notice the high magnification of these subjects, this is the power of the reversed lens.

reversed 28mm lens, ISO 100, f11 or so from memory, 1/180 sec, onboard flash fired.
Reversed 28mm lens, ISO 400, f4 or 5.6 from memory, 1/400 sec
UPDATE: I have added some shots of my Pentax SMC M 28mm f2.8 lens reverse mounted on my K200D, and a photo of the reversing adapter itself to my Part 5 post

Project 52 – #2 – Kurilpa Bridge


Kurilpa Pedestrian Bridge, originally uploaded by jezza323.

Buy art

This is the 2nd shot for my 2010 Project 52 – “Brisbane Landmarks”

This is the recently completed Kurilpa Bridge, a Pedestrian Bridge from the Brisbane CBD over the Brisbane River to West End/Southbank.

This is a 3 shot HDR, taken with my Pentax K200D and Pentax SMC DA 18-55mm AL II

Base shot was 18mm, ISO 100, f9.0, 5 sec, bracketing was at +/- 2.0 EV

UPDATE – Processing details now posted – sorry for the delay.

Shot and Processed as follows:-

  • Shot in Pentax RAW (PEF)
  • Imported into Lightroom 2.5
  • Exported to 16-bit TIFF
  • HDR Generated using Photomatix
  • Tone Mapped using Details Enhancer (settings shown below)
  • Save-as 16-bit TIFF
  • Import into Lightroom 2.5
  • Minor editing applied using adjustment brush to remove some unwanted detail on the right of image (brush positioning and settings shown below)
  • Increased Blacks and Brightness
  • Exported to JPG for Web


Bird and Stair Testing the Tair-11a


Bird and Stair Testing the Tair-11a  

Originally uploaded by jezza323

I have already used this one in my Tair-11a review, but I just have to share again. This shot really works for me.

Taken with the Tair-11a at f2.8 (wide open), ISO 100, 1/640.

Post Processing as follows:-

  • Shot in Pentax RAW (PEF)
  • Imported in Lightroom 2.5
  • Exported to JPG for Web

No editing at all!

If you like this shot, have a read of my Tair-11a Lens Review or have a look at my other Tair-11a shots

Macro Photography Techniques – Part 2

This is the 2nd technique I’ve used when taking macro photos (also the one I’ve used the most).

Macro Photography Techniques

  1. Close Focus Lens
  2. Teleconverters
  3. Extension Tubes
  4. Reversed Lenses
  5. Macro Lens
  6. Combining Techniques
  7. Close Up Filters

Teleconverter with a Close Focus Lens

This technique requires a teleconverter. A teleconverter is an accessory which mounts between your camera and your lens. The effect is increase of focal length. In this case you will probably want a 2x Teleconverter, which is designed to double the effective focal length of your lens. However it does not change the minimum focus distance, so you end up with the same lens, focusing at the same distance, but you get twice the magnification of the image. You can also get Macro Focusing Teleconverters (such as this) which have their own focusing ring, and allow extra magnification, and a good level of control over the magnification.

Drawbacks? Of Course…

The downside of this technique is that a 2x teleconverter, while doubling your effective focal length, it also reduces the effective aperture (incoming light) by 2 stops. So if your kit lens happens to be a Pentax SMC DA 18-55mm f3.5-5.6, and you are wanting to get maximum magnification (55mm @ minimum focus distance) adding a 2x teleconverter will mean that the lens (wide open, where it is a bit softer) becomes 110mm at f11.2. So in order to get a fast shutter speed you will need either high ISO (noisy) or a flash. I have had very good success just using the onboard flash though.

A teleconverter will also exaggerate any quality problems in the lens you are using. If you lens is a bit soft, it will be twice as soft using the 2x teleconverter. So you must be cautious about how you use it. This is where using a flash is also helpful, as it allows you to use a smaller aperture, which will mean the lens is going to be closer to its sweet spot for sharpness.

Another obvious drawback is that you need an extra piece of equipment. I was able to acquire an older 2x teleconverter to fit Pentax K mount on ebay for about $15. It has no “A” contacts (for camera autoexposure) or autofocus. Ideally you would want to have the “A” contacts for auto exposure, however, auto focusing is not required for this technique as you will be using manual focus mode set to minimum focus distance anyway.

Focusing

The same method for focusing is used as for the previous technique. You can read up on that here, in Part 1.

Results

Here are a couple of photos taken using this technique, including settings.

SMC F 35-70mm @ 70mm (effective 140mm), f11 (effective f22), 1/180 sec, ISO 200, onboard flash
SMC F 35-70mm @ 70mm (effective 140mm), f16 (effective f32), 1/20 sec (this should be shorter), ISO 400, onboard flash
SMC F 35-70mm @ 70mm (effective 140mm), f11 (effective f22), 1/180 sec, ISO 200, onboard flash

For those of you who already have teleconverters, why not give this technique a try, and post up the results in the comments.

Macro Photography Techniques – Part 1

This is the start of a series of posts on Macro Photography Techniques which I have successfully used. Each part will be a different technique. Feel free to add any ideas you have as comments, and also to post your macro’s if you have used the techniques before, or after you go and try it!

Macro Photography Techniques

  1. Close Focus Lens
  2. Teleconverters
  3. Extension Tubes
  4. Reversed Lenses
  5. Macro Lens
  6. Combining Techniques
  7. Close Up Filters


The Close Focus Lens

The first technique in the series will be the most obvious one, a close focus lens. A close focus lens is a lens which focuses quite closely, but is not a true macro lens. For example, the Pentax standard kit lens is the SMC DA 18-55mm f3.5-5.6. This lens focuses down to 25cm, which (at 55mm focal length, fully zoomed in) gives a reproduction ratio of around 1:2.9. A true macro lens will allow focusing down to a 1:1 ratio (older Macro lesnes are actually only 1:2). Even with 1 of these types of lenses some great macro shots can be created. Most DSLR owners will have a close focusing lens as most kit lenses are close focusing so its a technique anyone can try (and most would have).

Getting The Most From It – Focusing

The key with a close focus lens is being able to focus on something, with the sensor plane as close as possible to the subject. You need to make sure you are at that minimum focusing distance when you take the shot to get the maximum possible magnification from your lens. The easiest way to do that, is to set your camera (or lens, depending on model) to manual focus, and set the focus manually to the minimum focus distance. Once you have done that, all you need to do is to get nice and close to your subject, and focus by moving the camera (and probably yourself too) further away from, or closer to the subject as required. This will mean you get the maximum magnification because the lens is pre-set to the closest possible focus point. By moving the camera you move the subject into the correct distance and into focus.

This is the focusing technique I use for all my macro photography, so will apply across this whole post series. To help you achieve correct focus most cameras will have a focus confirmation of some kind, even in manual focus mode. Pentax cameras have a focus confirmation beep (which can be disabled) as well as a green hexagon displayed in the view finder once focus is confirmed. However, when using manual focus only the centre focus point can be used, so you must point the centre of the frame at the subject while focusing.

Depth Of Field – It’s Too Narrow!

With macro photography narrow depth of field can become an issue. When you are so close to your subject, and have a longish focal length, it will cause your depth of field to become very narrow. The only way to increase it is to use a smaller aperture (larger f number, eg f22). This will make your shots very dark, or your shutter speeds very long. To overcome this, you could use a flash. An off camera flash is preferred, but the on camera flash can work just fine too, especially with a reflector (I’ll explain that in a later post).

What this means for you, is (as always) the photo becomes a balancing act between shutter speed (fast to avoid blur), aperture (small to get the DOF you want) and ISO (low to avoid noise).
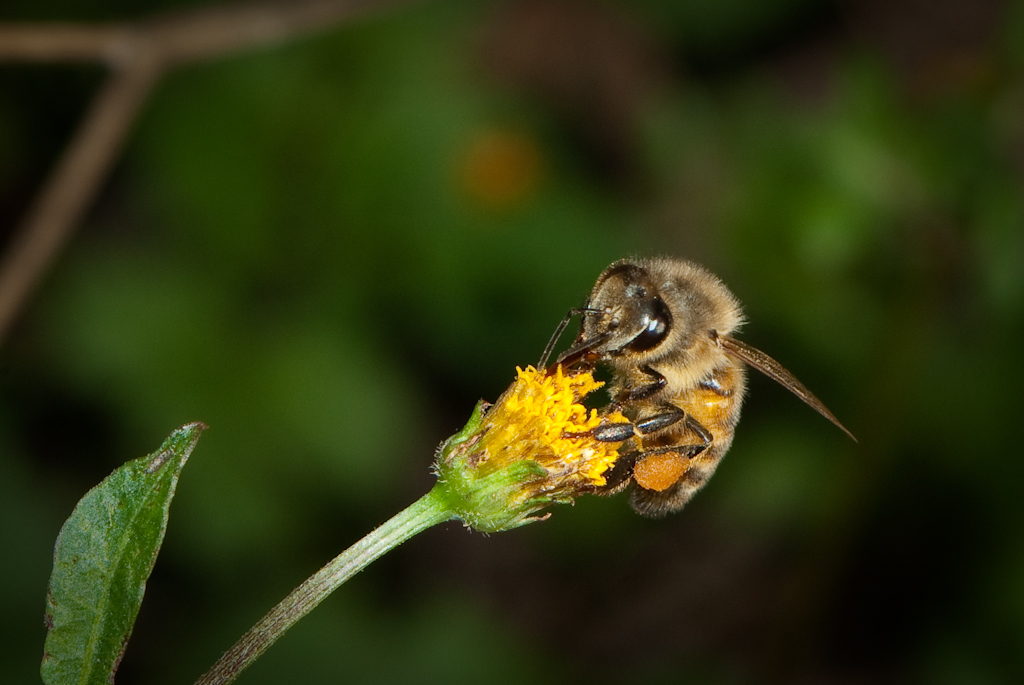
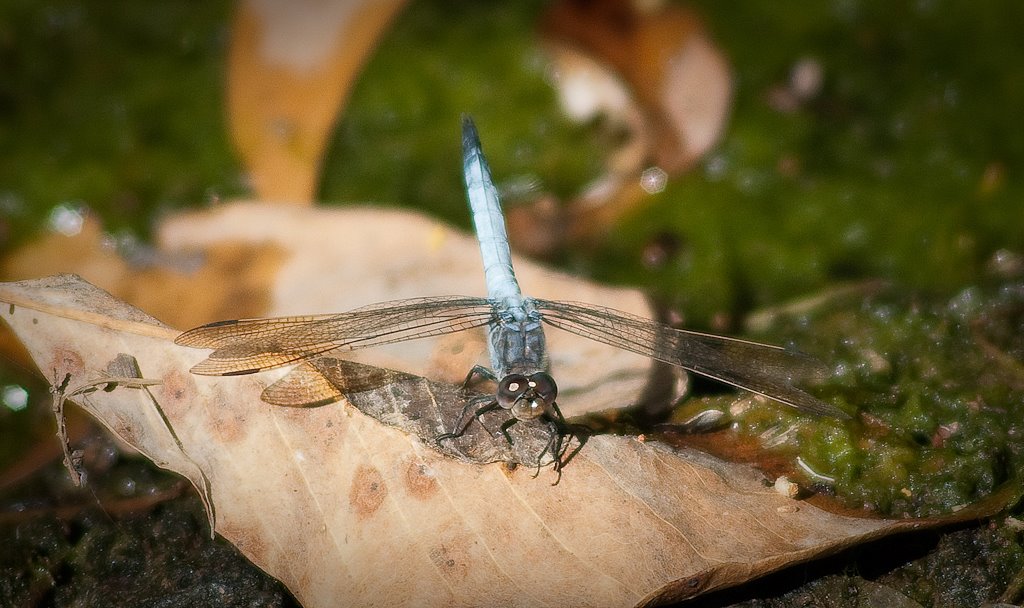
The Results

Here are a few shots I have taken using this method. Including the settings used.

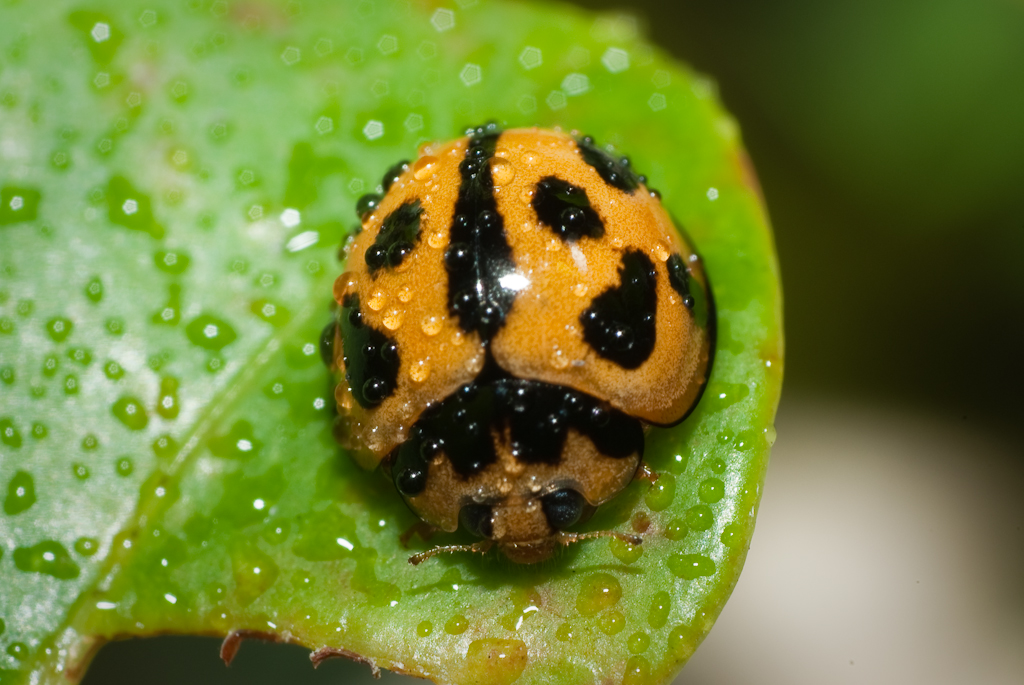
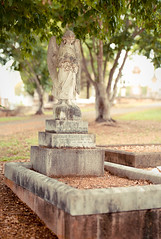
SMC M 28mm f2.8 @ min. focus + cropped – ISO 100, 1/100 sec, f4.0 (from memory)
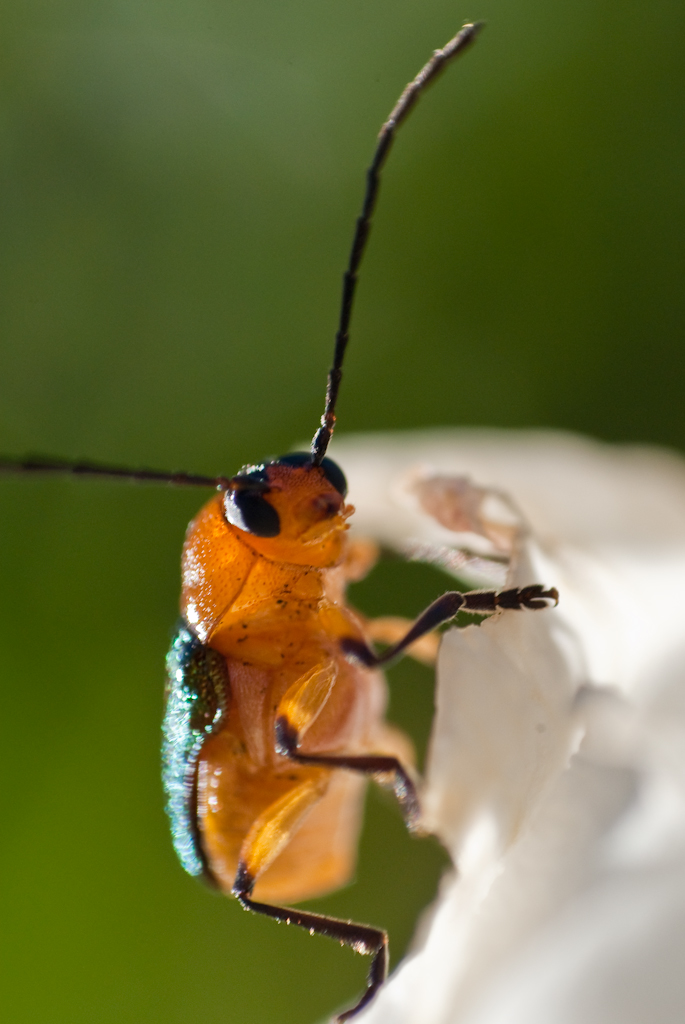
Tokina RMC 70-210mm f3.5 @ 210mm min. focus + cropped, ISO 200, 1/640 sec, f3.5

Time to get out and take some macros. Don’t forget to post the results in the comments section. Stay tuned for the rest of the posts in this series.

My Photography Gear

This is a full list of all my photography gear, I will try my best to keep it up to date as I buy and sell various things

Camera Body

  • Pentax K5-II
  • Pentax K200D
  • Canon Powershot A590 IS (running CHDK software)LEFT BEHIND
  • Canon Powershot ELPH 300HS (my wife’s camera)
  • Pentax Q

Pentax Lenses

  • Pentax SMC DA 18-55mm AL II f3.5-5.6 - SOLD
  • Pentax SMC A 50mm f1.7SOLD
  • Pentax SMC M 50mm f1.7 (has fungus)BINNED
  • Pentax SMC M 28mm f2.8SOLD
  • Pentax SMC FA 100-300mm f4.7-5.8GONE
  • Pentax F 35-70mm f3.5-4.5 - SOLD, BOUGHT NEW COPY
  • Pentax Q 01 Prime 8.5mm f1.9 (47mm equivalent)
  • Pentax Q 02 Zoom 5-15mm f2.8-4.5 (27.5-83.0mm equivalent) - SOLD
  • Pentax Q 03 Fisheye 3.2mm f5.6 (17.5mm equivalent)

Russian Lenses

  • Jupiter 9 85mm f2.0 M42
  • Tair 11-A 135mm f2.8 M42
  • Mir 1 37mm f2.8 M42SOLD
  • Helios 44-2 58mm f2.0 M42SOLD
  • Tair 3-Phs 300mm f4.5 M42

Others

  • Sigma 30mm f1.4
  • Sigma 10-20mm f4.0-5.6
  • Sigma 70-200mm f2.8 II APO DG EX MACRO (w HSM)
  • Sigma 150-500mm f5.0-6.3 APO DG OS (w HSM)
  • Tamron 17-50mm f2.8 - SOLD
  • Hanimar 135mm f2.8 M42 - SOLD
  • Soligor 135mm f3.5 M42 - SOLD
  • Vivitar 135mm f3.5 M42 - SOLD
  • Pentacon 30mm f3.5 M42- SOLD
  • Vivitar 35mm f3.5 M42 (loose rear elements, its my paper weight)- BINNED

Lens Accessories

  • Lens cleaning brush
  • Lens Cleaning tissues
  • Lens cleaning cloths (lots of these) – 3 packs are available from DealExtreme
  • Giottos Rocket Blower Medium
  • 67mm -> 77mm filter step up ring (allows 77mm filter on a 67mm threaded lens)
  • Kenko SHQ 1.5x Teleconverter, works with SDM/HSM lenses
  • Quantaray 2x AF Teleconverter
  • Vivitar Auto Teleconverter 2x-22 (allows wide open focusing but has no contacts and no autofocus)SOLD
  • Vivitar Auto Extension Tubes AT-22 (allows wide open focusing but has no contacts and no autofocus)- LEFT BEHIND
  • 49mm Hoya 3 position rubber hood- BINNED
  • 58mm black metal hood – bought from ebay (for FA 100-300)- LEFT BEHIND

Lens Filters

  • 52mm Kenko MC CPL
  • 52mm Hoya R72 Infrared
  • 52mm ND400 as mentioned here
  • 62mm Kenko MC UV
  • 67mm Kenko PRO1 Digital Protector
  • 67mm Kenko PRO1 Digital CPL
  • 67mm Hoya ND400 (9 s top ND filter)
  • 77mm IR720
  • 77mm Kenko MC CPL
  • 49mm Cokin CPL- LEFT BEHIND
  • 49mm UV x3 (came with various lenses)- LEFT BEHIND
  • 49mm Blue- LEFT BEHIND
  • 49mm Hoya Star Six- LEFT BEHIND
  • 49mm Hoya Centre Spot (blurs out the edges, leaving only the centre of the image clear)- LEFT BEHIND
  • 52mm Hoya NDX400 (9 stop ND filter)SOLD
  • 52mm IR720 as mentioned here- BINNED
  • 62mm Kenko MC CPLSOLD

Cokin P Filters and Accessories

  • Chinese copy 3 slot Cokin P holder
  • Chinese copy 1 slot Cokin P holder (wide angle)
  • 67mm adapter
  • 77mm adapter
  • Graduated ND8 Filter
  • ND 3.0 (10 stop) Filter

Flashes and Accessories

  • Sunpak Auto 200 flash (part of Dad’s gear, unsafe for DSLR hot shoe mounting)- LEFT BEHIND
  • Optical Trigger- LEFT BEHIND
  • Hand made diffuser using cardboard, alfoil and plain white paper- LEFT BEHIND

Other Accessories

  • Cable Release Remote – bought from DealExtreme
  • IR Push Button Remote – bought from DealExtreme
  • 3 axis hotshoe mounted bubble level – bought from DealExtreme
  • Pentax D-BG3 battery grip for K200D
Tripod
  • Slik 500 Pro DX w Head- SOLD
  • Manfrotto ART-190 aluminium tripod with Benro KB-2 Ballhead

Happy New Year & Project 52 Launch

As we approach the end of 2009 let me wish you all a wonderful and prosperous 2010. At the same time I would like to announce that I will be starting a project 52 (1 photo per week) for 2010. I will post all shots, all processing info and all locations here on my blog. So back to the celebrations, Happy New Year!

Project 52

A Backlit Brenizer Angel


A Backlit Brenizer Angel
Originally uploaded by jezza323

Another Brenizer Panorama from the Toowong Cemetary taken yesterday. This one is again with the Tair-11a on K200D. Its 58 images stitched with Autopano Giga 2 and edited (cropped, curves, colours, exposure brush) in Lightroom 2.5.

Processing :-

  • Shot in Manual Mode, ISO 200, f2.8, 1/320 sec shutter – Pentax RAW (PEF), custom white balance.
  • Imported into Lightroom 2.5
  • All shots in pano exported to subfolder “Pano-5″ as 16 bit TIFFs
  • Stitched using Autopano Giga 2
  • Saved-as 16 bit TIFF
  • Imported result back into Lightroom 2.5 library
  • Edited in Lightroom as show below (click pics for more detail). I did use a preset for most settings. Also cropped but not shown.
Exposure Brush to show more detail in the Angel
Develop settings