Tag Archives: brenizer technique

Newspaper? Recropped?

Newspaper – recrop, originally uploaded by jezza323.

Buy art

I received a suggestion that perhaps a cropping of my previously posted photograph “Newspaper?” would improve the result. If you would like to know how I produced this photograph, please read the original article.

What Do They Know?

Initially I thought “No way, are you kidding? It’s perfect!” as someone often does when considering their own work. After a short amount of consideration, I opened Lightroom and made this crop. Though I remained unconvinced I thought I would publish the recrop anyway.

Maybe They Were Right

Now that it comes down to a comparison, I do believe I prefer this crop to the original. I think it highlights the point of focus and the out of focus effect of the image more than the original. I think this crop also shows more clearly what the subject of the photograph is.

What About You?

So which do you prefer? This one? Or the original? And why?

All You Can Eat

All You Can Eat, originally uploaded by jezza323.

Buy art

Saturday Morning Photography

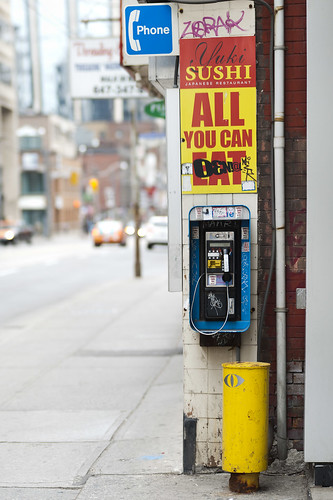
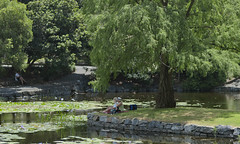
So here is another Tair-11a brenizer method shot from my Saturday morning pre-rain wander down University Av. I spotted this little sign and phone off a side street and decided it was interesting. I wanted to get this in 1 shot, but some objects in the foreground meant I had to get closer, which turned it into yet another Brenizer method photograph.

Failure

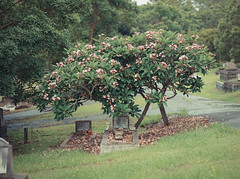
It actually took me 3 goes to get this shot right. It really has been a while since I have been out shooting. This image is made up of 12 photographs, all taken at f2.8 with my Tair-11a 135mm lens on my Pentax K200D body. I made sure the body was in manual mode, this is to ensure an even exposure across the panorama image. I set the manual aperture on the lens to f2.8, for minimum depth of field, then set the exposure to suit the part of the scene which I was most interested in (the phone in this case). Finally I started shooting the panorama images required. For some strange reason on my first attempt I forgot to focus the image properly, it must have looked ok through the viewfinder, but as I was walking away I did a quick check on the camera screen, and promptly returned for a 2nd attempt.

Fail Again

The 2nd attempt failed because I was rushing, and the shutter speed was too slow, meaning I had a bit of blur from my shaky hands messing up the images. Again I noticed this as I went to walk away whilst checking the image on the camera.

Success

Finally on the 3rd attempt, I adjusted the ISO up from 100 to 200, giving me a faster shutter speed. I slowly and carefully shot the panorama, keeping my hands steady and relaxed. This time I checked the shots before I started walking away, and was finally happy with the results.
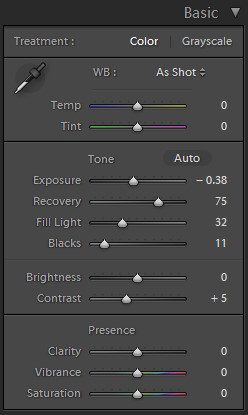
Processing

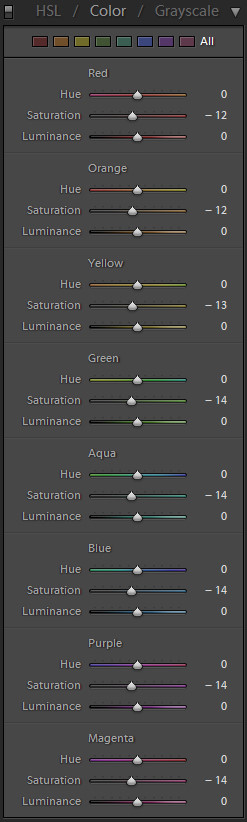
For processing I used Lightroom to export the original RAW files to TIFF format, which I then stitched using Autopano Giga, and then made a few minor levels adjusts and cropped the image after re-importing into the Lightroom library. Enjoy!

Project 52 – #3 – Anzac Square Eternal Flame AGAIN!

I re-did this shot yesterday afternoon. It was a bit overcast so there are no shadows, and thats why the sky is white. No stitching errors this time! (that you can notice at this size).

This is a Brenizer Panorama, stitched from 181 shots using Autopano. The final edit is 123 megapixels. I could have rendered it larger, but its hard enough to work with at this size!

Shot with Pentax K200D and Jupiter-9 85mm f2.0 @ f2.8. Shot handheld, this time I made a conscious effort to keep my body still while shooting, to avoid the stitching errors I got the first time I shot.

I am much happier with this shot, so I will use it as my Project 52 shot for Week 3.

Project 52 – #3 – Anzac Square Eternal Flame


Anzac Square Eternal Flame
Originally uploaded by jezza323

This is a Brenizer Panorama of the Eternal Flame in Anzac Square, Brisbane. This is landmark #3 in my Project 52 Brisbane Landmarks for 2010.

Taken with my K200D and Jupiter-9 85mm f2.0 lens @ f2.8. It is made up of 204 stitched images (it took a while to shoot it)

Unfortunately the exposure is a bit off (i was shooting in jpeg so i didnt fill up the card too much with 1 photo), and i got some parallax error in the stitch around the pillars above the flame. The midday lighting was also not ideal.

I am going to re-do this shot tomorrow afternoon to try and get a better version. I will update this with the results

Brenizer Shed Recrop


Brenizer Shed Recrop, originally uploaded by jezza323.

Buy art

This shows how cropping can really change an image (well I think so).

Compare to the original which I blogged a while back. It was just bland shot, with a distracting shed on the left of frame, and you couldnt really see the narrow depth of field, except that the foreground was out of focus.

In this tighter crop, you no longer have the distraction on left of frame, and you can see the sharp outline of the shed and tree as compared to the background.

If you like this shot, have a read of my Tair-11a Lens Review or have a look at my other Tair-11a shots

Picnic By the Lake, Under the Tree

This is another Brenizer Panorama I took yesterday at the Mt Cootha Botanic Gardens. Shot with the Pentax K200D and Tair-11a 135mm f2.8 lens, at 2.8.

Shooting and Processing as Follows

  • Shot in Pentax RAW (PEF) – 94 shots
  • Import into Lightroom 2.5
  • Export to 16 bit TIFF with ZIP compression
  • Stitched using Autopano Giga 2
  • Rendered to 16 bit TIFF
  • Imported into Lightroom 2.5
  • Heavy crop (94 images was for a much bigger scene, but I only liked this part of it)
  • Edited as shown below (Basic tab only)
  • Export to JPG for Web

If you like this shot, have a read of my Tair-11a Lens Review or have a look at my other Tair-11a shots

Flowering about your Resting Place

Another Brenizer shot I took today in the Toowong Cemetary in Brisbane. This one was also taken with the Tair-11a 135mm f2.8.

  • 42 shots taken with K200D, manual mode, ISO 100, f2.8, 1/640 sec, custom white balance, shot in JPEG (to save space)
  • Import into Lightroom 2.5
  • Stitched with Autopano Giga 2
  • Save as 16 bit TIFF
  • Import result into Lightroom 2.5
  • Edit as shown below
Lightroom Edits (click for larger)

The Brenizer Method Pt 2

Well writing the previous post and seeing my rather lame attempt at the technique inspired me to go out into my back courtyard and try again on my basil plants. I used my Tair-11A lens (135mm) at f4.0, the final image was 100 shots! Again first is a single frame, followed by the full resulting image. The narrow DOF really makes the subject pop.


UPDATE: I have used this technique/method a bit now, have a look at them: Brenizer images

The Brenizer Method

I mentioned in a previous post a way to use panorama shooting to get a very narrow depth of field (DOF) on an image. This technique has come to be known as the Brenizer Bokeh Panorama method. A quick overview is using a fast telephoto lens (for example, 85mm f1.4 or 135mm f2.8 etc) to get a very narrow depth of field, but you also end up with a narrow field of view (obviously). So to build up your normal image you take lots and stitch them together. The man this technique is named for is Ryan Brenizer. And you can find his original guide HERE. I first read THIS guide, and find it a bit more informative. Ryan Brenizer has also published a How To video HERE. I highly recommend giving this technique a go. I have tried a couple with my Tair 11-A (135mm f2.8). The first photo following is a single shot of the panorama, to get an idea of the field of view. And then the final result. This one would have worked better had I been a bit closer to the subject (and reduced the DOF some more).


So, if you haven’t tried this technique before. I suggest you get out there and give it ago. As you can see from the links I posted with the guides, you can produce some spectacular images! Don’t forget all the tips from my panorama post still apply.

UPDATE: Took another demonstration shot

ANOTHER UPDATE: I have used this technique/method a bit now, have a look at them: Brenizer images