Here is a shot taken with my lovely Tair-11a lens. As we were getting ready to head off some balloons launched and drifted across between the lookout and the city. The 135mm Tair-11a provided a “close up” (not very close at all really!) of the early morning light on the balloon.
Tag Archives: mt cootha
Untitled

Dawn at The Summit – Mt Cootha

Autumn Sunrise – Mt Cootha

Spikes in the Rain

Here is a slightly abstract shot of a plant I spotted at the Mt Cootha Botanic Gardens on Sunday. It was raining a little at the time, and you can make out the rain drops on the leaves.
I took this very quickly (it was raining on my remember) using the K200D and Jupiter-9 85mm f2.0 which was already mounted on the camera.
Almost no editing done here at all, just a slight crop
Project 52 – #8 – Japanese Garden, Mt Cootha

I am a little behind, but I hope to catch up this week. We have had rainy weather non stop for a couple weeks now. Yesterday I got out amongst the showers in the Mt Cootha Botanic Gardens, and in particular wanted to visit the Japanese Garden. You can read about the garden here.
Over the last week or so I’ve been discussing shooting in various different aspect ratios with a friend at work. He had the idea to shoot only in a particular aspect ratio for a bit. After this discussion I decided to copy his idea a little, and try shooting some stuff in the movie aspect ratio of 2.39:1 (my friend has decided on 16:9 btw). This is from my first shoot where I specifically considered shooting in this aspect. I dont plan on taking lots of shots in this aspect ratio, but it is fun to consider.
This is a Brenizer Panorama, taken with my Pentax K200D and Jupiter-9 85mm lens at f2.8. I stitched the shots using Autopano, then did some editing in Lightroom 2.5 to get the final result (crop, contrast, exposure, blacks)
More Digital Infrared (IR) Photography

Here is another shot I took recently with my R72 type filter. In this case I used a Hoya R72 filter mounted to my Pentax K200D & Pentax SMC DA 18-55 AL II combo.
This shot was processed entirely in Lightroom 2.5 (no photoshop trickery going on here!). You can see here the effect quite well, the sky is nice and dark, while the trees are a bit brighter than they would otherwise be. If you compare closely to the image below you can see the difference quite well. The general contrast is also much stronger.
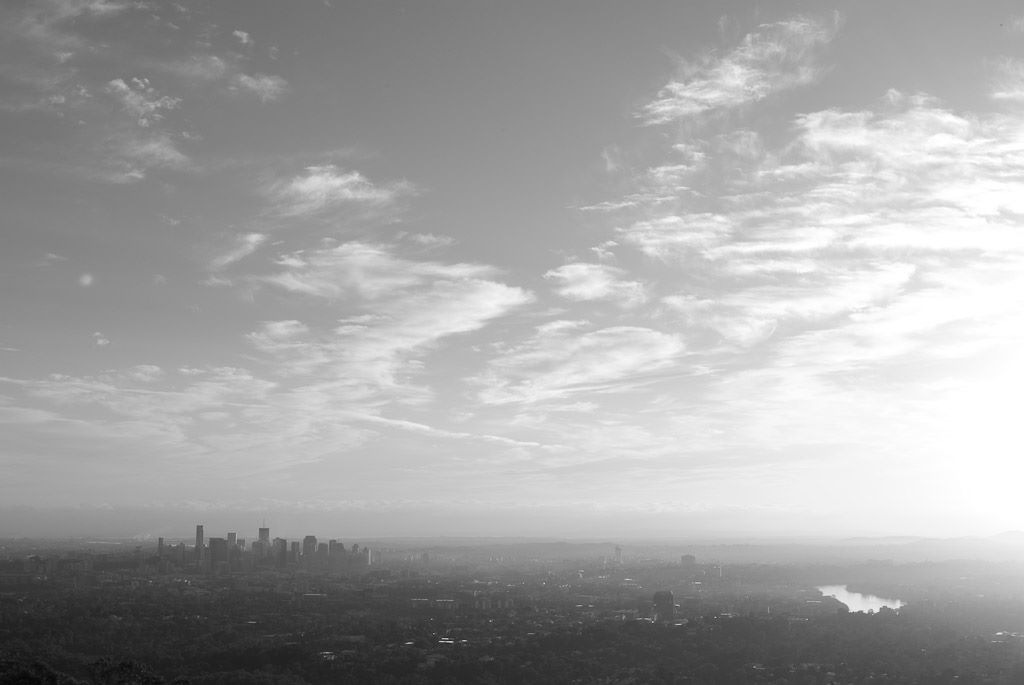
This is the same shot, but taken without an IR filter, just converted to greyscale in Lightroom.
And here is the IR shot in colour (with corrected White Balance and Exposure in Lightroom 2.5). This is what was coverted to greyscale to get the IR image above.
Infrared Digital Photography with an R72 Filter

This shot is from me playing around with an IR 720nm filter. This type of filter blocks all light below the 720nm wavelength. This means some reds, and infrared are the only light which can pass through. By using 1 of these filters on your camera, you will get some interesting results.
Unfortunately most modern cameras have an IR reduction filter mounted to the front of the sensor, which means that blocking visible light will result in very long exposures being required. This particular shot was taken in broad daylight, at f11.0, ISO 200 and required a 30 second shutter speed! 30 secs in broad daylight is quite a lot. A typical exposure in this situation would be around about 1/400 sec!
The main features of IR photography are black skies, and white leaves on trees and grass. This results in cool contrasty shots where things are just a little different to the norm.
Project 52 – #4 – Mt Cootha Lookout


This is a 5 shot HDR of the sunrise from Mt Cootha Lookout, which overlooks Brisbane’s CBD and surrounding suburbs. This is landmark #4 in my Project 52 Brisbane Landmarks for 2010.
I have already posted this shot on the blog as a general shot with full processing info, so check that out if you are interested
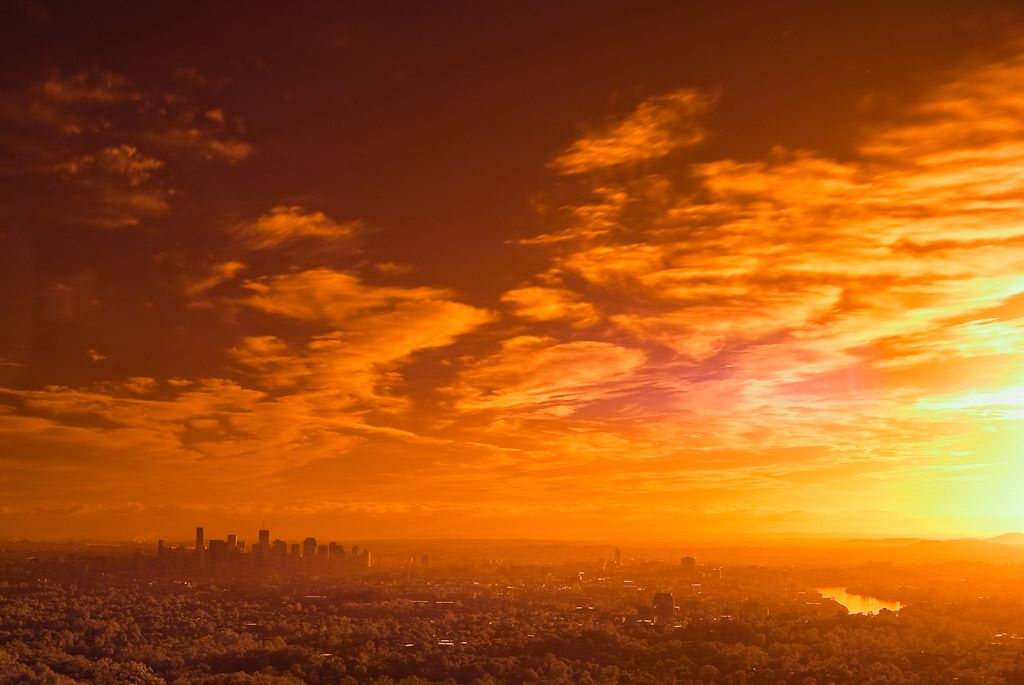
Australia Day Sunrise
Happy Australia Day to all the Australians ![]()
This shot is from a few moments before sunrise yesterday morning (Australia Day, 26th Jan 2010) from the Mt Cootha Lookout in Brisbane. The Brisbane CBD and surrounding suburbs are visible in the shot.
The shot was taken using my Pentax K200D, Pentax DA 18-55 AL II, Slik 500DX Pro tripod and Kenko CPL filter. It is a HDR shot blended from 5 images, taken at -4, -2, 0, +2, +4 EV steps using Photomatix 3.1 and Tone Mapped using the Details Enhancer. I outline how I did this below.
Shots used were all at 18mm, ISO 100 and f13. Shutter speeds were 1/20sec, 1/80sec, 1/5sec, 0.8sec, 3.0sec
Shooting and Processing as follows:
- Shot in Pentax RAW (PEF)
- Set Exposure Compensation to -2.0 EV
- Shot 3 bracketed shots at +/- 2.0 EV (giving -4, -2 and 0 EV shots)
- Set Exposure Compensation to +2.0 EV
- Shot 3 bracketed shots at +/- 2.0 EV (giving +4, +2 and 0 EV shots)
- Imported into Lightroom 2.5
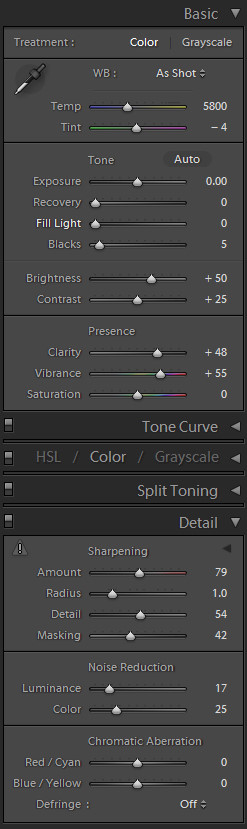
- Applied the settings shown below to all 6 images (the first image)
- Exported all 6 images to full quality JPG
- Deleted the worst of the 2 0 EV shots (this is only 5 images remember!)
- Blended the remaining 5 images in Photomatix
- Tone Mapped in Details Enhancer using the settings show below
- Saved as JPG
- Imported HDR JPG into Lightroom 2.5
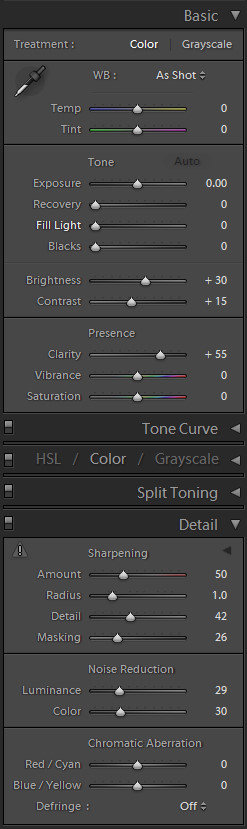
- Applied the settings shown below in Lightroom (last image)
- Exported to JPG for Web