Category Archives: By Lens

A Rainy Weekend of Camping


Peaceful Outlook
Originally uploaded by jezza323

I haven’t posted for a few days as I was off exploring the world. A friend and I travelled to Springbrook National Park for a weekend of camping and photography, only to discover that the weather was against us. It rained very heavily most of the time, so not much photography happened!

Here are the first of the processed shots though.

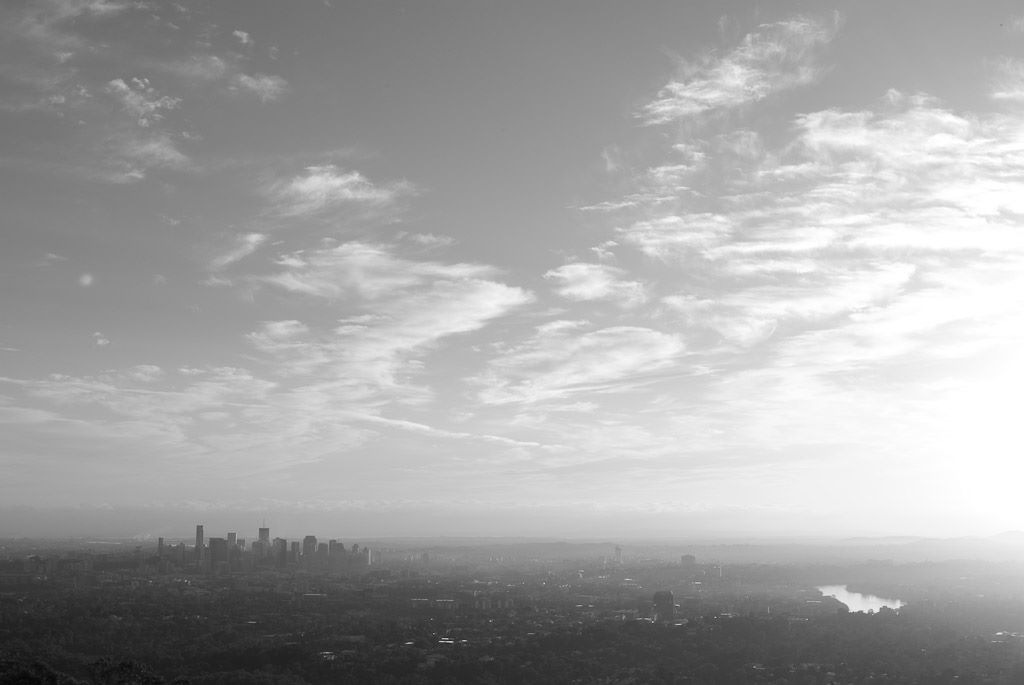
This shot was taken using the Pentax DA 18-55 AL II lens @ 18mm. It is 3 HDR images stitched together (HDR’s were 3 images each @ +/- 2.0 EV). All shots were taken in Pentax RAW (PEF), imported to Lightroom 2.5, blended using Photomatix batch process with Details Enhancer (quite extreme one too!) and stitched using Autopano.

I also took another HDR panorama from the other side of the shed looking back to the bridge I took this shot from. This is the link to flickr

More Digital Infrared (IR) Photography


Mt Cootha Sunrise in IR
Originally uploaded by jezza323

Here is another shot I took recently with my R72 type filter. In this case I used a Hoya R72 filter mounted to my Pentax K200D & Pentax SMC DA 18-55 AL II combo.

This shot was processed entirely in Lightroom 2.5 (no photoshop trickery going on here!). You can see here the effect quite well, the sky is nice and dark, while the trees are a bit brighter than they would otherwise be. If you compare closely to the image below you can see the difference quite well. The general contrast is also much stronger.

This is the same shot, but taken without an IR filter, just converted to greyscale in Lightroom.
And here is the IR shot in colour (with corrected White Balance and Exposure in Lightroom 2.5). This is what was coverted to greyscale to get the IR image above.

Infrared Digital Photography with an R72 Filter


Botanic Gardens in IR
Originally uploaded by jezza323

This shot is from me playing around with an IR 720nm filter. This type of filter blocks all light below the 720nm wavelength. This means some reds, and infrared are the only light which can pass through. By using 1 of these filters on your camera, you will get some interesting results.

Unfortunately most modern cameras have an IR reduction filter mounted to the front of the sensor, which means that blocking visible light will result in very long exposures being required. This particular shot was taken in broad daylight, at f11.0, ISO 200 and required a 30 second shutter speed! 30 secs in broad daylight is quite a lot. A typical exposure in this situation would be around about 1/400 sec!

The main features of IR photography are black skies, and white leaves on trees and grass. This results in cool contrasty shots where things are just a little different to the norm.

Rainy Day


Rainy Day
Originally uploaded by jezza323

Well its been raining since the beginning of the weekend here now (on and off raining anyway). Here is a shot I got of some rain clouds in between the showers. Unfortunately the background is a boring grey rather than white or blue sky (or even better more cloud formations)

This is a 3 shot panorama. I shot using the K200D and Jupiter-9 85mm lens with aperture set to f5.6. I made sure to shoot the frames quickly so the movement of the clouds wouldn’t interfere with the stitching.

Shooting and Processing as follows:

  1. Shot in Pentax RAW (PEF)
  2. Imported into Lightroom 2.5
  3. Exported to 3x 16 bit TIFF
  4. Stitched using Autopano Giga
  5. Rendered to a single 16 bit TIFF
  6. Imported new TIFF into Lightroom 2.5
  7. Applied adjustments in Lightroom (clarity, contrast, white balance)
  8. Exported to JPG for Web

The Desaturated Look


Untitled
Originally uploaded by jezza323

This is a shot I took during the week. I quite like this style of shot, so I thought I would share the preset I used.

The preset is called “PH Fashion Shoot II” and I found it at this site. I recommend downloading this set of presets (even if you don’t intend on using them) and just having a look at the settings they contain.

Enjoy!

Rocks Floating on Clouds


Rocks Floating on Clouds
Originally uploaded by jezza323

This is an old shot I thought I would share. It may not be immediately obvious to everyone how you get this effect of the cloud-like water.

This effect comes from the movement of the water during a long shutter exposure. In this case it is also accentuated by blending 2 shots together, similar to a HDR.

This was shot using the Pentax K200D and Pentax SMC DA 18-55 AL II lens. I also used TianYa ND8 filter and TianYa ND8 grad filters in a Cokin P holder. These filters block out light, so allow you to use longer shutter speeds, and enhance the cloud-like effect.

To get my 0, -2 EV images which I later blended, I set my camera to bracketing mode, and +/- 2.0 EV steps. I have also set my camera to shoot those steps in 0, -2, +2 order. For this shot the sky was becoming a bit blown out when getting the exposure I was after for the foreground, so I set the base exposure to what I wanted for the foreground, then shot 0 and -2 EV only (I didn’t bother shooting the 3rd bracket).

In Photomatix there is the option of “Exposure Blending” as opposed to “Generate HDR”. I selected this option, my 2 images, and the Average method.

Project 52 – #4 – Mt Cootha Lookout

 
This is a 5 shot HDR of the sunrise from Mt Cootha Lookout, which overlooks Brisbane’s CBD and surrounding suburbs. This is landmark #4 in my Project 52 Brisbane Landmarks for 2010.

I have already posted this shot on the blog as a general shot with full processing info, so check that out if you are interested

Australia Day Sunrise

Happy Australia Day to all the Australians :)

This shot is from a few moments before sunrise yesterday morning (Australia Day, 26th Jan 2010) from the Mt Cootha Lookout in Brisbane. The Brisbane CBD and surrounding suburbs are visible in the shot.

The shot was taken using my Pentax K200D, Pentax DA 18-55 AL II, Slik 500DX Pro tripod and Kenko CPL filter. It is a HDR shot blended from 5 images, taken at -4, -2, 0, +2, +4 EV steps using Photomatix 3.1 and Tone Mapped using the Details Enhancer. I outline how I did this below.

Shots used were all at 18mm, ISO 100 and f13. Shutter speeds were 1/20sec, 1/80sec, 1/5sec, 0.8sec, 3.0sec

Shooting and Processing as follows:

  1. Shot in Pentax RAW (PEF)
  2. Set Exposure Compensation to -2.0 EV
  3. Shot 3 bracketed shots at +/- 2.0 EV (giving -4, -2 and 0 EV shots)
  4. Set Exposure Compensation to +2.0 EV
  5. Shot 3 bracketed shots at +/- 2.0 EV (giving +4, +2 and 0 EV shots)
  6. Imported into Lightroom 2.5
  7. Applied the settings shown below to all 6 images (the first image)
  8. Exported all 6 images to full quality JPG
  9. Deleted the worst of the 2 0 EV shots (this is only 5 images remember!)
  10. Blended the remaining 5 images in Photomatix
  11. Tone Mapped in Details Enhancer using the settings show below
  12. Saved as JPG
  13. Imported HDR JPG into Lightroom 2.5
  14. Applied the settings shown below in Lightroom (last image)
  15. Exported to JPG for Web

A Gecko on My Windowsill


A Gecko on My Windowsill
Originally uploaded by jezza323

This is the gecko that came visiting while I was writing the last post in the macro photography series. He was only a baby, probably about 20mm long in total.

I shot this using the reversed 28mm lens mounted to my K200D. I used the on-board flash for some lighting. I took the shot at f22.0, but was unable to focus at f22, so I used my little finger to activate the aperture control lever on the lens (remember it was mounted reverse so you can access it!) to hold the aperture open while I composed and focused the shot. Then released the lever just before firing the shutter.

You can see by the size of the dirt and fibres in the shot that this is at quite high magnification. If you have a good 28 to 35mm lens you can reverse mount I highly recommend buying yourself a cheap reverse adapter and giving it a go. It may take a little while to get used to the short working distance (distance from lens to subject) but you can really get up close with lots of stuff!

Project 52 – #3 – Anzac Square Eternal Flame AGAIN!

I re-did this shot yesterday afternoon. It was a bit overcast so there are no shadows, and thats why the sky is white. No stitching errors this time! (that you can notice at this size).

This is a Brenizer Panorama, stitched from 181 shots using Autopano. The final edit is 123 megapixels. I could have rendered it larger, but its hard enough to work with at this size!

Shot with Pentax K200D and Jupiter-9 85mm f2.0 @ f2.8. Shot handheld, this time I made a conscious effort to keep my body still while shooting, to avoid the stitching errors I got the first time I shot.

I am much happier with this shot, so I will use it as my Project 52 shot for Week 3.