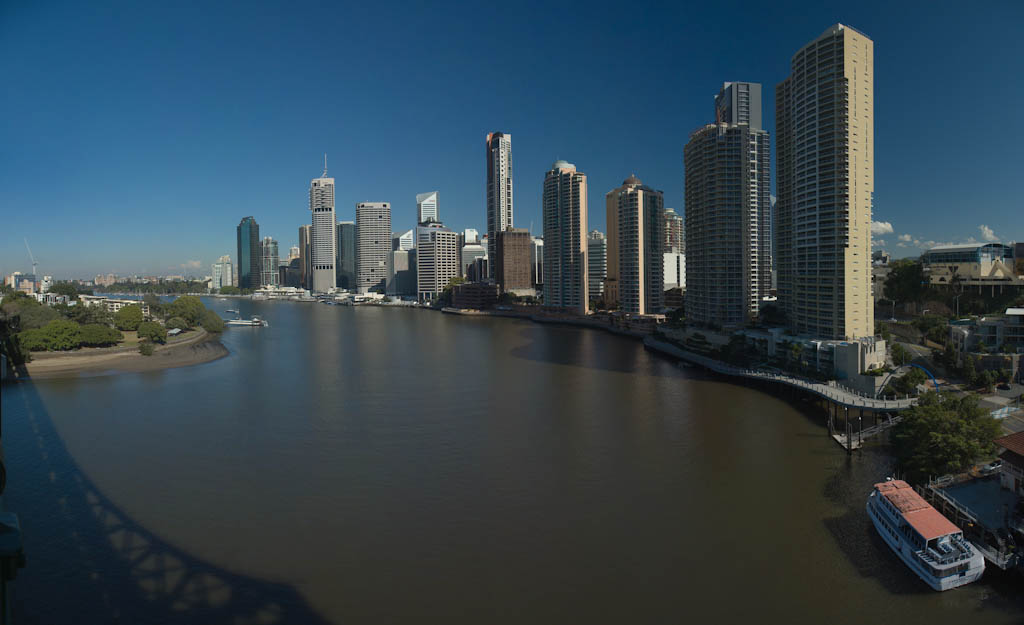
This is looking down part of the Brisbane Riverwalk. I took this shot from next to the Riverside Centre building, the main building in the shot is the Riparian Plaza and the building at the left is Waterfront Place.
Taken using Pentax K200D, Pentax SMC DA 18-55 AL II and Slik 500 DX Pro Tripod. This is a HDR Panorama, composed of 5 HDR images (I overlapped them a lot), each composed of 3 images shot at +2, 0, -2. Blended and Tone Mapped with Photomatix batch processor using Details Enhancer, and stitched using Autopano.
This is a shot of the Old Customs House in Brisbane. This is the view from the Brisbane Riverwalk.
This shot is another HDR Panorama, this time blended at stitched from 12 photos. It is stitched from 4 HDR images in a 2×2 layout using Autopano Giga, and each HDR image was shot at +/- 2.0 EV and then blended using Photomatix with the Batch Processing function, using Details Enhancer for Tone Mapping.
Shooting and Processing
- Shot all 12 photos in Pentax RAW (PEF), 4 lots of +/- 2.0 EV brackets
- Imported all images from memory card using Lightroom 2.5
- Exported all 12 photos to a new subfolder as 16bit TIFF files
- Opened Photomatix and ran Batch Process over the new subfolder
- Opened Autopano and selected the 4 resulting TIFF HDR images to stitch
- Rendered the created panorama to another 16-bit TIFF
- Imported final TIFF into Lightroom 2.5
- Edited white balance (its a hard one because the Riverwalk is lit with different colour lights to the lights on Customs House and cropped image
- Exported to JPG for Web
I haven’t posted for a few days as I was off exploring the world. A friend and I travelled to Springbrook National Park for a weekend of camping and photography, only to discover that the weather was against us. It rained very heavily most of the time, so not much photography happened!
Here are the first of the processed shots though.
This shot was taken using the Pentax DA 18-55 AL II lens @ 18mm. It is 3 HDR images stitched together (HDR’s were 3 images each @ +/- 2.0 EV). All shots were taken in Pentax RAW (PEF), imported to Lightroom 2.5, blended using Photomatix batch process with Details Enhancer (quite extreme one too!) and stitched using Autopano.
I also took another HDR panorama from the other side of the shed looking back to the bridge I took this shot from. This is the link to flickr
Well its been raining since the beginning of the weekend here now (on and off raining anyway). Here is a shot I got of some rain clouds in between the showers. Unfortunately the background is a boring grey rather than white or blue sky (or even better more cloud formations)
This is a 3 shot panorama. I shot using the K200D and Jupiter-9 85mm lens with aperture set to f5.6. I made sure to shoot the frames quickly so the movement of the clouds wouldn’t interfere with the stitching.
Shooting and Processing as follows:
- Shot in Pentax RAW (PEF)
- Imported into Lightroom 2.5
- Exported to 3x 16 bit TIFF
- Stitched using Autopano Giga
- Rendered to a single 16 bit TIFF
- Imported new TIFF into Lightroom 2.5
- Applied adjustments in Lightroom (clarity, contrast, white balance)
- Exported to JPG for Web
I am sitting here trying to process my Project 52 #3 photo, and it seems I failed at taking a good panorama. I have got numerous stitching errors in my Brenizer effect shot. I guess I must not have been still enough when taking the shots…
Some things just are not lining up…
Oh well, I guess Project 52 #3 may be a little delayed! I might have to take my tripod in, and try again another day.
FRUSTRATED!
Following on from my previous posts about panoramas, and the Brenizer narrow DOF panorama technique. I am briefly going to give Autopano’s panorama stitching software a plug, and explain how I use it. Autopano is one of the best panorama stitching applications around. I never have had any problems with it (that weren’t fixed by an update shortly later!) when stitching panoramas, even those as large as 100 shots.
I use Autopano Giga 2, although I really only use the features in Autopano Pro. My usual workflow for a panorama is as follows :-
- Shoot in Pentax RAW, Manual mode but Auto White Balance
- Import into Lightroom 2.5
- Set a custom white balance on 1 image from the panorama
- Select all images in panorama and sync the white balance to the value I chose.
- Export all images in the panorama to a new subfolder (eg. Pano-1) as 16 bit TIFF
- Open the new subfolder in an explorer window
- Open Autopano
- Create a new group in Autopano
- Select all the files in the subfolder in the explorer window, and drag and drop onto the new group in Autopano
- Edit the settings on the group in Autopano. Set the project folder to the subfolder location. Turn off Auto colour correction, sometimes I will increase the number of control points if there are few features in the images.
- Click the Detect button in Autpano, it will then stitch the images and render a small preview.
- Click the Render button in Autopano next to the preview. It will show a dialog with the render options. I render to a 16 bit TIFF with ZIP compression, and I change the output folder to be 1 above the subfolder (the same folder as the original import from camera). Also don’t forget to check the output size, if the panorama is not going to be printed extremely large, scale down the render, it will save a lot of time! And finally I change the filename to match the subfolder name, eg Pano-1.tif.
- Once rendering is complete, I return to Lightroom, library and synchronize the import folder, select Import new files, show import dialog before importing.
- Then I deselect the All option and only select the base import folder where I saved the panorama to.
- My Pano-1.tif file should now be present along with the original panorama frames in the library, I can edit it as I please (crop, curves, colours etc)
- And the final step is to export to JPG for publishing and also to DNG for archiving purposes.
Well that workflow took a more to write down than I expected. I hope it helps you out next time you are doing a panorama!
A Blog of my Photographic Journeys, Equipment, Techniques and Images.