Category Archives: By Camera

Cedar Creek Long Exposure


Cedar Creek 3 Falls
Originally uploaded by jezza323

Here is an older shot I took. This is of Cedar Creek just outside of Samford not far from Brisbane. No processing details from this one as it is from quite a while ago. Although I can promise that the PP was minimal, just some white balance tuning, tone curve and maybe a slight exposure adjustment.

This was taken quite early in the morning, the sun was still hidden behind the trees. I combined this with a circular polarising filter, and a Cokin P sized Tian Ya ND8 filter on my K200D with kit lens at 18mm and my trusty tripod.

The exposure was 8 seconds at f11.0 (where I find this lens to be the sharpest).

Post your water long exposure shots in the comments section!

Summer Storm vs Shutter Speed

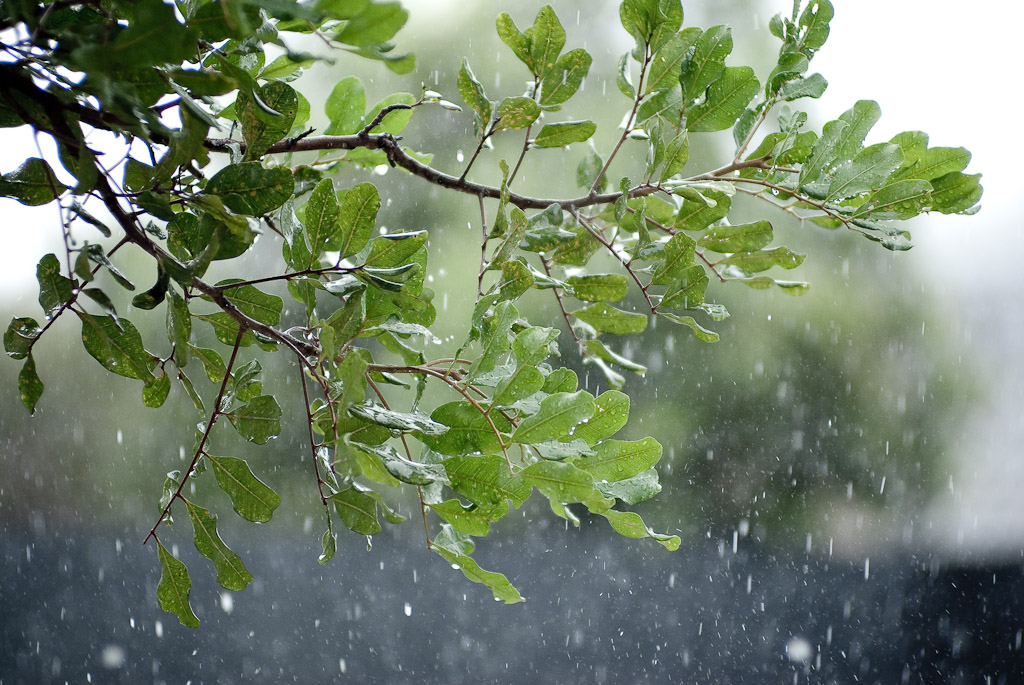
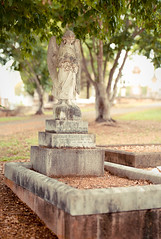
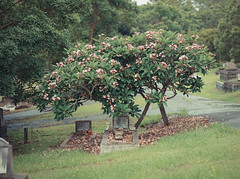
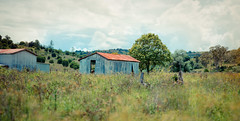
We just had a lunchtime summer storm roll through Brisbane, so while it was raining I took some shots of a tree near my house with the rain coming down on it. I thought it would be interesting to see the difference in the image of the rain with some different shutter speeds.

I setup my Pentax K200D on my tripod, mounted the Tair-11a 135mm f2.8 lens to get in close to some of the rain, and to keep the background blurred I set the aperture to f2.8. I set the camera to Aperture Priority mode (Av) to let it meter itself. The ISO was set to 400. This was the achieve a nice short shutter speed, and the resulting exposure was 1/640 sec and is shown below.

The following exposure I set the ISO to 100, and added a TianYa ND8 Cokin P sized filter in front of the lens (just held it by hand). This was to achieve a much longer exposure, and we end up with a 1/30 sec shutter speed and is shown below.

Take note of the difference in the rain drops. The first shot freezes the drops in mid air, while in the 2nd shot you get a long streak of falling water droplets. I personally prefer the first image, it conveys a sense of action to me that the 2nd image does not.

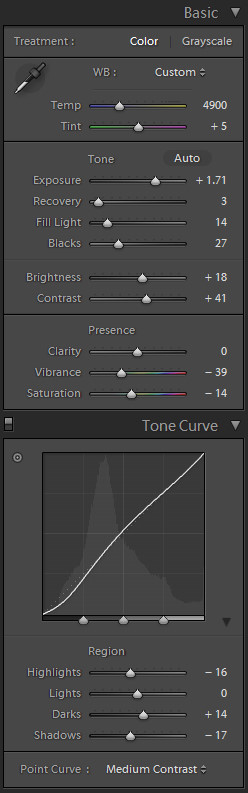
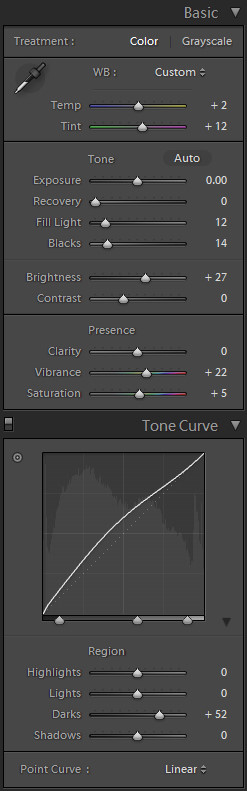
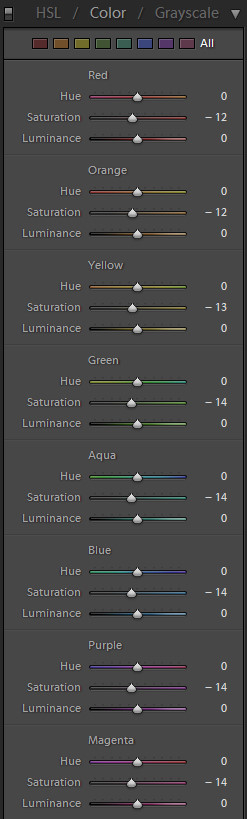
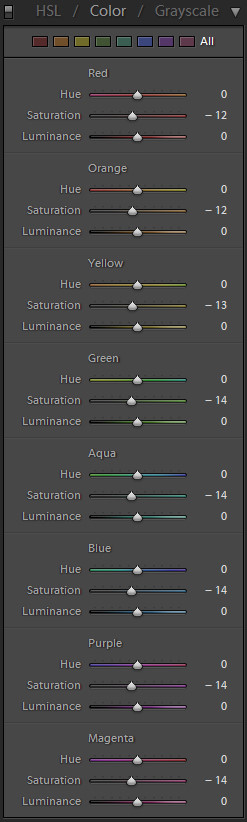
Processing on the first image was as follows :-

  • Shot in Pentax RAW (PEF)
  • Import into Lightroom 2.5
  • Processed as shown below (settings not show have not been altered)
  • Export to JPEG for Web

A Backlit Brenizer Angel


A Backlit Brenizer Angel
Originally uploaded by jezza323

Another Brenizer Panorama from the Toowong Cemetary taken yesterday. This one is again with the Tair-11a on K200D. Its 58 images stitched with Autopano Giga 2 and edited (cropped, curves, colours, exposure brush) in Lightroom 2.5.

Processing :-

  • Shot in Manual Mode, ISO 200, f2.8, 1/320 sec shutter – Pentax RAW (PEF), custom white balance.
  • Imported into Lightroom 2.5
  • All shots in pano exported to subfolder “Pano-5″ as 16 bit TIFFs
  • Stitched using Autopano Giga 2
  • Saved-as 16 bit TIFF
  • Imported result back into Lightroom 2.5 library
  • Edited in Lightroom as show below (click pics for more detail). I did use a preset for most settings. Also cropped but not shown.
Exposure Brush to show more detail in the Angel
Develop settings

Flowering about your Resting Place

Another Brenizer shot I took today in the Toowong Cemetary in Brisbane. This one was also taken with the Tair-11a 135mm f2.8.

  • 42 shots taken with K200D, manual mode, ISO 100, f2.8, 1/640 sec, custom white balance, shot in JPEG (to save space)
  • Import into Lightroom 2.5
  • Stitched with Autopano Giga 2
  • Save as 16 bit TIFF
  • Import result into Lightroom 2.5
  • Edit as shown below
Lightroom Edits (click for larger)

Rusted Shed on a Cloudy Day


Rusted Shed on a Cloudy Day
Originally uploaded by jezza323

This is a Brenizer pano of a shed I spotted on the side of the road near Minden, Qld. I shot it with my Tair-11a (135mm m42 mount) wide open (f2.8). It is a 45 shot panorama. I would have liked to get a bit closer, to narrow the DOF a bit more. But this is as good as I could get without gumboots.

Shot in JPEG (to save space on my card)
Stitched with Autopano Giga
Adjusted levels and colours in Lightroom 2.5
UPDATE: I have since re-cropped this image and re-posted, it works much better with a tighter crop.

Photobuddy for iPhone

I mentioned this iPhone app in a previous post briefly, but its worth its own post. You can find the official page here. It is VERY full featured and easy to use. It has the following things to offer a photographer :-

  1. Sunrise/Sunset time calculator based on location
  2. Exposure adjustments. Set an exposure (ISO / aperture / shutter speed) and add a filter, or adjust shutter speed to calculate what aperture is required for the same exposure etc.
  3. Exposure presets – some basic settings for certain situations, great for a camera with no light meter, or just to learn
  4. Depth of Field (DOF) calculator. Input your lens focal length, aperture and subject distance (you can calculate any 1 of these provided you have the others). You can then adjust various settings to work out how to get the depth of field you want.
  5. Flash calculator. Input your ISO, aperture, guide number and subject distance (you can calculate any 1 of these provided you have the others), then adjust as required.
  6. Angle of view calculator for your camera/lens combination
  7. Bracketing calculator for those manual mode HDRs (or if you want to do a larger EV variation than your camera’s bracketing mode allows)
  8. Distance calculator. Input your subject size and focal length and find out how far away you need to be to fit it all in the frame.
  9. Grey wedge screen. Displays a greyscale image on the iPhone screen for helping with colour adjustment. Of course its not that useful because the iPhone screen is not colour correct either.
  10. Colour Temp chart. Some common scenarios and  the associated colour temperatures.
  11. Bulb timer. Know how long since you started your bulb shot.
  12. Bellows compensation calculator. Calculate how much light you will lose for a given focal length and bellows (or extension tube) length.

The items I find most useful are the Bulb timer, I always use it for any bulb shots I do. The Exposure calculator and the sunrise/sunset calculator. These alone make it worth the asking price, let alone all the extra features!

Tair-11A 135mm f2.8

As I mentioned in an earlier post. I bought a Tair-11A M42 mount lens on Ebay. I have seen great shots from this lens on flickr, and read plenty of great reports on it. This lens is 135mm prime, aperture is a preset adjustment and ranges from f2.8 to f22. It focuses from 1.2m to infinity and has a small built in hood.

It truely is an amazing lens. Incredibly sharp, very smooth bokeh (out of focus highlights) and is a joy to use with a lovely smooth focusing ring. Here are some shots I’ve taken with it since it arrived.

First a bokeh test
Then this little bird came along
And to prove how sharp this lens is – this is a 100% crop of the bird from another shot
And a technique tester shot. A panorama to get the narrow DOF effect. I’ll explain this technique in a later post

A Late Christmas HDR


Christmas Lights At Dusk, originally uploaded by jezza323.

Buy art

Just thought I would share this shot I took on Tuesday 22nd December at King George Square in Brisbane’s CBD. This is a 3 shot HDR taken at +/- 2.0 EV steps, in Pentax RAW format (PEF). I took it using a my tripod, K200D and Pentax SMC DA 18-55mm AL II f3.5-5.6 lens with +2.0 EV bias (this means the shots is actually 0 EV +2 EV and +4 EV), no filters. I used the +2 starting EV to get more details from the christmas lights. The base shot settings were f13, 10 secs, ISO 100 in Av (Aperture priority) mode.

Processing was as follows

Lightroom 2.5

  • Import
  • Export all 3 files as 16-bit TIFF format

Photomatix

  • Generate HDR – settings shown below
  • Tone Mapped using Details Enhancer method – settings shown below
  • Save As 16-bit TIFF
Lightroom
  • Import
  • Crop (rotated slightly)
  • Export to JPG for Web