Category Archives: Landscapes

Twin Falls, Springbrook National Park

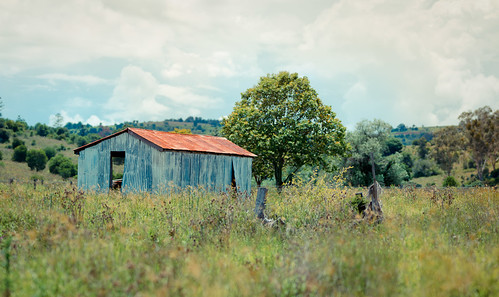
This is a HDR of the Twin Falls waterfalls at Springbrook National Park in the Gold Coast Hinterland. It was a very cloudy and very wet weekend, so I had to use HDR to prevent the sky from blowing out badly.

These falls are quite high and an impressive sight. If the weather were better I would have been keen for a swim in the pool. Maybe next time :-)

This was blended from 5 photos. To get the 5 shots, I set the camera exposure bias to -2.0 EV, then took 3 bracketed shots at /- 2.0 EV (giving -4, -2 and 0 EV) then quickly set the exposure bias to 2.0 EV and took 3 more bracketed shots (giving +4, +2 and 0 EV). I then have shots ranging from -4 to +4 EV in 2 EV steps. I delete 1 of the duplicate 0 EV shots and blend the remaining 5 in Photomatix.

This is a neat little trick if the normal +/- 2.0 EV bracketing is not enough for the scene being shot. In this case the white cloud above the waterfall was blown out in every shot except -4 EV.

Antarctic Beech Trees

Here is another HDR Panorama I took at Springbrook National Park on the weekend. These are Antarctic Beech Trees, which are quite rare, as you will notice if you read the wikipedia article. This shot was taken with the K200D, Pentax SMC DA 18-55 AL II kit lens, and Slik 500DX Pro tripod. It was raining lightly when I took the shot. I setup the tripod just on the inside of the fence which protects the trees from the path.

It was because I was so close that this had to be a panorama. I was not able to fit the base of the trees in the shot. I was also forced to use HDR for this shot due to the extremely bright white clouds behind the tree trunks. I did not want to lose the detail in the roots.

The shoot and processing details are as follows

  • Shot in Pentax RAW (PEF)
  • Imported into Lightroom 2.5
  • Exported to 16 bit TIFF
  • Exposures blended using Photomatix Batch Processing with Details Enhancer Tone Mapping
  • Photomatix resulting images were then stitched using Autopano
  • Resulting panorama was imported back into Lightroom 2.5
  • Minor adjustments made in Lightroom
  • Exported to JPG for Web

A Rainy Weekend of Camping


Peaceful Outlook
Originally uploaded by jezza323

I haven’t posted for a few days as I was off exploring the world. A friend and I travelled to Springbrook National Park for a weekend of camping and photography, only to discover that the weather was against us. It rained very heavily most of the time, so not much photography happened!

Here are the first of the processed shots though.

This shot was taken using the Pentax DA 18-55 AL II lens @ 18mm. It is 3 HDR images stitched together (HDR’s were 3 images each @ +/- 2.0 EV). All shots were taken in Pentax RAW (PEF), imported to Lightroom 2.5, blended using Photomatix batch process with Details Enhancer (quite extreme one too!) and stitched using Autopano.

I also took another HDR panorama from the other side of the shed looking back to the bridge I took this shot from. This is the link to flickr

More Digital Infrared (IR) Photography


Mt Cootha Sunrise in IR
Originally uploaded by jezza323

Here is another shot I took recently with my R72 type filter. In this case I used a Hoya R72 filter mounted to my Pentax K200D & Pentax SMC DA 18-55 AL II combo.

This shot was processed entirely in Lightroom 2.5 (no photoshop trickery going on here!). You can see here the effect quite well, the sky is nice and dark, while the trees are a bit brighter than they would otherwise be. If you compare closely to the image below you can see the difference quite well. The general contrast is also much stronger.

This is the same shot, but taken without an IR filter, just converted to greyscale in Lightroom.
And here is the IR shot in colour (with corrected White Balance and Exposure in Lightroom 2.5). This is what was coverted to greyscale to get the IR image above.

Infrared Digital Photography with an R72 Filter


Botanic Gardens in IR
Originally uploaded by jezza323

This shot is from me playing around with an IR 720nm filter. This type of filter blocks all light below the 720nm wavelength. This means some reds, and infrared are the only light which can pass through. By using 1 of these filters on your camera, you will get some interesting results.

Unfortunately most modern cameras have an IR reduction filter mounted to the front of the sensor, which means that blocking visible light will result in very long exposures being required. This particular shot was taken in broad daylight, at f11.0, ISO 200 and required a 30 second shutter speed! 30 secs in broad daylight is quite a lot. A typical exposure in this situation would be around about 1/400 sec!

The main features of IR photography are black skies, and white leaves on trees and grass. This results in cool contrasty shots where things are just a little different to the norm.

Rocks Floating on Clouds


Rocks Floating on Clouds
Originally uploaded by jezza323

This is an old shot I thought I would share. It may not be immediately obvious to everyone how you get this effect of the cloud-like water.

This effect comes from the movement of the water during a long shutter exposure. In this case it is also accentuated by blending 2 shots together, similar to a HDR.

This was shot using the Pentax K200D and Pentax SMC DA 18-55 AL II lens. I also used TianYa ND8 filter and TianYa ND8 grad filters in a Cokin P holder. These filters block out light, so allow you to use longer shutter speeds, and enhance the cloud-like effect.

To get my 0, -2 EV images which I later blended, I set my camera to bracketing mode, and +/- 2.0 EV steps. I have also set my camera to shoot those steps in 0, -2, +2 order. For this shot the sky was becoming a bit blown out when getting the exposure I was after for the foreground, so I set the base exposure to what I wanted for the foreground, then shot 0 and -2 EV only (I didn’t bother shooting the 3rd bracket).

In Photomatix there is the option of “Exposure Blending” as opposed to “Generate HDR”. I selected this option, my 2 images, and the Average method.

Project 52 – #4 – Mt Cootha Lookout

 
This is a 5 shot HDR of the sunrise from Mt Cootha Lookout, which overlooks Brisbane’s CBD and surrounding suburbs. This is landmark #4 in my Project 52 Brisbane Landmarks for 2010.

I have already posted this shot on the blog as a general shot with full processing info, so check that out if you are interested

Australia Day Sunrise

Happy Australia Day to all the Australians :)

This shot is from a few moments before sunrise yesterday morning (Australia Day, 26th Jan 2010) from the Mt Cootha Lookout in Brisbane. The Brisbane CBD and surrounding suburbs are visible in the shot.

The shot was taken using my Pentax K200D, Pentax DA 18-55 AL II, Slik 500DX Pro tripod and Kenko CPL filter. It is a HDR shot blended from 5 images, taken at -4, -2, 0, +2, +4 EV steps using Photomatix 3.1 and Tone Mapped using the Details Enhancer. I outline how I did this below.

Shots used were all at 18mm, ISO 100 and f13. Shutter speeds were 1/20sec, 1/80sec, 1/5sec, 0.8sec, 3.0sec

Shooting and Processing as follows:

  1. Shot in Pentax RAW (PEF)
  2. Set Exposure Compensation to -2.0 EV
  3. Shot 3 bracketed shots at +/- 2.0 EV (giving -4, -2 and 0 EV shots)
  4. Set Exposure Compensation to +2.0 EV
  5. Shot 3 bracketed shots at +/- 2.0 EV (giving +4, +2 and 0 EV shots)
  6. Imported into Lightroom 2.5
  7. Applied the settings shown below to all 6 images (the first image)
  8. Exported all 6 images to full quality JPG
  9. Deleted the worst of the 2 0 EV shots (this is only 5 images remember!)
  10. Blended the remaining 5 images in Photomatix
  11. Tone Mapped in Details Enhancer using the settings show below
  12. Saved as JPG
  13. Imported HDR JPG into Lightroom 2.5
  14. Applied the settings shown below in Lightroom (last image)
  15. Exported to JPG for Web

Brenizer Shed Recrop


Brenizer Shed Recrop, originally uploaded by jezza323.

Buy art

This shows how cropping can really change an image (well I think so).

Compare to the original which I blogged a while back. It was just bland shot, with a distracting shed on the left of frame, and you couldnt really see the narrow depth of field, except that the foreground was out of focus.

In this tighter crop, you no longer have the distraction on left of frame, and you can see the sharp outline of the shed and tree as compared to the background.

If you like this shot, have a read of my Tair-11a Lens Review or have a look at my other Tair-11a shots

Picnic By the Lake, Under the Tree

This is another Brenizer Panorama I took yesterday at the Mt Cootha Botanic Gardens. Shot with the Pentax K200D and Tair-11a 135mm f2.8 lens, at 2.8.

Shooting and Processing as Follows

  • Shot in Pentax RAW (PEF) – 94 shots
  • Import into Lightroom 2.5
  • Export to 16 bit TIFF with ZIP compression
  • Stitched using Autopano Giga 2
  • Rendered to 16 bit TIFF
  • Imported into Lightroom 2.5
  • Heavy crop (94 images was for a much bigger scene, but I only liked this part of it)
  • Edited as shown below (Basic tab only)
  • Export to JPG for Web

If you like this shot, have a read of my Tair-11a Lens Review or have a look at my other Tair-11a shots