Subway


Subway, originally uploaded by jezza323.

Buy art

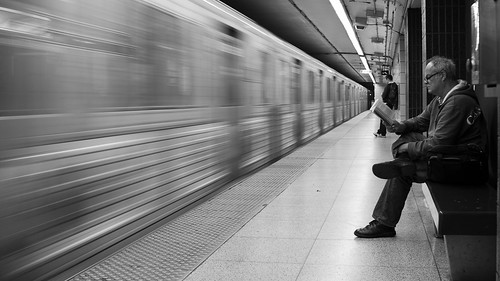
The final shot which I will blog from my Saturday morning walk in downtown. I was finished up, so I headed down to the subway to go home.

Packing Up

As I sat there removing the Tair-11a from my Pentax K200D body, and the tricky M42 adapter ring, I noticed this man reading quietly next to me. Looking down the platform I decided it would be worth getting a shot of the train pulling into the station.

Preparation

I popped the Sigma 30mm lens on, dialed in a slowish, but not too slow exposure and waited for the train to arrive. Fortunately my subject remained seated and reading until the train came to a complete stop, so I was able to get the shot I was looking for. I actually fired off 4 quick shots (I often do this if shooting a slower shutter speed, as 1 of them is bound to be sharp enough). It is a kind of cliche shot but I enjoy it.

Processing

All editing was done in Lightroom. I cropped the image to a 16:9 ratio (I do enjoy 16:9), adjusted the levels a tiny bit, made it black and white, then increased the contrast quite heavily.
Blog Update

As you will have noticed, I am back and being active on both flickr, and here. As a part of that I plan on making a few changes to the layout and look of the blog over the coming weeks, so don’t be suprised if you notice things changing (or if you have noticed changes already). And please let me know if you see any problems, have any suggestions, or have any comments on the changes I’m making.

Always moving

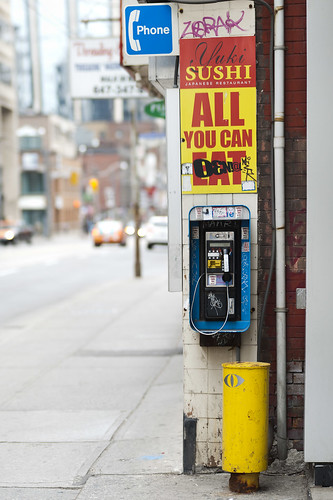
All You Can Eat

All You Can Eat, originally uploaded by jezza323.

Buy art

Saturday Morning Photography

So here is another Tair-11a brenizer method shot from my Saturday morning pre-rain wander down University Av. I spotted this little sign and phone off a side street and decided it was interesting. I wanted to get this in 1 shot, but some objects in the foreground meant I had to get closer, which turned it into yet another Brenizer method photograph.

Failure

It actually took me 3 goes to get this shot right. It really has been a while since I have been out shooting. This image is made up of 12 photographs, all taken at f2.8 with my Tair-11a 135mm lens on my Pentax K200D body. I made sure the body was in manual mode, this is to ensure an even exposure across the panorama image. I set the manual aperture on the lens to f2.8, for minimum depth of field, then set the exposure to suit the part of the scene which I was most interested in (the phone in this case). Finally I started shooting the panorama images required. For some strange reason on my first attempt I forgot to focus the image properly, it must have looked ok through the viewfinder, but as I was walking away I did a quick check on the camera screen, and promptly returned for a 2nd attempt.

Fail Again

The 2nd attempt failed because I was rushing, and the shutter speed was too slow, meaning I had a bit of blur from my shaky hands messing up the images. Again I noticed this as I went to walk away whilst checking the image on the camera.

Success

Finally on the 3rd attempt, I adjusted the ISO up from 100 to 200, giving me a faster shutter speed. I slowly and carefully shot the panorama, keeping my hands steady and relaxed. This time I checked the shots before I started walking away, and was finally happy with the results.

Processing

For processing I used Lightroom to export the original RAW files to TIFF format, which I then stitched using Autopano Giga, and then made a few minor levels adjusts and cropped the image after re-importing into the Lightroom library. Enjoy!

Niagara Falls

Niagara Falls, originally uploaded by jezza323.

A close up shot of the Horseshoe (Canadian) Falls at Niagara Falls. You can really see the power of the water here!

I went for an early morning walk on our last day (Victoria Day) while there were not too many people about. It was a beautiful clear sunny morning, but the spray was quite intense, and the harsh light made for difficult shooting conditions. I walked up to the falls, then took this shot on the way back.

This was a single exposure, taken with my Pentax K200D and Tamron 17-50mm len with a Kenko Pro-Digital CPL filter fitted. All editing (levels and tiny straighten) were done in Lightoom 3.

Skylon Tower


Skylon Tower, originally uploaded by jezza323.

This was taken from our hotel room when we spent the Victoria Day weekend down at Niagara Falls.

Skylon Tower is an observation tower built overlooking both the falls at Niagara. It is quite a sight all lit up at night.

I took this one handheld (I have no tripod anymore – see here for why) but it came out very sharp anyway. I pushed the ISO to 1600 (the highest my old K200D goes) and kept the lens as wide as I dared. The camera’s inbuilt Shake Reduction function also helped a lot for this shot. The exposure was 0.1s @ f4.0. Unfortunately I forgot to remove my Kenko Protection filter, so there are a few slight reflections doubling up in the shot. This happens with night shots as light reflects off the front lens element, then off the inside of the filter and back into the camera.

I edited this single exposure in Lightroom 3. I made use of the Noise Reduction, which is much improved from Lightroom 2. I also played with the levels and gave the shot a slight crop.

American Falls

American Falls, originally uploaded by jezza323.

This is the American Falls at Niagara Falls, viewed from the Canadian side of the border. I took this one quite late in the evening, on an after dinner walk. I was so stuffed full of food I had to walk some of it off.

This is a 3 shot HDR, taken at +/- 2.0 EV with the Pentax K200D and Tamron 17-50mm f2.8 lens.

I blended the shots with Photomatix and made some final adjusts in Lightroom.

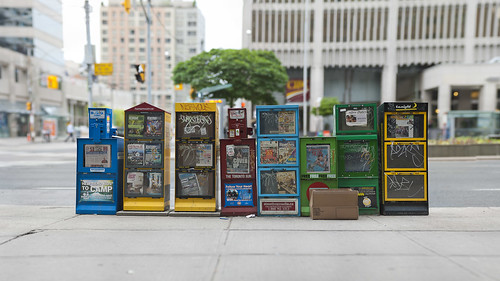
Newspaper?

Newspaper?, originally uploaded by jezza323.

Buy art

I managed to beat the rain out and about in Toronto this morning. Its been a while since I been out just to take photos. Its good to be back on the horse!

This is a Brenizer panorama I took of some newspaper and magazine stands near St Patrick Subway Station in downtown Toronto. This one was 93 separate shots, all taken with my Pentax K200D and Tair-11a 135mm f2.8 lens. I set the camera to Manual, dialed in the correct exposure and then started shooting.

I imported the RAW files into Lightroom from the SD card. Next I exported the images as TIFF files to a separate folder (to make the stitching process quicker, I exported the TIFFs to only 1280×1280 max size), which I then ran Autopano over to generate the final panorama. Finally I imported the panorama back into Lightroom, made a final crop, distortion and level adjustment. The image is still slightly distorted, but this comes from the projection of the panorama, and I wasnt quite able to get it spot on.

If you like this shot, check out my Tair-11a lens review and my post about the Brenizer Method / Bokeh Panorama technique.

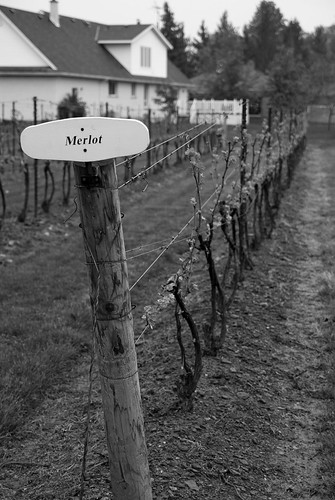
Time for a Merlot

Time for a Merlot, originally uploaded by jezza323.

I took this one in the rain, on a nice Sunday spent on a Niagara Wine Tour. The tour was great, it was a small group. We visited 4 wineries, and got an accidental (free) 3 wine tasting at lunch as well!

This shot was taken at the 2nd winery we visited, Reif Estate Winery in Niagara. They had there rows neatly labelled, which compelled me to take a photo. This is a single shot, taken with my Pentax K200D and Tamron 17-50mm f2.8 lens at 50mm and f3.5

As you can see it was early spring and the vines were just starting to shoot for the new season. I am looking forward to going back to the Niagara On The Lake area, maybe on a bicycle and having more of a look around.

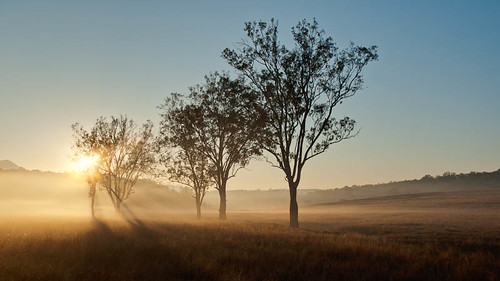
And The Sun Also Rises


And The Sun Also Rises, originally uploaded by jezza323.

Buy art


This is a shot back from my Fog chasing morning in Brisbane. I only just realised I hadn’t posted it up here!

This was my favourite photo of the day, I hope you enjoy it too.

This was taken with my Pentax K200D body, Tamron 17-50mm f2.8 lens. I took the shot with the exposure bias set to +2.0 EV, then took 3 exposures at +/- 2.0 EV, which meant I ended up with 0, +2 and +4 EV shots based on the camera’s inbuilt metering.

The reason for increasing the bias for this shot was because the shot was taken towards the sun, meaning the camera’s metering system would severely underexpose the foreground of the image, in an attempt to prevent the sun from blowing out too much. By altering the bias, I was able to get the detail in the foreground that I required.

I then used the LR/Enfuse plugin to Lightroom to blend the 3 exposures into the image you see here, along with a few final tweaks to the levels and cropping.

A Blog of my Photographic Journeys, Equipment, Techniques and Images.