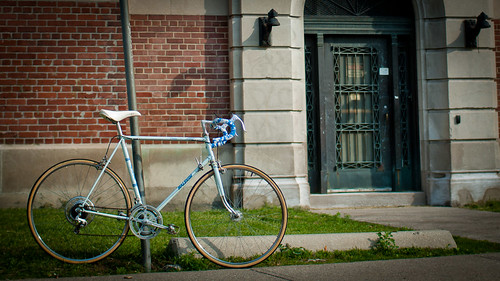
This is the bike I bought through Craigslist not long after I arrived in Toronto. It is an old Raleigh Grand Prix, with 27″ wheels and very cool original pale blue paint. I went for a ride around last weekend and took plenty of shots. I decided to get some shots of the bike while I had it with me.
Finding Interest
This shot was a little over exposed and not very interesting off the camera. Some playing around in Lightroom with a fairly heavy crop, some use of the Old Polar preset and a bit of a vignette produced this image, certainly worth posting.
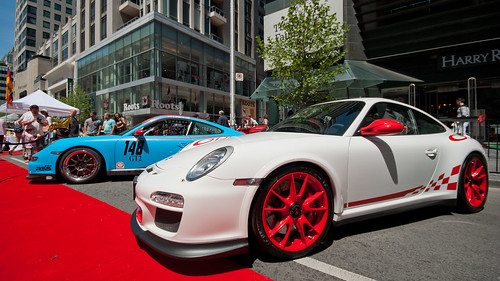
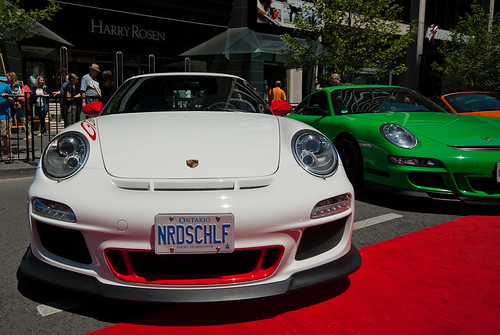
Another nice car from the Yorkville Exotic Car Show on Sunday. This Porsche GT3 RS certainly was eye catching, the Ice White combined with the bright orange/red of the highlights made it easy to spot. It also had an interesting numberplate, as you seen in another shot I took here. Makes you wonder if the owner has taken the car there?
As per the previous shot posted, the lighting was harsh, and the crowds were immense. The best way I found to get around the crowds was to get right up against the barriers with the wide angle lens to capture the cars without people all over the shot. To help with the lighting I used lightroom and bumped up the fill light quite a lot to bring out the detail in the shadows.
I went for a wander down to the Yorkville Exotic Car show yesterday, and the Porsche club had this beautiful Porsche 356 on display. It is clearly very well looked after, but not babied, with a number of historic rally participation stickers adorning its window and front bumper. The only things this car was missing are chrome bumpers and the chrome hubcaps. I am pretty confident that the owner would have these parts tucked away safely, they wouldn’t be worth risking in motorsport events.
Hard to Get a Good Angle in Good Light
It was so busy, with so many people there to see the cars. The only way I could get reasonable shots of the cars without people in the way was to get right up against the ropes, and use my wide angle Sigma 10-20mm lens at the wider zooms. It was also very bright, which made for some harsh lighting and shadows, but a big bump in “Fill Light” in Lightroom has helped balance out the lighting without introducing too much noise.
Thanks!
Big thanks to the owner of this car for putting it on show, it was great to see it. And congratulations on a magnificent Porsche as well!
I had seats in Grandstand #21, which luckily happened to be right next to the entrance to the track, as well as having a great view of the hairpin. This is the view from the edge of the stand, my seats were a bit off to the left of the photo, but the view was almost as good!
Shooting the Panorama
This panorama was shot using my Pentax K200D and Tamron 17-50mm. I took about 10 shots in portrait orientation at 17mm, with lots of overlap to give me the best chance of a successful panorama. It worked out very well considering the challenges of the image, and only the railing of the grandstand and some minor problems from moving people were encountered.
Harsh Lighting
It was a very bright sunny day which meant the shadows were quite harsh, so, once Autopano had stitched the image together for me, I loaded the single TIFF file into Photomatix and generated a low key HDR. This is the result, good view isn’t it?
Carn Webber!
To make the panorama extra special, that is my favourite driver Mark Webber in his Red Bull Racing car approaching on the right side of the image. Webber finished the race weekend 3rd, after being hit and spun in the 1st corner of the race, a good comeback! It was also a very spectacular race, Jenson Button won the race after a come from behind victory. During the race he had a drive through penalty, a flat tyre and was run into by his own team mate! What a performance.
I was lucky enough to be able to spend last weekend in Montreal for the Formula 1 Grand Prix du Canada. Unfortunately I didn’t get to see much of Montreal itself, but I saw lots of the Grand Prix!
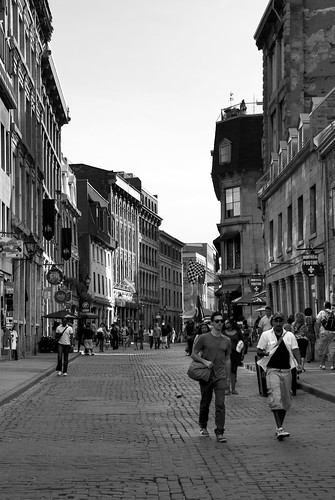
Old Montreal
This shot was taken on our first evening, we caught the Metro into Old Montreal to have a look around, as everyone had recommended we go there. Old Montreal had a very European feel about it; it has cobblestone streets lined with old buildings full of restaurants, pubs and gift shops. Well worth a visit if have the chance.
Photo & Processing
This is a single exposure taken with my Pentax K200D and Tamron 17-50mm f2.8 lens. I made sure to set the zoom to around about 35mm so there was minimal distortion in this shot.
Due to it being late evening the shadows were quite dark, and to help bring up the detail a little I decided to have a go at doing a single exposure HDR. I did a quick Tone Map in Photomatix, imported back to Lightroom (the Photomatix Lightroom plugin is really handy for this btw) and finished off with a slight crop and conversion to black and white.
Result
I quite like this photo, its a shame the shutter speed was a little slow, as it means some of the people’s features are a little blurred. How do you think it turned out? It is always good to have something to work on for next time.
As mentioned previously, I was looking for a new Point & Shoot camera and had thought the Canon Powershot ELPH 300 HS (also known as the IXUS 220 HS) fit my requirements. Yesterday afternoon I went down to Henry’s Camera store in downtown Toronto and purchased one. Mainly this will be my wife’s camera, but I intend to make use of it when I want to try shooting some more timelapse’s with CHDK or when carrying my SLR around proves to be a problem.
Why the ELPH 300?
The main reasons I chose this camera over others are:
24mm equivalent lens (wider than most point and shoot cameras)
A new CMOS sensor for low light performance (this model was only released in March 2011 so its nice new sensor technology)
HD video; 1080p and 720p are available, as well as lower quality modes
Size, it is a very small camera
It is a Canon, which means it can run CHDK (eventually)
What Is CHDK?
CHDK stands for Canon Hack Development Kit, and it allows you to unlock many features on most Canon Point and Shoot cameras. It works by placing a custom version of the software which runs on your camera onto your memory card, which is then loaded by the camera on startup. The custom software allows you do all sorts of things you couldn’t otherwise do on the camera, such as save images in RAW format, full manual exposure controls, in camera HDR and my favourite which is running scripts. A great benefit of CHDK is that the software is loaded on startup from the memory card which means there is no need to modify the software which exists on the camera. Modifying on camera software (the camera’s firmware) can be a risky process which can result in a bricked (unusable) camera. With the method CHDK uses you can simply flick the write protect switch on your SD card or swap to another SD card and be back up and running with the standard software immediately!
So What is the Point
Why would you want these extra features? These are my favourite features, a full list of features can be found on CHDK Wiki.
RAW Format
RAW mode allows you to get more data from the camera’s sensor into your image. JPEG is a lossy format, which means not all of the information the camera gets from its sensor ends up in your image file. Usually this doesn’t cause any problems, but if you want push the processing of an image to the extremes then RAW format will allow you to access extra information, usually in the form of more bits/pixel than the JPG format allows. RAW files are also larger than JPG files, so make sure you have plenty of memory available.
HDR
In camera HDR is another great benefit of using CHDK. It can be setup so a single shutter press will capture various exposures and automatically blend them all into 1 file, allowing greater dynamic range in your photograph. It is like taking 3 exposure bracketed shots on your SLR and processing them in Photomatix all with the press of the shutter button!
Manual Controls
CHDK’s extensive menu system allows you to change pretty much any setting in the camera, even those you would not normally have access to. For example, you are able to adjust the camera’s focus setting. This gives you the ability to focus manually, or even ask the camera to calculate the Hyper Focal distance for your current focal length and set the focus to that. There are so many settings you can adjust that I couldn’t possibly mention them all here.
Scripts
The scripting feature of CHDK is definitely my favourite. The script feature allows you to load a small file onto your memory card which can automate various tasks on the camera. The main use I have for this is a timelapse script. A timelapse script, once started, will automatically take images at a predefined interval, giving you the images you need to generate a timelapse video. Another script I have looked at briefly is the motion capture script which takes a photo anytime something moves, it is reported to be fast enough to capture lightning! Again these 2 scripts are just some examples of the many scripts you can run on the camera. You can write your own or see what you can find on the internet.
CHDK on the ELPH300 HS (Ixus 220 HS)
The Canon ELPH 300 HS is a new model released in March 2011, this means at the point of writing this post an official CHDK release for the camera does not yet exist. The CHDK software needs to be rewritten to suit each camera model released, and because this is done by volunteers in their own time it can take a little while. To see the current state of CHDK on the new Canon ELPH 300 HS camera you can visit the ELPH 300 page on the CHDK Wiki. If the information on this page is not detailed enough you can have a look on the CHDK forums to see how the porting process is progressing. A quick search for “Elph 300″ should turn up any progress reports.
At this stage there has only been 1 attempt to port the software which was abandoned soon after it began. In time I expect to see the software successfully running on the ELPH 300. Be patient.
Update (21/06/2011): A member of the CHDK forum has picked up the porting process where the previous attempt left off, good luck!
Update (12/08/2011): Unfortunately there has been no action on the development forum for a while now, hopefully some more people are buying the camera and we will see some progress soon.
Update (26/11/2011): First build of CHDK for the ELPH 300 HS/Ixus 220 HS is now available for testing! See the thread here on the CHDK forum for details,
Where is the Review!
I will be posting a review on this camera when I have really tested it out, so keep an eye out here or subscribe to my feed to make sure you don’t miss out.
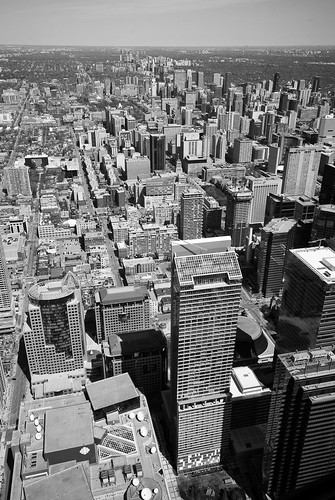
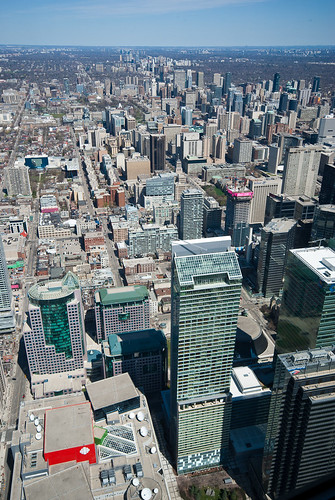
This is from when I first arrived in Toronto. My wife and I got ourselves a CityPass which allows you entry into the most popular attractions in the city at a reduced cost. I can highly recommend the CityPass, as you save an awful lot over paying the individual entry fees. One of the places a Toronto CityPass will get you into is CN Tower. The viewing area there gives an amazing outlook over the city, Lake Ontario and the islands.
The View
This is a shot looking North from the tower over the Toronto Entertainment District, with the Financial District on the right, and the line of building’s stretching towards the horizon is Yonge St. I had originally posted this shot to flickr in colour, but about 3 weeks later I was reviewing all the photos I had taken since we arrived, and decided to give black and white a try. I made a virtual copy in Lightroom, converted to black and white then adjusted the levels somewhat to come up with this image. I think it works much better than the colour version.
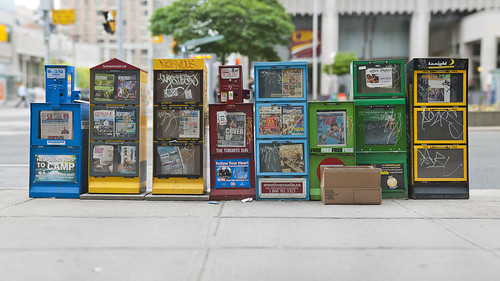
I received a suggestion that perhaps a cropping of my previously posted photograph “Newspaper?” would improve the result. If you would like to know how I produced this photograph, please read the original article.
What Do They Know?
Initially I thought “No way, are you kidding? It’s perfect!” as someone often does when considering their own work. After a short amount of consideration, I opened Lightroom and made this crop. Though I remained unconvinced I thought I would publish the recrop anyway.
Maybe They Were Right
Now that it comes down to a comparison, I do believe I prefer this crop to the original. I think it highlights the point of focus and the out of focus effect of the image more than the original. I think this crop also shows more clearly what the subject of the photograph is.
What About You?
So which do you prefer? This one? Or the original? And why?
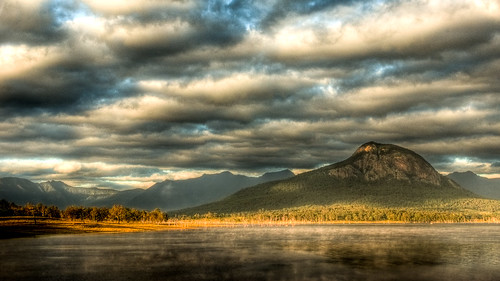
Here is a very old shot. I took this on my Lake Moogerah camping trip, early morning, mist rising off the lake, a few clouds about…
What more could you ask for?
This is quite harsh HDR processing, it has brought out a bit of noise, and makes the clouds seem a bit dark and threatening. Normally I don’t go for this more extreme processing, but it just seemed to work best for this image.
The shot was blended from 3 exposures taken at +/- 2.0 EV using my Pentax K200D and the old kit lens Pentax DA 18-55mm AL II (I sold this lens a while back now). The blending was done using Photomatix, tone mapping was done using the Details Enhancer method and final editing was done in Lightroom.
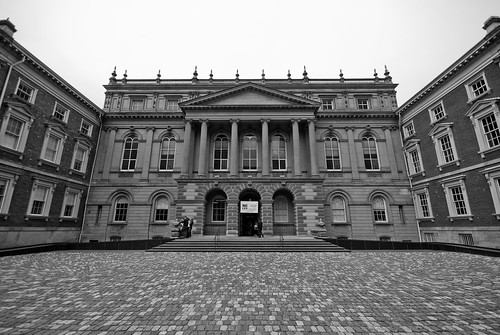
This photo shows Osgoode Hall and was taken during Doors Open Toronto. Osgoode Hall is found on the corner of University Av and Queen St West in downtown Toronto. This previous post is from inside the Great Library of this building.
Colour or Black & White?
I originally posted this shot to Flickr in colour, but looking at later I realized it would probably work even better in black & white. I think it does, what do you think? Black & White or Colour?
Photo Details
The photo is a single exposure, taken with my Pentax K200D and Sigma 10-20mm f4.0-5.6 lens at full wide 10mm. The only editing was levels and cropping in Lightroom.
A Blog of my Photographic Journeys, Equipment, Techniques and Images.