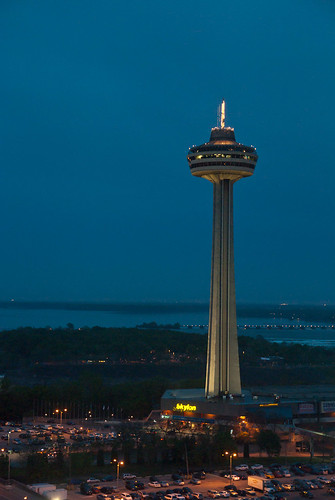
This was taken from our hotel room when we spent the Victoria Day weekend down at Niagara Falls.
Skylon Tower is an observation tower built overlooking both the falls at Niagara. It is quite a sight all lit up at night.
I took this one handheld (I have no tripod anymore – see here for why) but it came out very sharp anyway. I pushed the ISO to 1600 (the highest my old K200D goes) and kept the lens as wide as I dared. The camera’s inbuilt Shake Reduction function also helped a lot for this shot. The exposure was 0.1s @ f4.0. Unfortunately I forgot to remove my Kenko Protection filter, so there are a few slight reflections doubling up in the shot. This happens with night shots as light reflects off the front lens element, then off the inside of the filter and back into the camera.
I edited this single exposure in Lightroom 3. I made use of the Noise Reduction, which is much improved from Lightroom 2. I also played with the levels and gave the shot a slight crop.
This shot is from me playing around with an IR 720nm filter. This type of filter blocks all light below the 720nm wavelength. This means some reds, and infrared are the only light which can pass through. By using 1 of these filters on your camera, you will get some interesting results.
Unfortunately most modern cameras have an IR reduction filter mounted to the front of the sensor, which means that blocking visible light will result in very long exposures being required. This particular shot was taken in broad daylight, at f11.0, ISO 200 and required a 30 second shutter speed! 30 secs in broad daylight is quite a lot. A typical exposure in this situation would be around about 1/400 sec!
The main features of IR photography are black skies, and white leaves on trees and grass. This results in cool contrasty shots where things are just a little different to the norm.
This is a full list of all my photography gear, I will try my best to keep it up to date as I buy and sell various things
Camera Body
- Pentax K5-II
- Pentax K200D
- Canon Powershot A590 IS (running CHDK software) – LEFT BEHIND
- Canon Powershot ELPH 300HS (my wife’s camera)
- Pentax Q
Pentax Lenses
- Pentax SMC DA 18-55mm AL II f3.5-5.6 - SOLD
- Pentax SMC A 50mm f1.7 – SOLD
- Pentax SMC M 50mm f1.7 (has fungus) – BINNED
- Pentax SMC M 28mm f2.8 – SOLD
- Pentax SMC FA 100-300mm f4.7-5.8 – GONE
- Pentax F 35-70mm f3.5-4.5 - SOLD, BOUGHT NEW COPY
- Pentax Q 01 Prime 8.5mm f1.9 (47mm equivalent)
- Pentax Q 02 Zoom 5-15mm f2.8-4.5 (27.5-83.0mm equivalent) - SOLD
- Pentax Q 03 Fisheye 3.2mm f5.6 (17.5mm equivalent)
Russian Lenses
- Jupiter 9 85mm f2.0 M42
- Tair 11-A 135mm f2.8 M42
- Mir 1 37mm f2.8 M42 – SOLD
- Helios 44-2 58mm f2.0 M42 – SOLD
- Tair 3-Phs 300mm f4.5 M42
Others
- Sigma 30mm f1.4
- Sigma 10-20mm f4.0-5.6
- Sigma 70-200mm f2.8 II APO DG EX MACRO (w HSM)
- Sigma 150-500mm f5.0-6.3 APO DG OS (w HSM)
- Tamron 17-50mm f2.8 - SOLD
- Hanimar 135mm f2.8 M42 - SOLD
- Soligor 135mm f3.5 M42 - SOLD
- Vivitar 135mm f3.5 M42 - SOLD
- Pentacon 30mm f3.5 M42- SOLD
- Vivitar 35mm f3.5 M42 (loose rear elements, its my paper weight)- BINNED
Lens Accessories
- Lens cleaning brush
- Lens Cleaning tissues
- Lens cleaning cloths (lots of these) – 3 packs are available from DealExtreme
- Giottos Rocket Blower Medium
- 67mm -> 77mm filter step up ring (allows 77mm filter on a 67mm threaded lens)
- Kenko SHQ 1.5x Teleconverter, works with SDM/HSM lenses
- Quantaray 2x AF Teleconverter
- Vivitar Auto Teleconverter 2x-22 (allows wide open focusing but has no contacts and no autofocus) – SOLD
- Vivitar Auto Extension Tubes AT-22 (allows wide open focusing but has no contacts and no autofocus)- LEFT BEHIND
- 49mm Hoya 3 position rubber hood- BINNED
- 58mm black metal hood – bought from ebay (for FA 100-300)- LEFT BEHIND
Lens Filters
- 52mm Kenko MC CPL
- 52mm Hoya R72 Infrared
- 52mm ND400 as mentioned here
- 62mm Kenko MC UV
- 67mm Kenko PRO1 Digital Protector
- 67mm Kenko PRO1 Digital CPL
- 67mm Hoya ND400 (9 s top ND filter)
- 77mm IR720
- 77mm Kenko MC CPL
- 49mm Cokin CPL- LEFT BEHIND
- 49mm UV x3 (came with various lenses)- LEFT BEHIND
- 49mm Blue- LEFT BEHIND
- 49mm Hoya Star Six- LEFT BEHIND
- 49mm Hoya Centre Spot (blurs out the edges, leaving only the centre of the image clear)- LEFT BEHIND
- 52mm Hoya NDX400 (9 stop ND filter) – SOLD
- 52mm IR720 as mentioned here- BINNED
- 62mm Kenko MC CPL – SOLD
Cokin P Filters and Accessories
- Chinese copy 3 slot Cokin P holder
- Chinese copy 1 slot Cokin P holder (wide angle)
- 67mm adapter
- 77mm adapter
- Graduated ND8 Filter
- ND 3.0 (10 stop) Filter
Flashes and Accessories
- Sunpak Auto 200 flash (part of Dad’s gear, unsafe for DSLR hot shoe mounting)- LEFT BEHIND
- Optical Trigger- LEFT BEHIND
- Hand made diffuser using cardboard, alfoil and plain white paper- LEFT BEHIND
Other Accessories
- Cable Release Remote – bought from DealExtreme
- IR Push Button Remote – bought from DealExtreme
- 3 axis hotshoe mounted bubble level – bought from DealExtreme
- Pentax D-BG3 battery grip for K200D
Tripod
- Slik 500 Pro DX w Head- SOLD
- Manfrotto ART-190 aluminium tripod with Benro KB-2 Ballhead
Here we go, finally have a shot I can post from my cheap Ebay ND400 filter.
This shot was very underexposed. I allowed for about 9.5 stops of extra exposure (I use the PhotoBuddy app for the iPhone to work out exposures) but I would say this particular filter needs more like 11-12 stops extra. A Hoya ND400 filter is specified as a 9 stop filter. This shot has +4 stops of exposure in PP (Lightroom) and the colour cast is mostly corrected (but not totally) by adjusting the white balance. Here are the settings from lightroom and the shot. Its nothing special but it does display the problems with the colour, and obviously incorrect number of light stops filtered. As you can see I am at the limit of adjustment for white balance, but the photo still shows a slight purple cast. This means you will not get true colours from this filter.
Along with my cheap ND400 I bought a cheap IR72 filter, again just to play with the effect more so than anything else. Again the filter is for my DA 18-55 AL II lens which I would like to replace in the future.
As some people may know, DSLRs have a filter in front of the sensor which blocks most of the IR wavelengths of light at upto 95% effectiveness. This means that when you go and place a filter in front which blocks all visible light below 720nm (like an IR72 filter) your required shutter speeds get VERY long.
Upon receiving my filter I went about taking some shots at ISO1600, 0.5sec, f4.5 handheld (got to love that Pentax Shake Reduction). What I found was that the images just came out like I had a red filter in front, not very IR at all. Today I finally got my tripod out and did some testing, I found to get a proper IR like image I needed to shoot at around ISO400, 30sec, f11 in broad daylight. The effect that you want from an IR filter is tree leaves and grass coming out white, while everything else is more like a black and white image (probably with a very red cast to it from the camera though!)
So here are some key points for shooting IR with a modern DSLR which has the sensor IR block filter still in place.
- Shoot RAW – you will need to play with the white balance quite a lot to get a decent image. RAW also allows some give in exposure which means you dont have to get it exact (I am finding it hard to find the sweet spot).
- Shoot in Manual mode – you will need to play with aperture, ISO and shutter speed to get a good exposure. The camera won’t really know whats going on.
- Go for LONG exposures – If the shots are not coming out how you expect (looking for grass and trees to have white leaves) don’t be afraid to up the exposure some more, and then some more again! Remember I needed to go to 30 secs at ISO 400 to get the proper effect with my camera. Different cameras will have different filters on the sensors though, so play with your camera to find out what works for you.
- Check your focus – AF should still work fine, however, it may shift slightly from what is the correct focus distance (due to light wavelengths). So make sure you check that the things you want in focus are actually in focus.

I recently bought a cheap (very cheap) ND400 filter on Ebay for my DA 18-55 AL II lens. I picked the cheap option because I just wanted to play with the effect, but didnt want to spend lots on a filter for a lens I hope to replace soon.
Anyway, back to the point. Colour cast. This is where the quality difference really becomes apparent. The cheap filter produces a very pronounced purple cast. I havent tried to process any of the images yet, it is possible that setting the white balance can overcome the colour cast, but it should not be necessary.
Just another case of getting what you paid for I suppose! I will post some samples of pre and post processing soon.
UPDATE: Shots and details now available.
A Blog of my Photographic Journeys, Equipment, Techniques and Images.