Tag Archives: technique

Tips and Tricks From The Web – Street Photography Part 5

I haven’t been out shooting any street over the last little while, so instead of giving you my tips and tricks, I will share some I have found on the web. Hopefully they will help me out, and you too.

Street Photography Series

  1. Previous Attempts
  2. Zone Focusing
  3. Hyperfocal Distance
  4. Progress?
  5. Tips and Tricks from the Web

19 Killer Street Photography Tips

The first site with some notable tips I have found is this one. From ILovePhotoBlogs.com. Here are the points that stood out to me.

What is the best lens for street photography?
“I personally like to use a wide lens (24mm, 28mm, 35mm on full frame 35mm) to be pretty close to my subject and get that intimate look of my photos. It took me a while to get closer, so I’d suggest to start with maybe a 75mm or 50mm lens to keep some distance and get closer from there…”

Lens choice is an important technical aspect to street photography, and this tip is something I have seen mentioned more than once (many times in fact).

What are the best places to shoot street photography?
“At a fair, a midway at a carnival, a sports event, parade, concert or public ceremony, people’s need for personal space and therefore privacy is reduced. The level of sensory stimulation is also usually high at these events, which tends to reduce the need for space. As well, in most of these situations people are having fun so they are more relaxed.”

Choosing somewhere to take street shots is important. You won’t get yourself out the door if you don’t have somewhere to go in mind.

10 Quick Street Photography Tips

This 2nd link is from a Canon Powershot S90 Street Photography Challenge website. It is just 10 short tips on how to get some street shots. I don’t necessarily agree with them all by the way. These are the tips that hit home when I read it.

3. PRE-FRAME. PRE-FOCUS.
Frame the scene, preset your focus and wait patiently for the right elements to fall into place, before you click. You’ll be surprised at the results of this simple technique.

This is another technique I have seen mentioned a few times. I have tried this out once or twice. If you see a great background or scene, and can imagine a person with a certain look would work well there, then frame up, and wait patiently for someone matching your idea to come by, or you might find someone with a different look that works while you are waiting.

5. SHOOT FROM THE HIP.Learn to frame your images without looking through the viewfinder or at the LCD. Shoot with the camera away from your face – from the hip or low at your chest work well. Low angle shooting also gives an interesting perspective.

Another way to get that candid shot. Most of the street photographers I follow have used this method from time to time. It is worth while learning to aim your camera without looking through the view finder. I am notoriously bad at this myself, but it is something I am working on.

6. OBSERVE. OBSERVE. OBSERVE.Keep your eyes open and be aware of your surroundings. Observe everyone and everything around you. You’ll be surprised at how much is going on in front of you, and how much you can anticipate – ready for that next perfect shot.
7. BE PATIENT.Street photography is a test of patience. Either waiting for the scene to evolve or just capturing the right shot, a great photograph takes time to realize. Don’t rush that special moment before clicking.

I believe these 2 tips go hand in hand. You must observe whats going on around you, and you must be patient. A good shot won’t come by every 10-15 seconds. Wait for it to make itself available, be prepared, anticipate it, and shoot it.

Street Photography Tips

This is the final link for todays post. There are some really great street shots posted in this forum post, along with some interesting tips.

readiness
learn your camera’s controls, shoot in a way that let’s you shoot quickly! i’m always pre-set for the most part (choice of iso, aperture) and i typically shoot in aperture priority mode. i also learn the hyperfocal distances of my lenses, so that i can shoot comfortable within a distance range. watch the lighting, which can change by 8 or 9 stops just by turning a corner! it’s really important to have all your senses focused on the job at hand

You must be able to react quickly, part of that is knowing that your equipment is ready, the other part is being ready to react yourself.

confidence
street shooting requires confidence.. *you* are doing nothing wrong, so don’t sneak around! put away that tele, and stick a fifty or thirty-five on your dslr, or set your digicam’s zoom to the wider end of things, and see the scene “normally,” up close and personaly. this may be strange for some of you, but i assure you it gets easier after your initial trepidation wears off. the worst that can happen is people say “no, i don’t want my photo taken,” and so you smile and move on! the wider angles offer so much more to the viewer imo, that they’re worth the extra effort in becoming more comfortable …

The final tip of the day is this one. BE CONFIDENT! This is something I definately suffer from myself, I am shy by nature, so being out in the middle of a group of strangers pointing my camera at them is not comfortable for me, but, I do get out there, and I do try it. The more you do it, the more confident you will get.

If you have any good tips please share them with me, ill make sure they get posted up. Best of luck with your street shooting
Zone Focusing – Street Photography Part 2

When shooting street photography it is often important to be able to fire off a shot without any delay or hesitation, from yourself, or your gear, to capture that moment of shown emotion or humor or who knows what.

Street Photography Series

  1. Previous Attempts
  2. Zone Focusing
  3. Hyperfocal Distance
  4. Progress?
  5. Tips and Tricks from the Web

Zone Focusing Overview

One of the techniques you can use to ensure there is no delay from your equipment is to pre-focus using the zone focusing technique. What this requires is a good estimation of distance ahead of time. The general idea is to set the focus to a given range (or zone) ahead of time, and shoot within this zone. This technique is very effective with older manual focus lenses but can also be used with autofocus lenses, set to manual focus mode.

How to Focus on a Zone – DOF Scale

Many (in fact all the ones I own) older lenses will have a handy DOF scale or guide built into the focus and aperture rings on the lens. This article has a fantastic shot and explanation of how the guide on your lens can help you. As I’ve said, you need to have a reasonably good judge of distance to use this method, but if you don’t, try it out, because you will soon learn to be able to judge the distances better.

Without a DOF Scale

If you are using a lens which does not have a handy DOF guide (most newer lenses do not) you can still use the zone focusing technique, however you will need to pre-calculate your DOF (use the online calculator here), or use an application such as Photobuddy to help you out (this is the what I do).

Does It Work

I have used this technique in the past with my 50mm lens. I set the aperture to f8.0, then focused to 8m on the focusing scale. This gives a DOF of 11m (5.3m to 16.3m) on my K200D (the sensor crop factor does play a factor here!). Then when shooting all you need to do is pick your subjects within that range.

Good luck with your Zone Focusing!

Macro Photography Techniques – Part 6 – The End

This is the 6th and final post in the macro photography techniques thread. Once I get some more results with my external flash macro shots I will add flash information to the series.

Macro Photography Techniques

  1. Close Focus Lens
  2. Teleconverters
  3. Extension Tubes
  4. Reversed Lenses
  5. Macro Lens
  6. Combining Techniques
  7. Close Up Filters

How Do You Combine?

When I say combining techniques, I’m referring to a few options, I will give each a small write up.

Teleconverters and Reversed Lenses

This is a method I only tried very recently, it gives huge amounts of magnification, very short working distances, but very cool shots are possible. This method involves mounting a teleconverter to your body, then mounting your reversed lens to your teleconverter. You effectively double the magnification you get from the reversed lens setup. The trade offs in this case are, losing 2 stops of light (assuming a 2x teleconverter), short working distance (distance from lens to subject), tiny depth of field and extreme magnification (this makes it hard to frame handheld, as tiny movements result in big shifts in composition). I was put onto this method by this guy. Check out his flickr for some truely amazing macro photography. He combines various techniques involving off camera flash, reversed lenses, teleconverters, bellows, extension tubes and focus stacking.

Extension Tubes or Bellows and Reversed Lenses

This is a similar method to the previous. If you mount your reversed lens onto a set of extension tubes (or bellows), you will increase your magnification. The same trade offs apply as with the previous method, loss of light, shorter working distances, smaller depth of field, and larger magnification. This is not a method I have personally tried, but I know it works as I have seen the results!

Combine The Above

So what about a set of tubes or bellows, then a teleconverter, then a reversed lens? Well imagine the magnification!!!!! But the working distance might become so short, that the subject would actually have to be INSIDE the lens. This is obviously not possible, so take care you aren’t going for too much magnification.

What About A Macro Lens?

You can very easily use a macro lens in the above methods, instead of using the reversed lens. Either method (or both) will allow greater than 1:1 magnification for those super close shots.

Would You Believe It?

As I am typing out this post, a baby gecko appeared on my window sill. Naturally (with macro on the mind) I grabbed the camera off the desk, grabbed the 28mm with reverse adapter already mounted from the drawer and took his photo. I will be sure to post the shot when I am able to process it fully. As a side note, I discovered a new little trick. It will work with K mount lenses, but I’m not sure if it will work with others. On the back of the lens is a small lever, this is what the body uses to actuate the aperture for wide open focusing, stop down shooting. If you are careful about how you hold the lens, you are able to actuate this lever with a finger, to give the same effect. The gecko was sitting on a white windowsill, with a very close working distance and onboard flash at full power (it always fires full power with non “A” lenses) I needed to stop all the way down to f22.0. At f22.0 the viewfinder is basically completely black so this little trick allowed me to get the shot I wanted.

Result

Here is a shot I took using a reverse mounted 28mm lens, a 2x teleconverter, and the onboard flash. This insect was less than 10mm long, so you see the huge magnification this combination allows.


ISO 100, probably around f16 aperture, 1/180 sec, onboard flash

The End

Thanks for reading the final post in this series (for now). If there are other methods you would like me to cover then let me know however you can, and I’ll get onto it! And don’t forget to keep an eye out for some shots of the baby gecko.

Macro Photography Techniques – Part 5

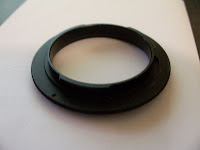
This post in my macro techniques series will cover the other methods, which I haven’t covered yet. But first here are a couple of pictures of a reversed lens (a Pentax SMC “M” 28mm f2.8) mounted on my K200D, and a picture of the reverse mount adapter.

Macro Photography Techniques

  1. Close Focus Lens
  2. Teleconverters
  3. Extension Tubes
  4. Reversed Lenses
  5. Macro Lens
  6. Combining Techniques
  7. Close Up Filters

Other Methods…

There are of course other methods of taking macro photos, which I have not yet covered, the main reason for that is I have not tried them! I don’t want to limit your macro photography methods just by what I’ve done.

A Macro Lens

The most obvious technique I have not mentioned is a true macro lens. A macro lens is a lens which allows 1:1 magnification. Some popular examples are the Tamron 90mm f2.8 Macro, Sigma 105mm f2.8 Macro, Pentax D-FA 100mm f2.8 Macro, Sigma 70mm f2.8 Macro, Canon 60mm f2.8 Macro, Canon 100mm f2.8 Macro and so on. There are also many very good older options, which are manual focus only, so do some research before you buy into this option. The only real downside to this option is the cost. A good Macro lens will set you back at least $300 (even for a manual focus one). This is the only reason I haven’t got 1 myself, although it is on the “One Day” list.

When using a full macro lens the same focusing techniques can be applied. You can set the focus on the lens to the magnification you want (1:1 or 2:1 etc) then physically move closer to, or further from your subject until it is in focus. If your macro lens has Autofocus, this can be of some help, but remember when working with extreme close up photography, the Depth of Field is VERY small, so a slight movement of the camera after focusing can result in out of focus photos. Also the Autofocus sensor in your camera may report the centre to be in focus, but what is really in the centre of the shot? Is it the eyes of your insect subject, or just its wing? For this reason I would still recommend manual focus.

The Good

The good thing about this option is its very simple to use, and you get a great portrait lens for free! (although some may argue macro lenses are a bit TOO sharp for portraits…). It means you can concentrate more on your composition, finding the things to photograph and perfecting your exposure.

Aperture and Flash Again

Again with a macro lens, you will have a very narrow depth of field, as you are so close to the subject. This means you will want to be using a very small aperture, probably around f22 in a lot of cases. So a flash is always a good option. A tall hot-shoe mounted flash pointing down at the subject can work well, or you could point it up and use a reflector of some kind to direct the light output down towards the subject. Another option is to use an off camera flash, off to the side of the subject, again either pointed down towards it, or up with a reflector. If pointing the flash directly at the subject, a large diffuser of some kind is a good option to soften the light and shadows cast.

Examples?

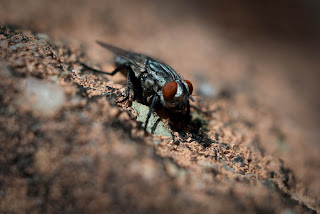
As I have already mentioned, this isnt a method I have used, as I don’t have, or have access to a macro lens. The best I can do is post a shot I took with a friend’s Carl Ziess Flektogon 35mm f2.4 lens, which focuses down to 2:1 magnification. I borrowed the lens for a walk in the Roma St Parklands, while composing another shot, this fly landed right next to me on the wall I was sitting on, so he became the new subject.


Carl Ziess 35mm f2.4 @ f4.0, ISO 100, 1/1000 sec, minimum focus distance (2:1 magnification)

Get out shooting, and enjoy!

Macro Photography Techniques – Part 3

The 3rd installment of the series will cover the use of extension tubes. Again this is a method which requires an extra piece of equipment, but again it is something which can often be acquired quite cheaply.

Macro Photography Techniques

  1. Close Focus Lens
  2. Teleconverters
  3. Extension Tubes
  4. Reversed Lenses
  5. Macro Lens
  6. Combining Techniques
  7. Close Up Filters

Extension Tubes with a Fast Lens

First off, lets talk about what extension tubes are. Extension tubes are a simple device which mounts between the camera body and the lens. They contain no optical elements (where a teleconverter does). All they do is modify the register distance (distance from the lens to the sensor or film plane) which means the minimum focus distance of the lens becomes much less, as does the maximum focus distance for that matter. You can no longer focus to infinity with a lens mounted on extension tubes. Moving the lens further from the sensor or film plane also results in a loss of light. This is why I recommend using a fast lens when using extension tubes. The exact amount of light you will lose will depend on the thickness of the tubes (or how far from the sensor plane you move the lens).

Types of Tubes

There are 2 main types of extension tubes. There are those which operate the lens’ aperture mechanism, and those which do not. The most commonly found is the type that do not. These are often sold very cheaply on ebay, and come in 5 parts. A body mount, a lens mount, and 3 extensions of various sizes. These work just fine, however, if you want to stop the lens down (and you will, to get more depth of field) these can become quite hard to use. If you stop down the lens, you will notice the view finder darkens significantly, to the point where focusing, and even just composition of a shot becomes hard or even impossible.

I recommend spending a little extra on your extension tubes, and getting the “Auto” type. This means that the extension tubes allow the camera body to still operate the lens aperture through the tubes. This allows you to focus/compose the shot with the lens wide open (as happens with the lens mounted normally) and then the body closes the aperture just as the shot is taken. I have a set of these extension tubes, made by Vivitar for Pentax K mount.

Bellows?

Bellows, what are they? Bellows are basically a very large, length adjustable extension tube. They allow for heaps of magnification, but are heavy and awkward to use. I have not personally used a set of bellows, nor do I see myself using a set of bellows as I like to be mobile. However, keep them in mind.

Which Lens

As mentioned earlier, I recommend using a fast lens which extension tubes, as it allows you to focus and compose more easily after you have lost light from the tubes themselves. Something to keep in mind is, the shorter the focal length of the lens, the more magnification you get from an extension tube. For example, my extension tubes are sized as follows; 12mm, 20mm and 36mm. If I use the largest tube (36mm) with my 50mm lens, I get extra magnification, but if I use the same tube with my 28mm lens, I will get greater than 1:1 magnification! A good approximate rule is, to get 1:1 use the same length of extension tubes as the focal length of the lens. This guideline only applies to lenses which are not extremely close focusing already (like the CZ Flektogon 35mm f2.4 which already focuses to 1:2 magnification, 35mm of tubes will get greater than 1:1 on this lens).

I have successfully used my 50mm f1.7 lens, 50mm f2.0 lens and 28mm f2.8 lens with extension tubes.

Focusing

As before, focusing is best achieved by moving yourself and the camera and lens closer to, and further away from the subject as required, rather than using the focusing ring. See Part 1 for a full description.

Results

Here are some photos taken using my extension tubes. Dont forget to share yours in the comments

50mm f1.7 lens, all 3 extension tubes, ISO 100, 1/180 sec, f11.0, onboard flash. These are aphids, the big one is an ant.


50mm f1.7 lens, 36mm extension tube, ISO 100, 1/180 sec, f11.0, onboard flash

The Brenizer Method Pt 2

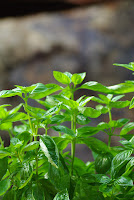
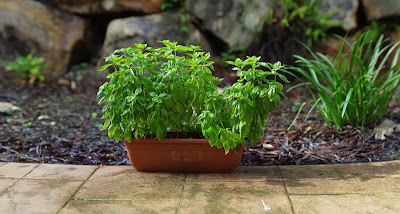
Well writing the previous post and seeing my rather lame attempt at the technique inspired me to go out into my back courtyard and try again on my basil plants. I used my Tair-11A lens (135mm) at f4.0, the final image was 100 shots! Again first is a single frame, followed by the full resulting image. The narrow DOF really makes the subject pop.


UPDATE: I have used this technique/method a bit now, have a look at them: Brenizer images

The Brenizer Method

I mentioned in a previous post a way to use panorama shooting to get a very narrow depth of field (DOF) on an image. This technique has come to be known as the Brenizer Bokeh Panorama method. A quick overview is using a fast telephoto lens (for example, 85mm f1.4 or 135mm f2.8 etc) to get a very narrow depth of field, but you also end up with a narrow field of view (obviously). So to build up your normal image you take lots and stitch them together. The man this technique is named for is Ryan Brenizer. And you can find his original guide HERE. I first read THIS guide, and find it a bit more informative. Ryan Brenizer has also published a How To video HERE. I highly recommend giving this technique a go. I have tried a couple with my Tair 11-A (135mm f2.8). The first photo following is a single shot of the panorama, to get an idea of the field of view. And then the final result. This one would have worked better had I been a bit closer to the subject (and reduced the DOF some more).


So, if you haven’t tried this technique before. I suggest you get out there and give it ago. As you can see from the links I posted with the guides, you can produce some spectacular images! Don’t forget all the tips from my panorama post still apply.

UPDATE: Took another demonstration shot

ANOTHER UPDATE: I have used this technique/method a bit now, have a look at them: Brenizer images