Tag Archives: macro technique

Macro Photography Techniques – Part 7 – The Forgotten

Well I have to revisit this series which I thought was complete. Al Williams (see his photography blog) contacted me to remind me that there is another way to take macro photos which I hadn’t mentioned at all, close up filters!

Macro Photography Techniques

  1. Close Focus Lens
  2. Teleconverters
  3. Extension Tubes
  4. Reversed Lenses
  5. Macro Lens
  6. Combining Techniques
  7. Close Up Filters

Close Up Filters

Close Up filters are actually lenses which mount to your regular lens via the filter mount. There are a few different types available. They provide extra magnification without altering too much else. The filters are available in various levels of magnification, various sizes, and all kinds of quality levels (and prices too). The most popular type I have seen discussed is the Raynox DCR-150 and DCR-250. These are high quality lenses which have a quick mount/dismount clip rather than the standard threaded mount for the lens. The Raynox lenses are not available in varying sizes though, so you are somewhat limited as to which lenses they can be mounted to. The standard screw mount filter was very popular in the past, so it can be quite easy to find a “set” 2nd hand. A set of close up filters is usually made up of 3 filters, all the same filter size, but in varying amounts of magnification. These filters can be used individually or in combination to get various levels of magnification.

Image Quality

I have never tested a set of close up filters myself. I do have reservations about the loss of image quality which may occur when using these lenses. Having said that, the loss in quality from a high quality filter/lens should be no more than the loss you get from using a UV filter. When looking to buy a filter (or a set) I would recommend paying some extra money, and sticking to the well known brands. I would imagine that when using the “set” of filters, combining all 3 may result in a noticable loss of quality (after all it is 3 more lenses for the light to pass through) but if it provides the magnification required then its more than good enough. These sets of filters are usually numbered based on the amount of magnification they give. A typical set consists of a #1, #2 and #4 filter, where #4 gives the most magnification.

Al’s Shots

Al not only told me to get my finger out and stop forgetting stuff, he even kindly offered to take some photos using his set of close up filters, and share them with you on the blog. So here they are. You can see other shots Al has taken on his flickr account. All shots were taken with the Pentax SMC M 50mm f2.0 lens @ f8.0, 1/15 sec and ISO 500 and at minimum focusing distance.

Lens only (no filter)
With Close Up Filter #1
Vivtar Close Up Filter #2
Vivitar Close Up Filter #4
Vivitar Close Up Filters #1 & #2
Vivitar Close Up Filters #1, #2 & #4

As you can see, the magnification differs quite a lot between the filters, and the combinations of filters. So there is yet another way to take some great macro photos. Big thanks to Al for pointing out my error in missing this option, and even bigger thanks for providing the images.
Macro Photography Techniques – Part 6 – The End

This is the 6th and final post in the macro photography techniques thread. Once I get some more results with my external flash macro shots I will add flash information to the series.

Macro Photography Techniques

  1. Close Focus Lens
  2. Teleconverters
  3. Extension Tubes
  4. Reversed Lenses
  5. Macro Lens
  6. Combining Techniques
  7. Close Up Filters

How Do You Combine?

When I say combining techniques, I’m referring to a few options, I will give each a small write up.

Teleconverters and Reversed Lenses

This is a method I only tried very recently, it gives huge amounts of magnification, very short working distances, but very cool shots are possible. This method involves mounting a teleconverter to your body, then mounting your reversed lens to your teleconverter. You effectively double the magnification you get from the reversed lens setup. The trade offs in this case are, losing 2 stops of light (assuming a 2x teleconverter), short working distance (distance from lens to subject), tiny depth of field and extreme magnification (this makes it hard to frame handheld, as tiny movements result in big shifts in composition). I was put onto this method by this guy. Check out his flickr for some truely amazing macro photography. He combines various techniques involving off camera flash, reversed lenses, teleconverters, bellows, extension tubes and focus stacking.

Extension Tubes or Bellows and Reversed Lenses

This is a similar method to the previous. If you mount your reversed lens onto a set of extension tubes (or bellows), you will increase your magnification. The same trade offs apply as with the previous method, loss of light, shorter working distances, smaller depth of field, and larger magnification. This is not a method I have personally tried, but I know it works as I have seen the results!

Combine The Above

So what about a set of tubes or bellows, then a teleconverter, then a reversed lens? Well imagine the magnification!!!!! But the working distance might become so short, that the subject would actually have to be INSIDE the lens. This is obviously not possible, so take care you aren’t going for too much magnification.

What About A Macro Lens?

You can very easily use a macro lens in the above methods, instead of using the reversed lens. Either method (or both) will allow greater than 1:1 magnification for those super close shots.

Would You Believe It?

As I am typing out this post, a baby gecko appeared on my window sill. Naturally (with macro on the mind) I grabbed the camera off the desk, grabbed the 28mm with reverse adapter already mounted from the drawer and took his photo. I will be sure to post the shot when I am able to process it fully. As a side note, I discovered a new little trick. It will work with K mount lenses, but I’m not sure if it will work with others. On the back of the lens is a small lever, this is what the body uses to actuate the aperture for wide open focusing, stop down shooting. If you are careful about how you hold the lens, you are able to actuate this lever with a finger, to give the same effect. The gecko was sitting on a white windowsill, with a very close working distance and onboard flash at full power (it always fires full power with non “A” lenses) I needed to stop all the way down to f22.0. At f22.0 the viewfinder is basically completely black so this little trick allowed me to get the shot I wanted.

Result

Here is a shot I took using a reverse mounted 28mm lens, a 2x teleconverter, and the onboard flash. This insect was less than 10mm long, so you see the huge magnification this combination allows.


ISO 100, probably around f16 aperture, 1/180 sec, onboard flash

The End

Thanks for reading the final post in this series (for now). If there are other methods you would like me to cover then let me know however you can, and I’ll get onto it! And don’t forget to keep an eye out for some shots of the baby gecko.

Macro Photography Techniques – Part 5

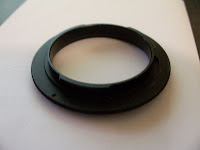
This post in my macro techniques series will cover the other methods, which I haven’t covered yet. But first here are a couple of pictures of a reversed lens (a Pentax SMC “M” 28mm f2.8) mounted on my K200D, and a picture of the reverse mount adapter.

Macro Photography Techniques

  1. Close Focus Lens
  2. Teleconverters
  3. Extension Tubes
  4. Reversed Lenses
  5. Macro Lens
  6. Combining Techniques
  7. Close Up Filters

Other Methods…

There are of course other methods of taking macro photos, which I have not yet covered, the main reason for that is I have not tried them! I don’t want to limit your macro photography methods just by what I’ve done.

A Macro Lens

The most obvious technique I have not mentioned is a true macro lens. A macro lens is a lens which allows 1:1 magnification. Some popular examples are the Tamron 90mm f2.8 Macro, Sigma 105mm f2.8 Macro, Pentax D-FA 100mm f2.8 Macro, Sigma 70mm f2.8 Macro, Canon 60mm f2.8 Macro, Canon 100mm f2.8 Macro and so on. There are also many very good older options, which are manual focus only, so do some research before you buy into this option. The only real downside to this option is the cost. A good Macro lens will set you back at least $300 (even for a manual focus one). This is the only reason I haven’t got 1 myself, although it is on the “One Day” list.

When using a full macro lens the same focusing techniques can be applied. You can set the focus on the lens to the magnification you want (1:1 or 2:1 etc) then physically move closer to, or further from your subject until it is in focus. If your macro lens has Autofocus, this can be of some help, but remember when working with extreme close up photography, the Depth of Field is VERY small, so a slight movement of the camera after focusing can result in out of focus photos. Also the Autofocus sensor in your camera may report the centre to be in focus, but what is really in the centre of the shot? Is it the eyes of your insect subject, or just its wing? For this reason I would still recommend manual focus.

The Good

The good thing about this option is its very simple to use, and you get a great portrait lens for free! (although some may argue macro lenses are a bit TOO sharp for portraits…). It means you can concentrate more on your composition, finding the things to photograph and perfecting your exposure.

Aperture and Flash Again

Again with a macro lens, you will have a very narrow depth of field, as you are so close to the subject. This means you will want to be using a very small aperture, probably around f22 in a lot of cases. So a flash is always a good option. A tall hot-shoe mounted flash pointing down at the subject can work well, or you could point it up and use a reflector of some kind to direct the light output down towards the subject. Another option is to use an off camera flash, off to the side of the subject, again either pointed down towards it, or up with a reflector. If pointing the flash directly at the subject, a large diffuser of some kind is a good option to soften the light and shadows cast.

Examples?

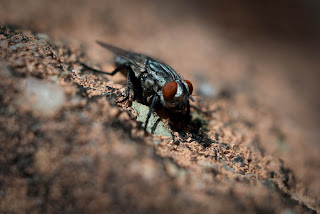
As I have already mentioned, this isnt a method I have used, as I don’t have, or have access to a macro lens. The best I can do is post a shot I took with a friend’s Carl Ziess Flektogon 35mm f2.4 lens, which focuses down to 2:1 magnification. I borrowed the lens for a walk in the Roma St Parklands, while composing another shot, this fly landed right next to me on the wall I was sitting on, so he became the new subject.


Carl Ziess 35mm f2.4 @ f4.0, ISO 100, 1/1000 sec, minimum focus distance (2:1 magnification)

Get out shooting, and enjoy!