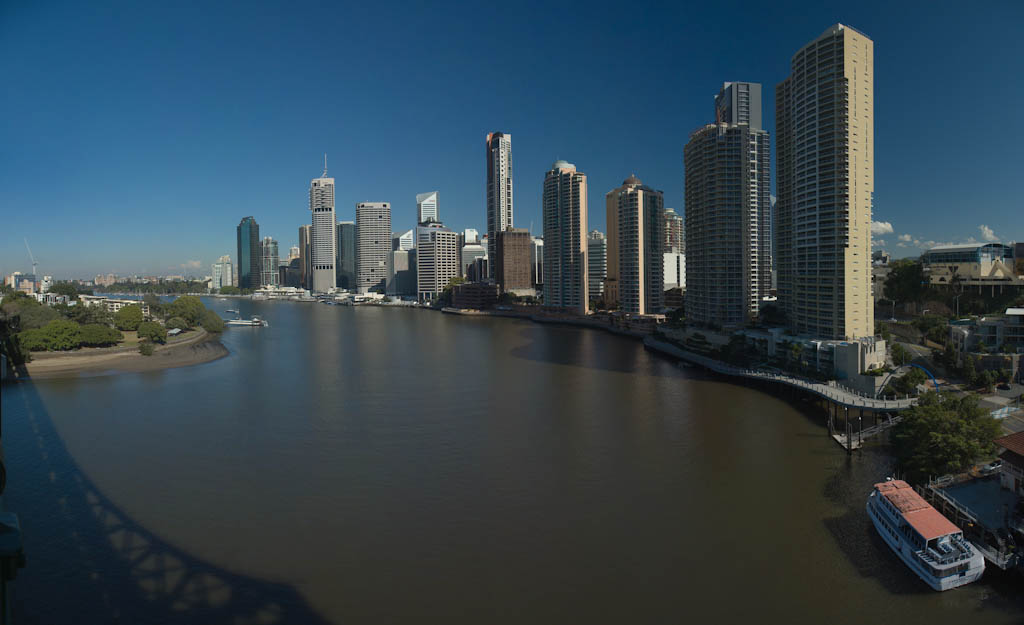
Following on from my previous posts about panoramas, and the Brenizer narrow DOF panorama technique. I am briefly going to give Autopano’s panorama stitching software a plug, and explain how I use it. Autopano is one of the best panorama stitching applications around. I never have had any problems with it (that weren’t fixed by an update shortly later!) when stitching panoramas, even those as large as 100 shots.
I use Autopano Giga 2, although I really only use the features in Autopano Pro. My usual workflow for a panorama is as follows :-
Shoot in Pentax RAW, Manual mode but Auto White Balance
Import into Lightroom 2.5
Set a custom white balance on 1 image from the panorama
Select all images in panorama and sync the white balance to the value I chose.
Export all images in the panorama to a new subfolder (eg. Pano-1) as 16 bit TIFF
Open the new subfolder in an explorer window
Open Autopano
Create a new group in Autopano
Select all the files in the subfolder in the explorer window, and drag and drop onto the new group in Autopano
Edit the settings on the group in Autopano. Set the project folder to the subfolder location. Turn off Auto colour correction, sometimes I will increase the number of control points if there are few features in the images.
Click the Detect button in Autpano, it will then stitch the images and render a small preview.
Click the Render button in Autopano next to the preview. It will show a dialog with the render options. I render to a 16 bit TIFF with ZIP compression, and I change the output folder to be 1 above the subfolder (the same folder as the original import from camera). Also don’t forget to check the output size, if the panorama is not going to be printed extremely large, scale down the render, it will save a lot of time! And finally I change the filename to match the subfolder name, eg Pano-1.tif.
Once rendering is complete, I return to Lightroom, library and synchronize the import folder, select Import new files, show import dialog before importing.
Then I deselect the All option and only select the base import folder where I saved the panorama to.
My Pano-1.tif file should now be present along with the original panorama frames in the library, I can edit it as I please (crop, curves, colours etc)
And the final step is to export to JPG for publishing and also to DNG for archiving purposes.
Well that workflow took a more to write down than I expected. I hope it helps you out next time you are doing a panorama!
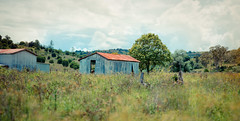
This is a Brenizer pano of a shed I spotted on the side of the road near Minden, Qld. I shot it with my Tair-11a (135mm m42 mount) wide open (f2.8). It is a 45 shot panorama. I would have liked to get a bit closer, to narrow the DOF a bit more. But this is as good as I could get without gumboots.
Shot in JPEG (to save space on my card)
Stitched with Autopano Giga
Adjusted levels and colours in Lightroom 2.5 UPDATE: I have since re-cropped this image and re-posted, it works much better with a tighter crop.
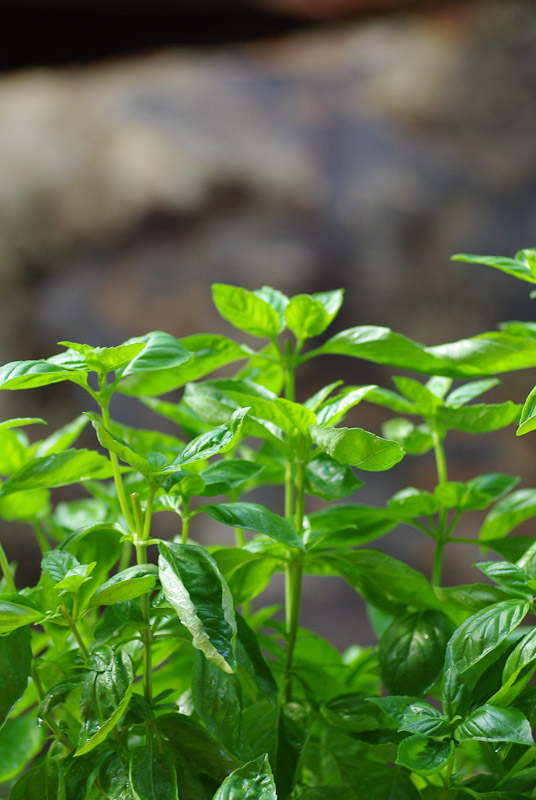
Well writing the previous post and seeing my rather lame attempt at the technique inspired me to go out into my back courtyard and try again on my basil plants. I used my Tair-11A lens (135mm) at f4.0, the final image was 100 shots! Again first is a single frame, followed by the full resulting image. The narrow DOF really makes the subject pop.
UPDATE: I have used this technique/method a bit now, have a look at them: Brenizer images
I mentioned in a previous post a way to use panorama shooting to get a very narrow depth of field (DOF) on an image. This technique has come to be known as the Brenizer Bokeh Panorama method. A quick overview is using a fast telephoto lens (for example, 85mm f1.4 or 135mm f2.8 etc) to get a very narrow depth of field, but you also end up with a narrow field of view (obviously). So to build up your normal image you take lots and stitch them together. The man this technique is named for is Ryan Brenizer. And you can find his original guide HERE. I first read THIS guide, and find it a bit more informative. Ryan Brenizer has also published a How To video HERE. I highly recommend giving this technique a go. I have tried a couple with my Tair 11-A (135mm f2.8). The first photo following is a single shot of the panorama, to get an idea of the field of view. And then the final result. This one would have worked better had I been a bit closer to the subject (and reduced the DOF some more).
So, if you haven’t tried this technique before. I suggest you get out there and give it ago. As you can see from the links I posted with the guides, you can produce some spectacular images! Don’t forget all the tips from my panorama post still apply.
I mentioned this iPhone app in a previous post briefly, but its worth its own post. You can find the official page here. It is VERY full featured and easy to use. It has the following things to offer a photographer :-
Sunrise/Sunset time calculator based on location
Exposure adjustments. Set an exposure (ISO / aperture / shutter speed) and add a filter, or adjust shutter speed to calculate what aperture is required for the same exposure etc.
Exposure presets – some basic settings for certain situations, great for a camera with no light meter, or just to learn
Depth of Field (DOF) calculator. Input your lens focal length, aperture and subject distance (you can calculate any 1 of these provided you have the others). You can then adjust various settings to work out how to get the depth of field you want.
Flash calculator. Input your ISO, aperture, guide number and subject distance (you can calculate any 1 of these provided you have the others), then adjust as required.
Angle of view calculator for your camera/lens combination
Bracketing calculator for those manual mode HDRs (or if you want to do a larger EV variation than your camera’s bracketing mode allows)
Distance calculator. Input your subject size and focal length and find out how far away you need to be to fit it all in the frame.
Grey wedge screen. Displays a greyscale image on the iPhone screen for helping with colour adjustment. Of course its not that useful because the iPhone screen is not colour correct either.
Colour Temp chart. Some common scenarios and the associated colour temperatures.
Bulb timer. Know how long since you started your bulb shot.
Bellows compensation calculator. Calculate how much light you will lose for a given focal length and bellows (or extension tube) length.
The items I find most useful are the Bulb timer, I always use it for any bulb shots I do. The Exposure calculator and the sunrise/sunset calculator. These alone make it worth the asking price, let alone all the extra features!
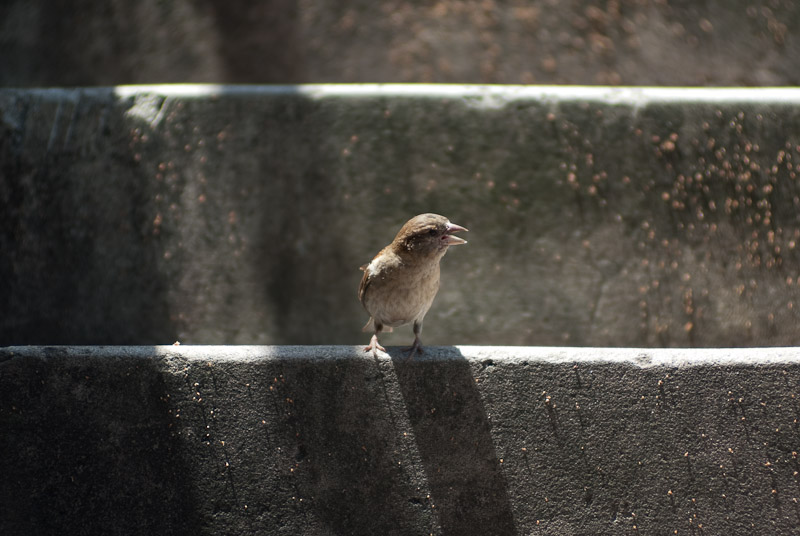
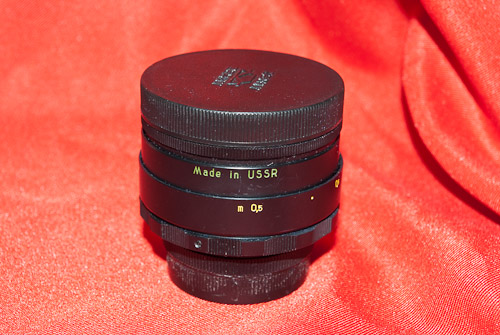
As I mentioned in an earlier post. I bought a Tair-11A M42 mount lens on Ebay. I have seen great shots from this lens on flickr, and read plenty of great reports on it. This lens is 135mm prime, aperture is a preset adjustment and ranges from f2.8 to f22. It focuses from 1.2m to infinity and has a small built in hood.
It truely is an amazing lens. Incredibly sharp, very smooth bokeh (out of focus highlights) and is a joy to use with a lovely smooth focusing ring. Here are some shots I’ve taken with it since it arrived.
First a bokeh test
Then this little bird came along
And to prove how sharp this lens is – this is a 100% crop of the bird from another shot
And a technique tester shot. A panorama to get the narrow DOF effect. I’ll explain this technique in a later post
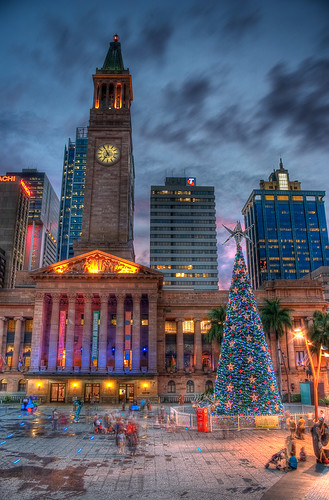
Just thought I would share this shot I took on Tuesday 22nd December at King George Square in Brisbane’s CBD. This is a 3 shot HDR taken at +/- 2.0 EV steps, in Pentax RAW format (PEF). I took it using a my tripod, K200D and Pentax SMC DA 18-55mm AL II f3.5-5.6 lens with +2.0 EV bias (this means the shots is actually 0 EV +2 EV and +4 EV), no filters. I used the +2 starting EV to get more details from the christmas lights. The base shot settings were f13, 10 secs, ISO 100 in Av (Aperture priority) mode.
Processing was as follows
Lightroom 2.5
Import
Export all 3 files as 16-bit TIFF format
Photomatix
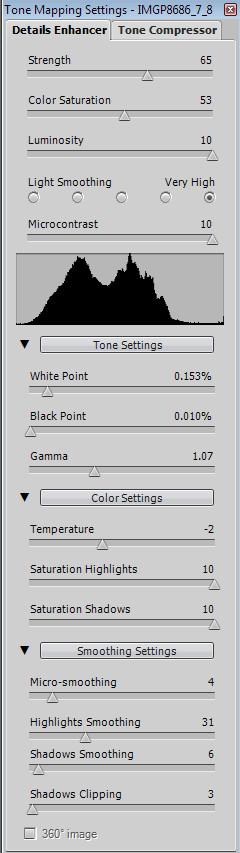
Generate HDR – settings shown below
Tone Mapped using Details Enhancer method – settings shown below
Here we go, finally have a shot I can post from my cheap Ebay ND400 filter.
This shot was very underexposed. I allowed for about 9.5 stops of extra exposure (I use the PhotoBuddy app for the iPhone to work out exposures) but I would say this particular filter needs more like 11-12 stops extra. A Hoya ND400 filter is specified as a 9 stop filter. This shot has +4 stops of exposure in PP (Lightroom) and the colour cast is mostly corrected (but not totally) by adjusting the white balance. Here are the settings from lightroom and the shot. Its nothing special but it does display the problems with the colour, and obviously incorrect number of light stops filtered. As you can see I am at the limit of adjustment for white balance, but the photo still shows a slight purple cast. This means you will not get true colours from this filter.
Shooting panoramas is something I have done a little bit of now. It allows you to really get some great large images, without having a super expensive camera or lenses. Some tips I’ve found from experience.
Avoid Parallax – Landscapes work best, where most of the image is at infinity focus or close to it. This avoids parallax error. (see here for a good article about parallax error)
Camera Orientation – Shoot with the camera in portrait orientation when doing a landscape orientation panorama, this gives a much better final image, not too wide for the height. With a portrait orientation panorama, shoot with the camera in landscape orientation.
Manual Exposure – Set the camera on manual mode, so all shots will be at the same ISO / shutter / aperture. You can use another auto mode to get the required exposure for the panorama. Pick the point in the panorama which will be brightest, and use the exposure information to guide your manual settings.
White Balance – If shooting JPG also set the white balance (dont use Auto white balance) so that the white balance is the same for all the shots (if you shoot RAW then make sure you set the white balance to the same for all shots before you merge the panorama).
Overlap! – Make sure you overlap shots by plenty. Better to have too many photos to stitch than having gaps. I aim for about 50% overlap. To do this when you compose the next shot in the sequence, have something that was at the very edge of the previous frame, and move it to the centre of the next.
Shoot Extra – Go extra around the edges. Dont stop where you want the final cropped panorama to finish. When correcting distortion you can often lose parts of the edges of the image. So go an extra row if you are doing a multiple row panorama, and go for an extra shot at either end of what you would like to show in the final image.
Manual Focus – Make sure the camera is set to manual focus. By all means use autofocus to get the correct focus, but then switch to manual. This will make sure the focus doesnt change between shots.
Thats all I can think of just at the moment, I’ll add more if I think of them!
I believe I may have a problem… I thought I had enough lenses for a while, until I saw a Helios 44-2 M42 lens (58mm f2.0) for a tiny $15, I did a quick search of Flickr and liked the look of the images from it. I bought it and its a great lens, not just great value for $15, but just a generally great lens! This lens led me into researching Russian lenses in general. I then was able to get a Mir-1 (37mm f2.8) M42 from the PentaxForums trading section from an Australian member, it included the lens, original hard plastic case and instruction in russian. I just recently replaced my Hanimar 135mm lens with a Russian Tair-11A 135mm f2.8 M42, and hope to add add the very popular Jupiter 9 (85mm f2.0) M42 lens to my collection. If you don’t know much about these well regarded (and quite cheap) Russian made lenses, I suggest you look into them.
A Blog of my Photographic Journeys, Equipment, Techniques and Images.