Category Archives: Tair-11a

Brenizer Shed Recrop


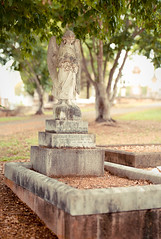
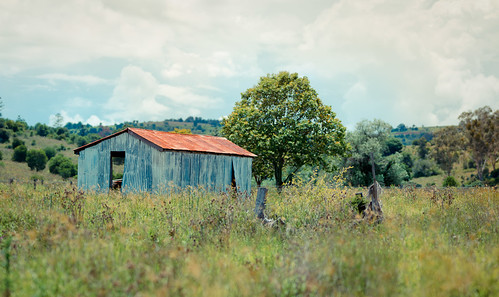
Brenizer Shed Recrop, originally uploaded by jezza323.

Buy art

This shows how cropping can really change an image (well I think so).

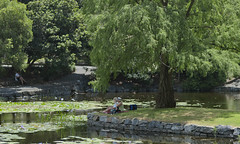
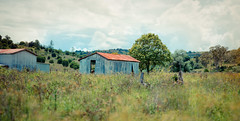
Compare to the original which I blogged a while back. It was just bland shot, with a distracting shed on the left of frame, and you couldnt really see the narrow depth of field, except that the foreground was out of focus.

In this tighter crop, you no longer have the distraction on left of frame, and you can see the sharp outline of the shed and tree as compared to the background.

If you like this shot, have a read of my Tair-11a Lens Review or have a look at my other Tair-11a shots

Bird and Stair Testing the Tair-11a


Bird and Stair Testing the Tair-11a  

Originally uploaded by jezza323

I have already used this one in my Tair-11a review, but I just have to share again. This shot really works for me.

Taken with the Tair-11a at f2.8 (wide open), ISO 100, 1/640.

Post Processing as follows:-

  • Shot in Pentax RAW (PEF)
  • Imported in Lightroom 2.5
  • Exported to JPG for Web

No editing at all!

If you like this shot, have a read of my Tair-11a Lens Review or have a look at my other Tair-11a shots

Picnic By the Lake, Under the Tree

This is another Brenizer Panorama I took yesterday at the Mt Cootha Botanic Gardens. Shot with the Pentax K200D and Tair-11a 135mm f2.8 lens, at 2.8.

Shooting and Processing as Follows

  • Shot in Pentax RAW (PEF) – 94 shots
  • Import into Lightroom 2.5
  • Export to 16 bit TIFF with ZIP compression
  • Stitched using Autopano Giga 2
  • Rendered to 16 bit TIFF
  • Imported into Lightroom 2.5
  • Heavy crop (94 images was for a much bigger scene, but I only liked this part of it)
  • Edited as shown below (Basic tab only)
  • Export to JPG for Web

If you like this shot, have a read of my Tair-11a Lens Review or have a look at my other Tair-11a shots

A Backlit Brenizer Angel


A Backlit Brenizer Angel
Originally uploaded by jezza323

Another Brenizer Panorama from the Toowong Cemetary taken yesterday. This one is again with the Tair-11a on K200D. Its 58 images stitched with Autopano Giga 2 and edited (cropped, curves, colours, exposure brush) in Lightroom 2.5.

Processing :-

  • Shot in Manual Mode, ISO 200, f2.8, 1/320 sec shutter – Pentax RAW (PEF), custom white balance.
  • Imported into Lightroom 2.5
  • All shots in pano exported to subfolder “Pano-5″ as 16 bit TIFFs
  • Stitched using Autopano Giga 2
  • Saved-as 16 bit TIFF
  • Imported result back into Lightroom 2.5 library
  • Edited in Lightroom as show below (click pics for more detail). I did use a preset for most settings. Also cropped but not shown.
Exposure Brush to show more detail in the Angel
Develop settings

Rusted Shed on a Cloudy Day


Rusted Shed on a Cloudy Day
Originally uploaded by jezza323

This is a Brenizer pano of a shed I spotted on the side of the road near Minden, Qld. I shot it with my Tair-11a (135mm m42 mount) wide open (f2.8). It is a 45 shot panorama. I would have liked to get a bit closer, to narrow the DOF a bit more. But this is as good as I could get without gumboots.

Shot in JPEG (to save space on my card)
Stitched with Autopano Giga
Adjusted levels and colours in Lightroom 2.5
UPDATE: I have since re-cropped this image and re-posted, it works much better with a tighter crop.

Tair-11A 135mm f2.8

As I mentioned in an earlier post. I bought a Tair-11A M42 mount lens on Ebay. I have seen great shots from this lens on flickr, and read plenty of great reports on it. This lens is 135mm prime, aperture is a preset adjustment and ranges from f2.8 to f22. It focuses from 1.2m to infinity and has a small built in hood.

It truely is an amazing lens. Incredibly sharp, very smooth bokeh (out of focus highlights) and is a joy to use with a lovely smooth focusing ring. Here are some shots I’ve taken with it since it arrived.

First a bokeh test
Then this little bird came along
And to prove how sharp this lens is – this is a 100% crop of the bird from another shot
And a technique tester shot. A panorama to get the narrow DOF effect. I’ll explain this technique in a later post