Category Archives: Pentax DA 18-55 AL II

More Digital Infrared (IR) Photography


Mt Cootha Sunrise in IR
Originally uploaded by jezza323

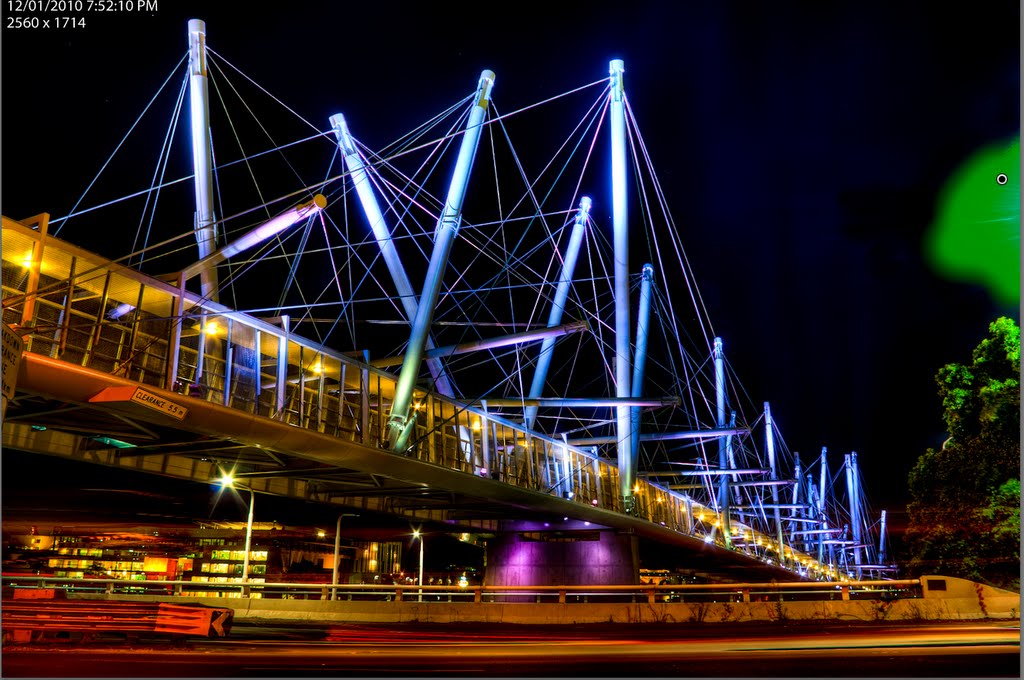
Here is another shot I took recently with my R72 type filter. In this case I used a Hoya R72 filter mounted to my Pentax K200D & Pentax SMC DA 18-55 AL II combo.

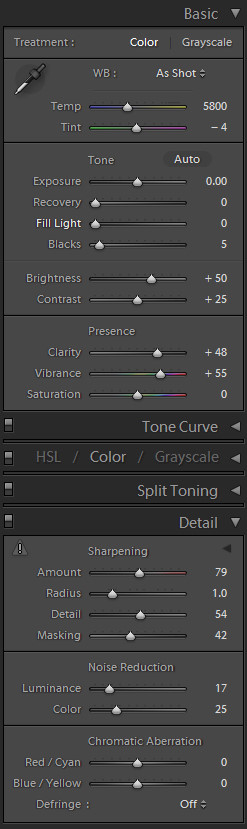
This shot was processed entirely in Lightroom 2.5 (no photoshop trickery going on here!). You can see here the effect quite well, the sky is nice and dark, while the trees are a bit brighter than they would otherwise be. If you compare closely to the image below you can see the difference quite well. The general contrast is also much stronger.

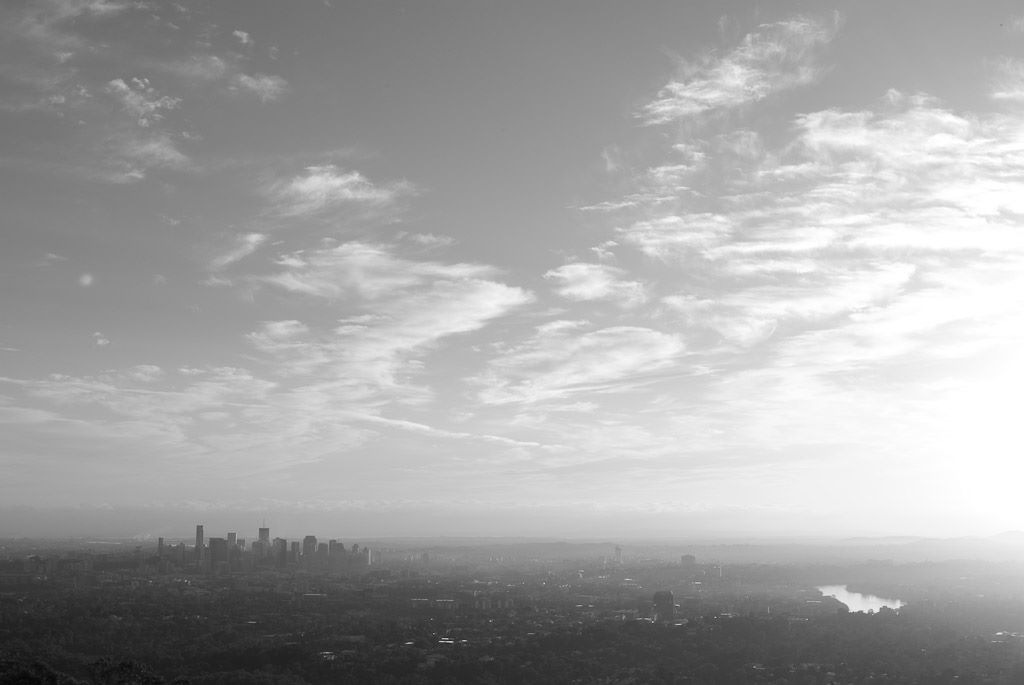
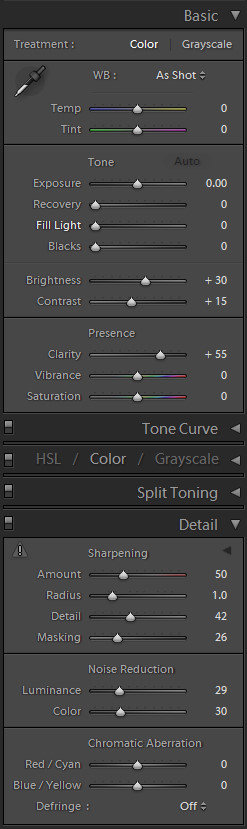
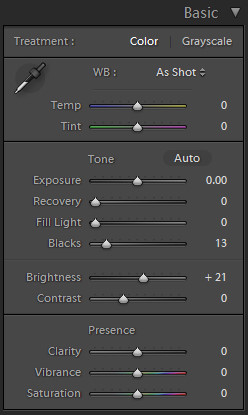
This is the same shot, but taken without an IR filter, just converted to greyscale in Lightroom.
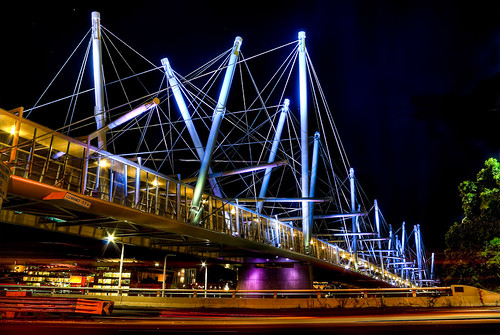
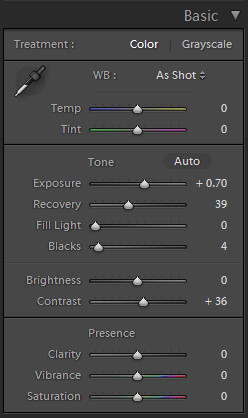
And here is the IR shot in colour (with corrected White Balance and Exposure in Lightroom 2.5). This is what was coverted to greyscale to get the IR image above.

Infrared Digital Photography with an R72 Filter


Botanic Gardens in IR
Originally uploaded by jezza323

This shot is from me playing around with an IR 720nm filter. This type of filter blocks all light below the 720nm wavelength. This means some reds, and infrared are the only light which can pass through. By using 1 of these filters on your camera, you will get some interesting results.

Unfortunately most modern cameras have an IR reduction filter mounted to the front of the sensor, which means that blocking visible light will result in very long exposures being required. This particular shot was taken in broad daylight, at f11.0, ISO 200 and required a 30 second shutter speed! 30 secs in broad daylight is quite a lot. A typical exposure in this situation would be around about 1/400 sec!

The main features of IR photography are black skies, and white leaves on trees and grass. This results in cool contrasty shots where things are just a little different to the norm.

Rocks Floating on Clouds


Rocks Floating on Clouds
Originally uploaded by jezza323

This is an old shot I thought I would share. It may not be immediately obvious to everyone how you get this effect of the cloud-like water.

This effect comes from the movement of the water during a long shutter exposure. In this case it is also accentuated by blending 2 shots together, similar to a HDR.

This was shot using the Pentax K200D and Pentax SMC DA 18-55 AL II lens. I also used TianYa ND8 filter and TianYa ND8 grad filters in a Cokin P holder. These filters block out light, so allow you to use longer shutter speeds, and enhance the cloud-like effect.

To get my 0, -2 EV images which I later blended, I set my camera to bracketing mode, and +/- 2.0 EV steps. I have also set my camera to shoot those steps in 0, -2, +2 order. For this shot the sky was becoming a bit blown out when getting the exposure I was after for the foreground, so I set the base exposure to what I wanted for the foreground, then shot 0 and -2 EV only (I didn’t bother shooting the 3rd bracket).

In Photomatix there is the option of “Exposure Blending” as opposed to “Generate HDR”. I selected this option, my 2 images, and the Average method.

Project 52 – #4 – Mt Cootha Lookout

 
This is a 5 shot HDR of the sunrise from Mt Cootha Lookout, which overlooks Brisbane’s CBD and surrounding suburbs. This is landmark #4 in my Project 52 Brisbane Landmarks for 2010.

I have already posted this shot on the blog as a general shot with full processing info, so check that out if you are interested

Australia Day Sunrise

Happy Australia Day to all the Australians :)

This shot is from a few moments before sunrise yesterday morning (Australia Day, 26th Jan 2010) from the Mt Cootha Lookout in Brisbane. The Brisbane CBD and surrounding suburbs are visible in the shot.

The shot was taken using my Pentax K200D, Pentax DA 18-55 AL II, Slik 500DX Pro tripod and Kenko CPL filter. It is a HDR shot blended from 5 images, taken at -4, -2, 0, +2, +4 EV steps using Photomatix 3.1 and Tone Mapped using the Details Enhancer. I outline how I did this below.

Shots used were all at 18mm, ISO 100 and f13. Shutter speeds were 1/20sec, 1/80sec, 1/5sec, 0.8sec, 3.0sec

Shooting and Processing as follows:

  1. Shot in Pentax RAW (PEF)
  2. Set Exposure Compensation to -2.0 EV
  3. Shot 3 bracketed shots at +/- 2.0 EV (giving -4, -2 and 0 EV shots)
  4. Set Exposure Compensation to +2.0 EV
  5. Shot 3 bracketed shots at +/- 2.0 EV (giving +4, +2 and 0 EV shots)
  6. Imported into Lightroom 2.5
  7. Applied the settings shown below to all 6 images (the first image)
  8. Exported all 6 images to full quality JPG
  9. Deleted the worst of the 2 0 EV shots (this is only 5 images remember!)
  10. Blended the remaining 5 images in Photomatix
  11. Tone Mapped in Details Enhancer using the settings show below
  12. Saved as JPG
  13. Imported HDR JPG into Lightroom 2.5
  14. Applied the settings shown below in Lightroom (last image)
  15. Exported to JPG for Web

Project 52 – #2 – Kurilpa Bridge


Kurilpa Pedestrian Bridge, originally uploaded by jezza323.

Buy art

This is the 2nd shot for my 2010 Project 52 – “Brisbane Landmarks”

This is the recently completed Kurilpa Bridge, a Pedestrian Bridge from the Brisbane CBD over the Brisbane River to West End/Southbank.

This is a 3 shot HDR, taken with my Pentax K200D and Pentax SMC DA 18-55mm AL II

Base shot was 18mm, ISO 100, f9.0, 5 sec, bracketing was at +/- 2.0 EV

UPDATE – Processing details now posted – sorry for the delay.

Shot and Processed as follows:-

  • Shot in Pentax RAW (PEF)
  • Imported into Lightroom 2.5
  • Exported to 16-bit TIFF
  • HDR Generated using Photomatix
  • Tone Mapped using Details Enhancer (settings shown below)
  • Save-as 16-bit TIFF
  • Import into Lightroom 2.5
  • Minor editing applied using adjustment brush to remove some unwanted detail on the right of image (brush positioning and settings shown below)
  • Increased Blacks and Brightness
  • Exported to JPG for Web


Project 52 – #1 – It Begins


Southbank Peace Pagoda

Originally uploaded by jezza323

Here is the first shot for my 2010 Project 52 which I have decided to use the theme of “Brisbane Landmarks”. It is a Nepalese Peace Pagoda located at Southbank in Brisbane, QLD Australia. It was built for Expo ’88 and petitioned successfully to remain on the old Expo site (which is now Southbank).

This photo is a HDR, combined from 11 shots. All shots were taken at f16.0 and ISO 100, and shutter speeds were – 1/30, 1/15, 1/8, 1/4, 1/2, 1, 2, 4, 8, 15, 30 secs.

Processing as follows :-

  • Shot in Pentax RAW (PEF)
  • Imported into Lightroom 2.5
  • Shots exported to 16-bit TIFF
  • Photomatix generated HDR from 11 16-bit TIFFs
  • Photmatix Tone Mapped using Tone Compressor
  • Saved as 16-bit TIFF
  • Imported new file back to Lightroom 2.5
  • Cropped in Lightroom 2
  • Edited in Lightroom  as shown below (settings not shown were not edited)

Cedar Creek Long Exposure


Cedar Creek 3 Falls
Originally uploaded by jezza323

Here is an older shot I took. This is of Cedar Creek just outside of Samford not far from Brisbane. No processing details from this one as it is from quite a while ago. Although I can promise that the PP was minimal, just some white balance tuning, tone curve and maybe a slight exposure adjustment.

This was taken quite early in the morning, the sun was still hidden behind the trees. I combined this with a circular polarising filter, and a Cokin P sized Tian Ya ND8 filter on my K200D with kit lens at 18mm and my trusty tripod.

The exposure was 8 seconds at f11.0 (where I find this lens to be the sharpest).

Post your water long exposure shots in the comments section!

A Late Christmas HDR


Christmas Lights At Dusk, originally uploaded by jezza323.

Buy art

Just thought I would share this shot I took on Tuesday 22nd December at King George Square in Brisbane’s CBD. This is a 3 shot HDR taken at +/- 2.0 EV steps, in Pentax RAW format (PEF). I took it using a my tripod, K200D and Pentax SMC DA 18-55mm AL II f3.5-5.6 lens with +2.0 EV bias (this means the shots is actually 0 EV +2 EV and +4 EV), no filters. I used the +2 starting EV to get more details from the christmas lights. The base shot settings were f13, 10 secs, ISO 100 in Av (Aperture priority) mode.

Processing was as follows

Lightroom 2.5

  • Import
  • Export all 3 files as 16-bit TIFF format

Photomatix

  • Generate HDR – settings shown below
  • Tone Mapped using Details Enhancer method – settings shown below
  • Save As 16-bit TIFF
Lightroom
  • Import
  • Crop (rotated slightly)
  • Export to JPG for Web