Category Archives: Articles

Hoya NDX400 (ND400) filter

I have finally given in and bought myself a good quality ND filter. I went with the Hoya NDX400 (9-stop) filter. I bought this filter as the only 2 filters I am confident of the quality with are this, and the B+W 110 (10-stop) filter, but the B+W in the 52mm size required for my kit lens is quite a bit more expensive than the Hoya. I bought the filter from Citiwide on ebay. They are a Hong Kong based ebay store, and the service was excellent. The filter was shipped the very next day after payment was made. It did take a little while to get here from Hong Kong, but I expected that.

I took the filter out for its first real use on the weekend when I went camping at Queen Mary Falls, not far from Killarney on the Darling Downs in Queensland. I took a few shots of the falls, starting off without the filter, then with the filter for a comparison. I will post up the results tomorrow. Its a beautiful area, and I will be posting a number of shots from around there over the next week or so, the previous photo of the Condamine River Head Waters is the first posted shot from the NDX400 filter, so I will post it again, just to make sure.

This filter certainly puts the cheap one I had previously to shame :) The colours are only slightly warmer than usual, but this might just be a white balance detection problem with the filter on more than colours themselves.

Blending Time – HDR Photography Part 3

HDR Photography

  1. Shooting a HDR
  2. Getting it off the Camera
  3. Blending Time
  4. Final Processing
  5. Some Inspiration

Time to Mix Exposures

If you have been following this series, at this point you will have taken some bracketed shots, grouped them together somehow, and then opened Photomatix, and set some options to have your images stacked together. Now we will cover the process of Tone Mapping your image down to 8 bits of information per pixel.

Checking Your Shot

The first thing you need to do is click the Tone Mapping button on the left in Photomatix. This will open the Tone Mapping dialog, with a preview pane to let you see the effect of the changes you are making. Once you have the preview pane available, you should check over it.
The things you need to check for are:

  • Alignment issues (even if you didn’t use the “Align source images” option, still have a quick check)
  • Ghosting issues (black or white “holes” in the image where moving objects appeared)

If you do find some issues, you can either leave them be, and fix them later in the GIMP or Photoshop (whatever your image editing app of choice is) or you can try the blending process again, with some different settings to try and reduce the effect.

Details Enhancer

Now all you need to do is Tone Map your photo, and you are pretty much done. However this is probably the hardest part of the process. There are just sooo many options, which change the results so much. When I first started I had a basic favourite few settings, and I would jiggle the sliders a little on 2-3 options, and that as about it.
After some time of this, and a bunch of rather boring HDR images, I went googling for some inspiration, and came across this set of “presets” from Stuart (whoever Stuart is!) – Stuart’s Photomatix Presets. Now there are quite a lot of presets here, and it has taken me some time to get to grips with them all, but the process I used when I first downloaded them, was to go through, and select each one, and see the result for myself in the preview window. I would then choose the one I thought looked best, and make minor adjustments (usually lower the Colour Saturation, and maybe make it a bit brighter or darker with the White/Black level sliders) and go with that.

Now that I have been using that method for a while, I know what sort of results I can expect from different Presets, so if I know a certain look will work with the image I’m working with, I can go straight to that preset, make some minor adjustments and I am done. I have also created some more Presets of my own. Most of mine are minor adjustments of the downloaded Presets, but they work for me in saving time and effort exploring all those sliders every time.

Tone Compressor

The Tone Compressor method of Tone Mapping is not one I have used very much to be honest… I find I am unable to get a good contrasty image out of it, every time I try I end up with an image with flat colours. It does tend to avoid that nasty halo-ing you get with the more “extreme” Details Enhancer methods though. I used the Tone Compressor method on this Project 52 photo – Project 52 – #1 – It Begins, but as I look back on it now, I do find the colours a little flat. Definately have a play around with this one though, it is far simpler to understand, and if you keep an eye on the Histogram as you make changes you will get a good idea of what each slider does.

Getting It Off The Camera – HDR Photography Part 2

HDR Photography

  1. Shooting a HDR
  2. Getting it off the Camera
  3. Blending Time
  4. Final Processing
  5. Some Inspiration

Off The Card

Now that you have been out and shooting bracketed shots, or bracketed panorama shots, you have at least 3 times as many images on your memory card to deal with. These are the steps I go through when I am getting my shots off the camera and doing the initial viewing in Lightroom.

Import

I import from my card reader using Lightroom’s import function. This automatically imports images into my photos folder, under a YYYYYYYY-MM-DD (ie 20102010-01-12) format. You can also ask Lightroom to backup the photos to a 2nd location when importing, very important, and simple to do.

Review

The first thing I do after import, is a quick review of imported images in the Lightroom Library module. I work my way through, viewing every image (only briefly). If I believe a HDR set of 3 (or more) bracketed images is worth processing further, I will select all the images, then I will export each set to its own subfolder, such as “HDR-1″ or “HDR-4″ as a 16-bit TIFF file (you must not use the compression option for your TIFF files, photomatix does not support it). I then stack the selected images (stacking is a lightroom feature) using the Ctrl+G shortcut. This leaves me with a number of subfolders in my working folder, which need to be processed further. (When doing HDR Panoramas I export all the images into a single folder, ie. “HDR-Pano-1″)

Windows Explorer

I will then open up Photomatix on my main monitor (I have a dual monitor setup, with a decent 24″ Dell and an old 17″ LCD) and Windows Explorer on my 2nd smaller monitor. At this point I will navigate to my first HDR subfolder, select the images I wish to blend in Photomatix, and simply drag and drop them from my Explorer window onto Photomatix.

Photomatix

After dropping some files onto Photomatix, a small dialog asking what you want to do with the images will be displayed. If you wish to just blend them together (as opposed to HDR) then select that, otherwise you will want to choose “Generate an HDR image”. You then need to confirm the selected images. Photomatix will then ask you to select some settings to use to generate your HDR.

Generate HDR Settings

  • Align source images – If you were not using a tripod, you should check this box. I usually use the “By matching features” method, but if that does not work, then you should also try the “By correcting horizontal and vertical shifts” method.
  • Reduce chromatic abberations – I always leave this checked, as the HDR process enhances any CA in the shot
  • Reduce noise – I always leave this one checked too, again because the HDR process enhances any noise in the shot.
  • Attempt to reduce ghosting artifacts – If you have some people/cars/boats in your image which move between the seperate shots, you can try using this option to have Photomatix attempt to remove them, however it doesnt always work. If you find it results in black or white sections of the image (obvious blending errors where the moving objects were), you should start again and not select this option, you can always fix it in the final image. For this one I usually try the “Moving objects/people” option, because thats what I’m trying to remove. If you have a tree which blows about in the wind between shots, use the “Background movements” option.

Now you are ready to click OK. Photomatix will take a few moments, then display you a rather strange looking version of your image, ready to be Tone Mapped. If you notice anything wrong with the image at this point, such as the black/white sections from ghosting or misalignment of the images, you should close, and start the process again here.

I will leave it there for today, in the next post I will cover the Tone Mapping process.

How to Take a HDR Photo – HDR Photography Part 1

I have had a few people asking me what my process or method for processing HDR images is over the last few days, so here is a detailed run down of how I shoot, process, blend and publish my HDR images. I will split this up into a number of shorter posts, but I will try to get through all the steps as quickly as I can over the next few days.

HDR Photography

  1. Shooting a HDR
  2. Getting it off the Camera
  3. Blending Time
  4. Final Processing
  5. Some Inspiration

Shooting a HDR Image

HDR stands for High Dynamic Range, and a HDR image is an image where the range of brightness displayed in that single image is more than you would normally get from a single photo. In a HDR image you are compressing really bright stuff, and really dark stuff into a more evenly lit image. By doing so you can make out the detail in the darker areas, and the detail in the bright areas, where normally, you would just see black, or white sections.

There are 2 main ways of shooting a HDR image. The first is to shoot a single frame, and have it saved as a RAW file (RAW files contain a wider range of brightness information for each pixel than a JPEG file). You can then compress the wide range of brightness in that file down into a HDR image. I rarely use this method, as I always shoot RAW anyway, and only use HDR when there is need to capture a wider range of information than a single RAW can capture.

The 2nd method is to shoot multiple frames of the same scene at different exposures, which is called “Bracketing”. Most new digital cameras give you the ability to shoot in a bracketing mode. When shooting in this mode, the camera will take 3 (or more) images at varying exposures. By doing so, you are able to capture the detail in the image over a much wider range of brightness. When you blend these 3 (or more) exposures together, you end up with a HDR image. This is the method I use for shooting my HDR images.

Bracketing Shots

If your camera gives you the option to shoot in Bracketing mode, it will often allow you to select the spacing between the exposures of each image. With my Pentax K200D camera, I am able to adjust the exposure brackets from 0.3 EV spacing, up to 2.0 EV spacing, in 1/3 EV steps (0.3, 0.7, 1.0 etc). Most people seem to recommend shooting your brackets at +/- 2.0 EV. This gives a good range of exposure, without going too far apart in your images. When shooting your brackets, it is very helpful to use a tripod. This will prevent any problems in blending the final image due to misalignment of the images, but it also helps to prevent camera shake causing blurry shots, especially for the +2.0 EV shot, as the shutter speed for this shot will be quite slow.

Other Settings

Most of my HDR shots are of buildings/landscapes and other things which do not move and require a large Depth of Field. So when shooting this type of scene I recommend shooting in Aperture Priority mode on your camera, with the aperture set to around f13 or even f16 (where possible, see 2 paragraphs down for why it might not be). Shooting in Av (aperture priority) will give the best control over your depth of field, using aperture priority mode when bracketing means that the camera will only adjust the shutter speed for your brackets. By locking the aperture down, it means the depth of field remains constant throughout the bracketed images.

It is also possible to use Shutter Priority mode for shooting your HDR, however this means the camera will adjust the aperture +/- 2.0 EV stops for each bracket, giving you varying depth of field, which may result in some parts of the scene being out of focus for the +2.0 EV image (where the aperture will be the widest).

A lot of my HDR’s are in poor light, so I almost always use ISO 100 with longer exposures to ensure the least possible amount of noise. Something to watch out for though is the 30″ (second) maximum shutter time limit on most DSLRs. If you’re 0.0 EV image requires a shutter speed of anything greater than 2 stops less than 30 seconds (7.5″ is 2 stops less than 30″) it means that your +2.0 EV shot will not be a full 2 stops brighter. For this reason I try to adjust the ISO and aperture until I am able to get the 0.0 EV shot down to at least a 10″ shutter speed. By ensuring I have at least 1.7 stops of headroom in shutter speed I am able to use the longer shutter speed shot to get the details out of the darkest areas in the image.

Extra Dynamic Range
n some cases (not very often though) a +/- 2.0 EV bracket does not give enough range in light, and you still have blown out highlights, or blacked out shadows. Some cameras allow you to specify a wider range for bracketing, but my camera does not. So a little trick I have learnt is to use the exposure compensation (or exposure bias) to help fill those ranges. What I do is set the exposure compensation to -2.0 EV, and then shoot a 3 image bracket at +/- 2.0 EV. This results in shots at -4.0 EV, -2.0 EV and 0.0 EV. Then I quickly reset the exposure compensation to +2.0 EV and shoot another 3 image bracket. So in total I have a -4.0 EV, -2.0 EV, 2x 0.0 EV, +2.0 EV and +4.0 EV images. When processing, I simply discard 1 of the 0.0 EV images and blend away.

I hope this helps you get your HDR shot. In the next post I will cover my workflow for processing HDR’s up to the tone mapping stage.

Tips and Tricks From The Web – Street Photography Part 5

I haven’t been out shooting any street over the last little while, so instead of giving you my tips and tricks, I will share some I have found on the web. Hopefully they will help me out, and you too.

Street Photography Series

  1. Previous Attempts
  2. Zone Focusing
  3. Hyperfocal Distance
  4. Progress?
  5. Tips and Tricks from the Web

19 Killer Street Photography Tips

The first site with some notable tips I have found is this one. From ILovePhotoBlogs.com. Here are the points that stood out to me.

What is the best lens for street photography?
“I personally like to use a wide lens (24mm, 28mm, 35mm on full frame 35mm) to be pretty close to my subject and get that intimate look of my photos. It took me a while to get closer, so I’d suggest to start with maybe a 75mm or 50mm lens to keep some distance and get closer from there…”

Lens choice is an important technical aspect to street photography, and this tip is something I have seen mentioned more than once (many times in fact).

What are the best places to shoot street photography?
“At a fair, a midway at a carnival, a sports event, parade, concert or public ceremony, people’s need for personal space and therefore privacy is reduced. The level of sensory stimulation is also usually high at these events, which tends to reduce the need for space. As well, in most of these situations people are having fun so they are more relaxed.”

Choosing somewhere to take street shots is important. You won’t get yourself out the door if you don’t have somewhere to go in mind.

10 Quick Street Photography Tips

This 2nd link is from a Canon Powershot S90 Street Photography Challenge website. It is just 10 short tips on how to get some street shots. I don’t necessarily agree with them all by the way. These are the tips that hit home when I read it.

3. PRE-FRAME. PRE-FOCUS.
Frame the scene, preset your focus and wait patiently for the right elements to fall into place, before you click. You’ll be surprised at the results of this simple technique.

This is another technique I have seen mentioned a few times. I have tried this out once or twice. If you see a great background or scene, and can imagine a person with a certain look would work well there, then frame up, and wait patiently for someone matching your idea to come by, or you might find someone with a different look that works while you are waiting.

5. SHOOT FROM THE HIP.Learn to frame your images without looking through the viewfinder or at the LCD. Shoot with the camera away from your face – from the hip or low at your chest work well. Low angle shooting also gives an interesting perspective.

Another way to get that candid shot. Most of the street photographers I follow have used this method from time to time. It is worth while learning to aim your camera without looking through the view finder. I am notoriously bad at this myself, but it is something I am working on.

6. OBSERVE. OBSERVE. OBSERVE.Keep your eyes open and be aware of your surroundings. Observe everyone and everything around you. You’ll be surprised at how much is going on in front of you, and how much you can anticipate – ready for that next perfect shot.
7. BE PATIENT.Street photography is a test of patience. Either waiting for the scene to evolve or just capturing the right shot, a great photograph takes time to realize. Don’t rush that special moment before clicking.

I believe these 2 tips go hand in hand. You must observe whats going on around you, and you must be patient. A good shot won’t come by every 10-15 seconds. Wait for it to make itself available, be prepared, anticipate it, and shoot it.

Street Photography Tips

This is the final link for todays post. There are some really great street shots posted in this forum post, along with some interesting tips.

readiness
learn your camera’s controls, shoot in a way that let’s you shoot quickly! i’m always pre-set for the most part (choice of iso, aperture) and i typically shoot in aperture priority mode. i also learn the hyperfocal distances of my lenses, so that i can shoot comfortable within a distance range. watch the lighting, which can change by 8 or 9 stops just by turning a corner! it’s really important to have all your senses focused on the job at hand

You must be able to react quickly, part of that is knowing that your equipment is ready, the other part is being ready to react yourself.

confidence
street shooting requires confidence.. *you* are doing nothing wrong, so don’t sneak around! put away that tele, and stick a fifty or thirty-five on your dslr, or set your digicam’s zoom to the wider end of things, and see the scene “normally,” up close and personaly. this may be strange for some of you, but i assure you it gets easier after your initial trepidation wears off. the worst that can happen is people say “no, i don’t want my photo taken,” and so you smile and move on! the wider angles offer so much more to the viewer imo, that they’re worth the extra effort in becoming more comfortable …

The final tip of the day is this one. BE CONFIDENT! This is something I definately suffer from myself, I am shy by nature, so being out in the middle of a group of strangers pointing my camera at them is not comfortable for me, but, I do get out there, and I do try it. The more you do it, the more confident you will get.

If you have any good tips please share them with me, ill make sure they get posted up. Best of luck with your street shooting

Neutral Density (ND) Filter FAQ

This is a bit different to a normal post by me. This is a reproduction of a fantastic FAQ I found posted on PentaxForums.com (click for the original). Rather than trying to come up with something similar, I asked the original poster if I could post it here. So here it is, a great ND filter FAQ by Andrew Stockwell who runs Northeast Light Photography.com. Thanks Andrew.

Welcome, if you reading this, and are not sure what a Neutral Density (ND) Filter is or a Graduated Neutral Density (GND) filter is, read on, hopefully I’m going to answer all or most of your questions about this topic that since I have joined here there seems to be a lot of speculation and questions about, or people that are just unaware of a great tool in your bag. Also there seeems to be a lot of threads about them, but not one place where everything, or at least the basics in one place. In this FAQ, I will use links, and there will be stuff cut and pasted, and I may use some of my shots for examples. So if I have your interest piqued now, sit back, relax, and read on.

1. What is a Neutral Density Filter?

In photography and optics, a neutral density filter or ND filter is a “grey” filter. An ideal neutral density filter reduces light of all wavelengths or colors equally. The purpose of standard photographic neutral density filters is to allow the photographer greater flexibility to change the apeture or exposure time, allowing for more control, particularly in extreme circumstances.

A common example of this is use of a GND filter to control sky exposure (hold back), while using enough shutter time to expose the foreground of a scene, and have a photo that has a balanced exposure, and looks as close to the human eye saw it as possible.

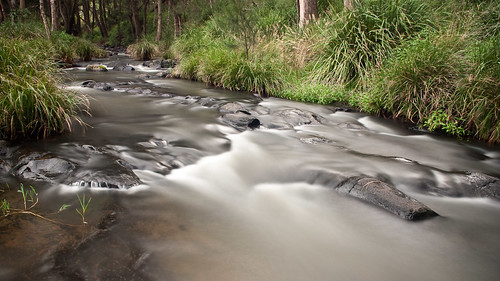
Or a ND solid to reduce light, so shutter times can be longer, and produce a desired effect in a shot, example:

I don’t remember what ND I had on for this shot, but it was taken in the middle of a mostly cloudy day, so I got the shutter time long enough to produce that silky/misty water effect in the shot.

2. What types of Neutral Density Filters are there?

The two most common types used in film and digital photography are:

  • Round Screw-In filters that thread on to the front of a lens.
  • The “Cokin” type system, which uses mostly square or rectangle filters, that are mounted to the lens via a holder, and a adapter ring that threads onto the lens.

3. What are the advantages and disadvatages to each type?

Round, Screw-In Filters:

Advantages:

  • Compact, they usually take up less room in a kit bag, but it depends on lens size also, if you are using large ring size lenses, the filters can get pretty big.
  • Ability to combine or stack filters on the front of a lens, although this can cause vignetting on some lenses, if using thick ring filters.
  • Vari ND’s or Combo ND/Polarizer filters, such as Singh-Ray brand produces
  • Commonly sold at stores like Best Buy, Wal Mart, Ritz, etc, so they are easy to find in a pinch.
  • A majority of ND’s above 4 stops are sold in the Round/Screw-In style.

Disadvantages:

  • In using Round/Screw-In Graduated ND filters, it give the photographer absolutely no control of the grad line placement in a scene, as the line is always in the center. (This is a big one for me)
  • On certain lenses, UWA usually, round filters can vignette, as the angle of view is so wide on these lenses, that the ring that holds the filter element can be seen in the corners of a photo taken on the wide end of the lens.
  • Some lower quality filters are not optically good, meaning they can cause color casts on photos taken
  • If you have a lot of different lens sizes (front element size), you have to carry a set of filters for all lenses you wish to use the filters on (Another big one for me)

“Cokin” Style Filters:

Advantages:

  • You can use them on any lens you carry as long as you carry the adapter rings for your particular system, which are usually cheaper than a round/screw-in ND filter usually costs.
  • You have almost infinte possibilities for composing a shot, in relation to the grad line on a GND filter, since you can slide the filters up and down in the filter holder to control the placement of the grad line.
  • As long as you buy the right system for the lenses you have, you shouldn’t see vignetting on you lenses, example if you have a 10mm lens with a 77mm ring size, you might want to think of at least 100mm size filters or 4X4 or 4X6, or hand holding them if you buy 85mm or 3X3 filters
  • Filters are typically made of resin, unless you spend mucho $$, so they are harder to damage, but are still able to be scratched or can chip if dropped on an edge on a hard or jagged object.
  • More choices for types of ND and GND filters. Due to size, you can get reverse GND, which start darker in near the grad line, and get lighter as they move toward the edge, or you can get hardline or softline GNDs, which have many uses and advantages, which I will go into.

Disadvantages:

  • Initial cost, some systems, depending on size and brand can be very pricey, but I typically think the cost of admission is worth it, but shop around, and find a system that works for you, and won’t make you broke. Read a lot of reviews!!! But once you have a system of filters, and you have all the filters you want, all you need to do is buy adapter rings at that point if you get a new lens that has a different filter size than you already have.
  • Depending on the amount of adapter rings, filters, holders, case, the system can get rather large. This can take up a bit of room in your kit. My recommendation is to buy a filter one at a time, if you find you use it, stick with it, and if you want more stops of ND, then buy another, the next level darker. Also read a lot about this before buying. If you have a bunch of filters in your bag you don’t ever use, then it isn’t worth wasting you money on them. Figure out what you shoot, and what filters would be best for what you typically shoot.
  • They can scratch, they can chip, they can break. But this shouldn’t be a discouragement from buying them. Just be careful with them, and you shouldn’t have any problems.
  • Dependent on what size lens you have, and FOV of the lens at wide end if a zoom, if you use the wrong size filters, you could also vignette, example is: My 16-50mm vignetted on the Cokin P series regular holder on the wide end, and it would sometime vignette on the P-Size wide angle holder if oriented incorrectly.

4. What brands are out there for purchase?

The answer is many.

Typical screw-in brands are Tiffen, Hoya, B+W, Singh Ray, Heliopan, and many more, but those are typically the better quality brands.

For “Cokin” type systems:

I am going to amplify this by saying when I use the word Cokin, I use it because it is the brand typically seen and used by a lot of people, but there are many makers of “slide holder” filter systems

They are:
Cokin, Lee, Formatt, Hi-Tech (made by Formatt), Tiffen, Schneider, are the common ones.

5. Where can I purchase both types?

Screw-In filters: Walmart, Target, Best Buy, etc. are the easy places the find them, but your selection will be limited here

B&H, Adorama, 2Filter.com, Filterhouse.com are going to have much more diverse inventories and types of filters, check here if you are looking for specialty stuff, or want a better selection, and if you don’t see it on their site, it doesn’t hurt to call and ask if someone makes something like what you are looking for. Example, Hi-tech makes 10 Stop ND filters, but 2Filter.com typically doesn’t stock them, but they can be ordered off the Formatt.co.uk website.

For “slide holder” style systems, you can buy these at most of the places you can buy the round/screw in style at, but you are probably not going to find them at Best-Buy or Wal-Mart.

6. What Types of ND’s do I need?

Only you can really answer this question, first ask yourself, what do you shoot the most, and what types of effects are you looking for when you use the filters. Are you trying to induce motion blur by using a longer shutter speed? Are you shooting seascapes or such that have a hard horizon line? Conversely is there any foreground items that a hard grad line would show up on if you placed it wrong, and make your picture look like someone drew a line through it? Do you want to do multi minute exposures during the middle of day, or early morning or late evening during the best light? Do you want to shoot shot with a lot of dynamic range and contrast, (sunrises and sunsets with good foreground interest), and have everything exposed right?

Here is what I will say, if you use a hard line grad in a scene without a good hard horizon line, or somewhere to logically terminate the grad line, your shots will look weird, as you will see this line run through your shot, and it isn’t intended to be there, but it shows up either due to no straight line in the shot to put the grad line, or the filter you used is to dark for the scene. I use all soft line grads, as i can control how much ND I use by sliding up or down. Hard line grads tend to be not as graduated, as they are basically filter that is half dark, and half light with very little “taper”

Soft line grads are also easier to “hide” in a scene, and there is not hard dividing line.

I will also tell you what I currenly own, and have owned in the past, and what I use the most.

I currently have a set of Hi-Tech 4X4 and 4X6 filters, that fit nicely in to a Cokin Z-Pro holder, using Cokin Z-Pro adapter rings. I use the cokin holder since it is muc cheaper than the Hi-tech holder, and does the same thing.

I have a .9 (3-stop) soft edge GND, a 1.2 ND solid, a .9 ND solid, and have just ordered a 3.0 (10-Stop) solid ND, and will be ordering a .6 SE GND before I leave for Acadia in July. I just switched systems, from a Cokin P-Size set of Hi-Techs, so I don’t have as many filters yet. For two reasons, I haven’t had enough time and money to buy more yet, but I also saw what filters I actually used when I owned P-Series filters. I used pretty much what I own now for Z-Pro size.

Bottom line, look at a lot of photos, read a lot of reviews, read a lot of forums, and if you can borrow some, do it, so you don’t buy more than what you need to get started.

7. So why the 10-Stop filter?

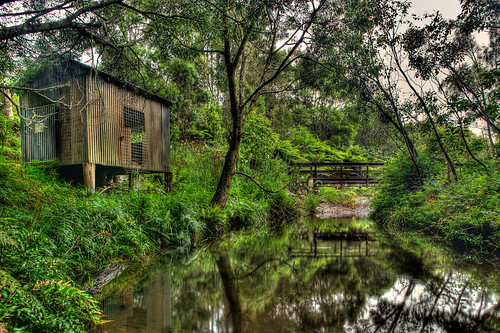
For shots like this:

This is a 136 second shot, taken with a 3 stop solid ND, and a 3 stop GND. In the right conditions, imagine what can be done with a 10-Stop filter. The emphasis is on the cloud and water movement here. The extremely long shutter times give the clouds a chance to move through the shot, and the water becomes a mist with enough sea state. It also helps saturate the light in the sky a little more as the light has more time to change as the shot goes on, so you can get some pretty cool effects with ND filters, and this is my favorite aspect of what I do with them.

What sizes are common for “slide holder” system?

Common are 2X2 inch, 3X3″, 4X4″, 4×6″ 2X3″ 3×4″ and 4×5″

Conversion time:

3X3 or 3 inch systems are relative to 85mm. (Cokin P Series)
4X4 and 4 inch systems are relative to 100mm. (Cokin Z-Pro Series)

If you get X-Pro by Cokin, well great, you have the biggest ones, and I don’t think many others make filters this big, so I am not going to try to convert them.

I will tell you that on my Pentax 16-50mm lens, P-Series size vignetted using the Cokin regular holder, and sometimes with the wide angle holder, so food for thought if you think you are going to go cheap and get P-size, and use them on a UWA lens at the wide end and think they won’t vignette.

8. What is a reverse GND?

I mentioned this earlier, a reverse GND has the darker part of the gradient closer to the center, and it gets lighter going toward the “top” of the filter. I haven’t used one yet, haven’t needed one yet.

If someone has used one, and wants to chime in, and show examples, I will paste your experiences into this post.

9. What is this .6, .9, 1.2, business, and what does it mean?

ND filters are quantified by their optical density or equivalently their f-Stop reduction as follows:

Code:
Attenuation Factor| Filter Optical Density| F-Stop Reduction  | % Light Transmittance
2                     0.3              1      50%
4                     0.6              2      25%
8                     0.9              3      12.5%
64                    1.8              6      1.5625%
1,000                3.0              10       <0.1%
10,000              4.0              13
1,000,000          6.0              20

So when you see ND-2, it is one stop of light reduction (refer to first column

Also,
When you see .3, it is one stop of light reduction, refer to 2nd column.

So when you are deciding what filters you need, refer to this chart so you can see how much neutral density you want. It all depends on the desired effects you want to introduce into a shot, or if you think you may encounter a very contrasty scene, needing a lot of ND in the sky, to get the foreground exposed correctly.

I will continue to expand this as people point out new things I haven’t covered yet, or their experiences, so if you guys see anything you want added to this, or otherwise, let me know. I hope this helps make a decision for people that are looking to cross this bridge. I will tell you this, I almost never shoot without these. I don’t believe in adding gradient filters in post processing, and believe that filters are still a valuable tool to photographers who know how and when to use them, and I think they will never become obsolete. I agree a lot of things can be done in PS, but it still doesn’t make up for good exposure made at point of capture.

You can read more by typing Neutral Density Filter into a google search, or here is the Wiki enty: Neutral density filter – Wikipedia, the free encyclopedia
Here is the Grad wiki:
Graduated neutral density filter – Wikipedia, the free encyclopedia

Also, I am by no means saying I know everything there is to know about this topic, and I am always learning, so if you have something to add, please add it. And Mods, consider stickying this, so people can easily find it, or put it into a threads of note thread.

One other thing you may want to consider is a tripod if you don’t own one, as longer exposures require them to keep camera shake introduced by you the photographer out of the shot, and keep it sharp.

Enjoy this,
-Andy

Edits:

One thing I’d add in selecting the “right” GND filter to use for a given scene is to start by understanding the difference between the dark and light points in it. I might also add that the cost difference between a 10 stop screw in filter and a 2 stop is substantial. You can stack ND filters as well (and don’t forget step rings provide you with greater flexibility too).

There is quite a price difference between a 10stop filter, and a 2 or 3 stop filter. For example a B+W screw in 77mm 10 stop will run you about $100 depending on vendor. A 2 or 3 stop tiffen ND or GND will cost you about $40.

Also, in the realm of round/screw-in filters, you could also buy the filter bigger than your lens ring size, then use a step up ring to alliviate any vignetting you have from a stack of filters. You can stack filters, that is why filters have threads on them, and filter holders have multiple slots, but be aware, that some ND’s are not of the best optical quality, and depending on the quality of your IR filter on your CMOS, it can cause color casts on your shots based on some wavelengths of light not making it through the 3 stacked 3stop ND’s you have on the front of your camera. Formatt freely admits that you may see color casts from the Hi-Tech 10 stop ND. It is just that something that dark is going to filter some light wavelengths. Usually blue, since it is a shorter wavelength than red, and then you may see red casts to your shots. So keep this in mind when buying, and using the filters. If the scene is really dark to begin with, you are going to need a lot more shutter time to make the proper exposure.

More good reading here about color casts:
Crummy ND filters seem to be a crummy IR filter… – FM Forums

Macro Photography Techniques – Part 7 – The Forgotten

Well I have to revisit this series which I thought was complete. Al Williams (see his photography blog) contacted me to remind me that there is another way to take macro photos which I hadn’t mentioned at all, close up filters!

Macro Photography Techniques

  1. Close Focus Lens
  2. Teleconverters
  3. Extension Tubes
  4. Reversed Lenses
  5. Macro Lens
  6. Combining Techniques
  7. Close Up Filters

Close Up Filters

Close Up filters are actually lenses which mount to your regular lens via the filter mount. There are a few different types available. They provide extra magnification without altering too much else. The filters are available in various levels of magnification, various sizes, and all kinds of quality levels (and prices too). The most popular type I have seen discussed is the Raynox DCR-150 and DCR-250. These are high quality lenses which have a quick mount/dismount clip rather than the standard threaded mount for the lens. The Raynox lenses are not available in varying sizes though, so you are somewhat limited as to which lenses they can be mounted to. The standard screw mount filter was very popular in the past, so it can be quite easy to find a “set” 2nd hand. A set of close up filters is usually made up of 3 filters, all the same filter size, but in varying amounts of magnification. These filters can be used individually or in combination to get various levels of magnification.

Image Quality

I have never tested a set of close up filters myself. I do have reservations about the loss of image quality which may occur when using these lenses. Having said that, the loss in quality from a high quality filter/lens should be no more than the loss you get from using a UV filter. When looking to buy a filter (or a set) I would recommend paying some extra money, and sticking to the well known brands. I would imagine that when using the “set” of filters, combining all 3 may result in a noticable loss of quality (after all it is 3 more lenses for the light to pass through) but if it provides the magnification required then its more than good enough. These sets of filters are usually numbered based on the amount of magnification they give. A typical set consists of a #1, #2 and #4 filter, where #4 gives the most magnification.

Al’s Shots

Al not only told me to get my finger out and stop forgetting stuff, he even kindly offered to take some photos using his set of close up filters, and share them with you on the blog. So here they are. You can see other shots Al has taken on his flickr account. All shots were taken with the Pentax SMC M 50mm f2.0 lens @ f8.0, 1/15 sec and ISO 500 and at minimum focusing distance.

Lens only (no filter)
With Close Up Filter #1
Vivtar Close Up Filter #2
Vivitar Close Up Filter #4
Vivitar Close Up Filters #1 & #2
Vivitar Close Up Filters #1, #2 & #4

As you can see, the magnification differs quite a lot between the filters, and the combinations of filters. So there is yet another way to take some great macro photos. Big thanks to Al for pointing out my error in missing this option, and even bigger thanks for providing the images.

Street Photography – Progress? – Part 4

Street Photography

  1. Previous Attempts
  2. Zone Focusing
  3. Hyperfocal Distance
  4. Progress?
  5. Tips and Tricks From the Web

So far I’ve talked about street photography focusing techniques. I haven’t had much time to go and put those techniques into practice yet, but I did get 10 mins yesterday lunchtime and 5 mins the previous afternoon on my way to the train station, so lets see how I went

Hyperfocal Distance

This shot was taken with the K200D and Pentax SMC M 28mm f2.8 lens. I set the lens to f11.0, and approximately to hyperfocal distance (I used the Depth of Field scale on the lens focusing ring). I then set the exposure (Pentax M lenses must be shot in manual mode if you want to stop them down). I was then able to take a photo of pretty much anything that was more than about 1.8m away from me, and it should be in focus. This is the shot I took of some workers on their way to the train station. If you go to Flickr and view larger, you will see that the further away from the camera the worse the focus gets. Did I possibly focus too closely to get true hyperfocal distance? Something to work on for next time.

Zone Focusing

This shot was taken with the K200D and the Pentax A 50mm f1.7 lens. The longer focal length of this lens means that the hyperfocal distance is quite far, so you can’t get close to the subject, which means you end up cropping the shot to make them the subject of the photo. So when using a longer focal length I recommend using the zone method. I gave this a shot in the pedestrian mall yesterday. I set the lens to f8.0, and the focus to 3m on the focus ring distance scale. This is where I estimated most people would be walking by from where I was positioned. I then proceeded to snap away. This is 1 of the resulting shots. The focus was set a little in front of the couple I was photographing in this shot, so they are slightly out of focus, again something to work on. I will post another image tonight.

Hyperfocal Distance – Street Photography Part 3

Street Photography Series

  1. Previous Attempts
  2. Zone Focusing
  3. Hyperfocal Distance
  4. Progress?
  5. Tips and Tricks from the Web

Hyperfocal Distance

The hyperfocal distance is the focus point for any given focal length and aperture combination which gives the largest possible depth of field. Basically zone focus with the biggest possible zone.


How to Find It

Hyperfocal distance can be calculated using an online calculator, or an application such as Photobuddy. Another option (I did this before I got Photobuddy) is to write them down, because the only variables are focal length and aperture you can write down the hyperfocal distance for the most common focal lengths you will use, and each aperture. For example, if I am going shooting with my Pentax M 28mm lens, I know the focal length will be 28mm, and I know I won’t be shooting wide apertures without focusing on the subject itself. So what I can do is calculate and write down the hyperfocal distance at f5.6, f8.0, f11.0 and f16.0 as a small reference. The other option you have is to use the DOF scale on your lens (if it has one). This link has a good picture to show how to use the scale to set to hyperfocal distance.

Here is my example hyperfocal chart for a K200D with a 28mm lens (you probably dont actually need near limit written down, but it can be helpful – it is always half of the hyperfocal distance)

  • f5.6 – 6.96m – near limit 3.48m
  • f8.0 – 4.93m – near limit 2.465m
  • f11.0 – 3.49m – near limit 1.745m
  • f16.0 – 2.48m – near limit 1.24m

Applying Hyperfocal To Street Photography

To apply this method of focusing to your street photography is much like zone focusing. When you calculate your hyperfocal distance, you will know the near limit of acceptable focus. Once you know this, and can judge that distance, you can photograph anything which is at least that far away from you without having to focus on it. All you need to do is set your lens/body to the appropriate f-stop, focal length, and focus distance then start taking shots.

I will post up my results with this technique in the few days. I am waiting for the temps to drop, its been over 30 degrees C here all week!

Zone Focusing – Street Photography Part 2

When shooting street photography it is often important to be able to fire off a shot without any delay or hesitation, from yourself, or your gear, to capture that moment of shown emotion or humor or who knows what.

Street Photography Series

  1. Previous Attempts
  2. Zone Focusing
  3. Hyperfocal Distance
  4. Progress?
  5. Tips and Tricks from the Web

Zone Focusing Overview

One of the techniques you can use to ensure there is no delay from your equipment is to pre-focus using the zone focusing technique. What this requires is a good estimation of distance ahead of time. The general idea is to set the focus to a given range (or zone) ahead of time, and shoot within this zone. This technique is very effective with older manual focus lenses but can also be used with autofocus lenses, set to manual focus mode.

How to Focus on a Zone – DOF Scale

Many (in fact all the ones I own) older lenses will have a handy DOF scale or guide built into the focus and aperture rings on the lens. This article has a fantastic shot and explanation of how the guide on your lens can help you. As I’ve said, you need to have a reasonably good judge of distance to use this method, but if you don’t, try it out, because you will soon learn to be able to judge the distances better.

Without a DOF Scale

If you are using a lens which does not have a handy DOF guide (most newer lenses do not) you can still use the zone focusing technique, however you will need to pre-calculate your DOF (use the online calculator here), or use an application such as Photobuddy to help you out (this is the what I do).

Does It Work

I have used this technique in the past with my 50mm lens. I set the aperture to f8.0, then focused to 8m on the focusing scale. This gives a DOF of 11m (5.3m to 16.3m) on my K200D (the sensor crop factor does play a factor here!). Then when shooting all you need to do is pick your subjects within that range.

Good luck with your Zone Focusing!